Turning fresh cucumbers into crispy dill pickles is an art. It mixes simple ingredients with careful techniques. This recipe lets home cooks make tangy, crunchy pickles in their kitchen.
Making dill pickles is more than cooking. It’s a journey into traditional food preservation. Whether you’re new or experienced, making your own pickles is rewarding and tasty.
The charm of homemade dill pickles is their simplicity. With basic ingredients and patience, you can make pickles that taste better than store-bought ones.

Table of Contents
Key Takeaways
- Dill pickles can be ready in as little as 1 hour for rounds and 3 hours for spears
- One batch yields approximately 16 pickle spears
- Refrigerated pickles maintain quality for up to 3 weeks
- Optimal cucumber weight is around 12 ounces per batch
- Proper brine preparation is crucial for perfect pickles
Essential Equipment and Ingredients for Pickle Making
Making tasty pickles from cucumbers needs the right tools and ingredients. Knowing what you need will help you make great pickles. Let’s look at the key things that turn cucumbers into tasty pickles.
Canning Tools and Equipment
For safe and tasty pickles, you need special equipment. Your toolkit should have:
- Clean glass mason jars with secure lids
- Large stock pot with a canning rack
- Canning jar lifter tongs
- Wide-mouth funnel
- Clean kitchen towels
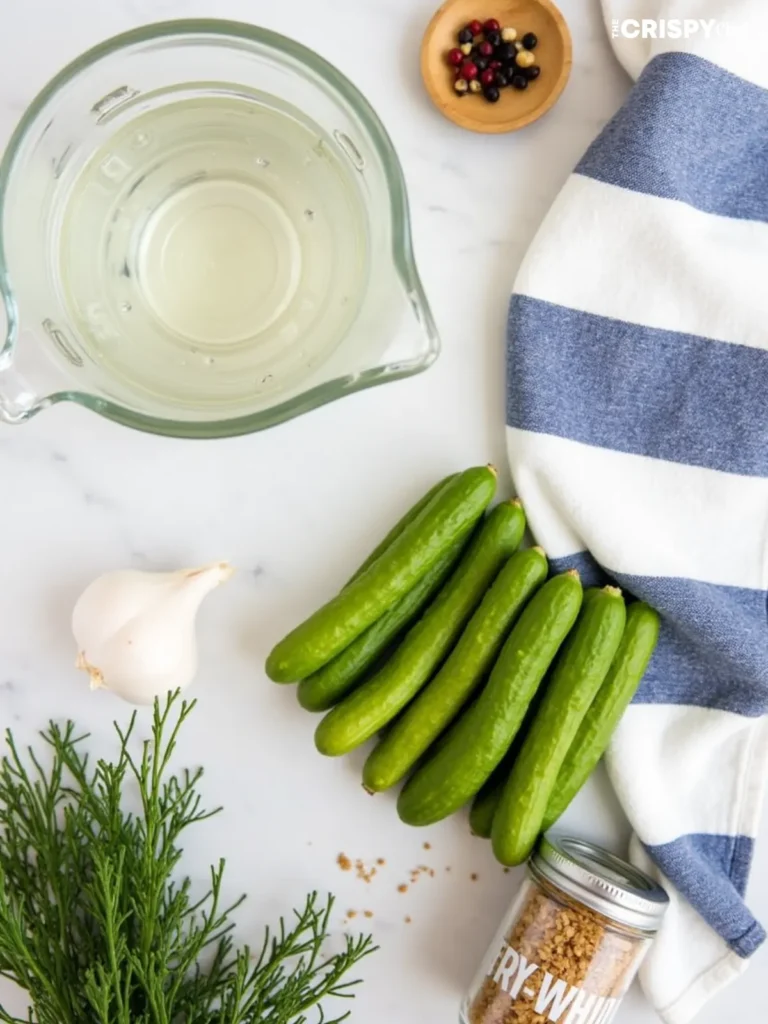
Essential Ingredients Checklist
For perfect pickles, pick your ingredients carefully. Your pantry should have:
- Vinegar: White or apple cider vinegar with 5% acidity
- Pickling salt
- Fresh dill
- Garlic cloves
- Whole spices like peppercorns and coriander seeds
Selecting the Right Cucumbers
Not all cucumbers are good for pickles. Look for ones that stay crisp and soak up flavors well:
- Kirby cucumbers
- Persian cucumbers
- English cucumbers
“The secret to great pickles lies in selecting fresh, firm cucumbers and using the right preservation techniques.”
Investing in good tools and choosing top ingredients will help you make amazing homemade pickles. They’ll impress everyone you share them with.
Understanding the Perfect Pickling Brine
Creating an easy dill pickle recipe begins with the perfect pickling brine. This flavorful liquid turns cucumbers into crisp, tangy pickles. Your brine is more than just salt and vinegar – it’s the secret to making great pickles.
Let’s look at the key parts of an amazing pickling brine for your easy dill pickle recipe:
- Water: Creates the liquid base
- Vinegar: Provides acidity and preservation
- Salt: Enhances flavor and helps preservation
- Optional sweeteners: Balance the tangy flavor
“The perfect brine is a delicate balance of science and flavor” – Pickle Artisan
Your ideal brine usually has this important ratio:
| Ingredient | Measurement | Purpose |
|---|---|---|
| Water | 1/2 cup | Liquid base |
| Rice Vinegar | 1/2 cup | Acidity |
| Maple Syrup/Sugar | 1 1/2 tablespoons | Flavor balance |
| Fine Sea Salt | 1 1/2 teaspoons | Preservation |
Try different vinegars to make your easy dill pickle recipe unique. White vinegar, apple cider vinegar, or rice vinegar can add a special touch. The goal is to keep the right salt-to-vinegar ratio for both safety and taste.
Selecting and Preparing Your Cucumbers
Starting with the right cucumbers is key to making tasty pickles. Not all cucumbers are good for pickling. The secret to great pickles is in choosing and preparing them well.
For the best pickles, pick specific cucumber varieties. National Pickling cucumbers are top choices. They grow quickly and are perfect for pickling.
Ideal Cucumber Characteristics
- Small size (about 4 inches long)
- Thin skin
- Firm flesh
- Barely visible seeds
Washing and Preparation Techniques
It’s important to wash cucumbers well to remove dirt and germs. Look over each cucumber. Throw away any that are damaged or too ripe.
“Fresh and firm cucumbers yield the crispest pickles” – Pickling Experts
Cutting and Sizing Considerations
| Cut Style | Brine Penetration | Best Use |
|---|---|---|
| Spears | Excellent | Snacking, Garnish |
| Chips (1/4 inch) | Rapid | Sandwiches, Quick Pickling |
| Halves | Good Surface Exposure | Large Batch Pickling |
Removing Blossom Ends
Removing the blossom end is crucial for keeping pickles crunchy. This step stops enzymes that make cucumbers soft. Your pickles will stay crunchy and delicious.
Pro tip: Use 2 pounds of pickling cucumbers, about 4 inches long, for the best results in your pickle recipes.
The Art of Making Dill Pickles
Making the perfect dill pickle recipe needs care and love. Your homemade pickles will turn simple cucumbers into a tangy, crunchy treat. It’s a mix of science and cooking art.
- Select fresh pickling cucumbers (5-6 inches long)
- Prepare your spice mixture carefully
- Sterilize your canning jars
- Create the perfect brine
The secret to great dill pickles is in the ingredients. Here’s what you need:
| Ingredient | Quantity per Quart |
|---|---|
| Pickling Cucumbers | 5 cucumbers |
| Pickling Salt | 1 tablespoon |
| Fresh Dill | 3 dill heads |
| Garlic | 2 cloves |
When making pickles, focus on your brine. Use 1 cup water to 1 cup vinegar for 5% acidity. Your spice mix should include:
- 1 Tbsp whole black peppercorns
- 1 Tbsp coriander seeds
- Optional: 1 Tbsp red pepper flakes
“Pickling is part science, part art – and entirely delicious!” – Pickle Enthusiast
Pro tip: For fridge pickles, chill for at least 3 hours. Your recipe makes about 7 quarts, with each jar giving 10 servings.
Mastering the Water Bath Canning Process
Preserving homemade dill pickles needs precision and care. The water bath canning method keeps your pickles safe and tasty for a long time. Learning the right techniques ensures your pickles stay crisp and flavorful.
Safety Precautions for Pickle Preservation
Canning dill pickles requires careful attention to safety. Follow these critical guidelines to prevent foodborne illness:
- Sterilize all jars and equipment thoroughly
- Use clean, unblemished cucumbers
- Maintain proper hygiene during the entire process
- Use fresh, high-quality ingredients for pickle recipes
Processing Times for Perfect Preservation
Processing times depend on your elevation and jar size. Here’s a comprehensive guide to ensure safe canning:
| Jar Size | 0-1,000 ft | 1,001-6,000 ft | Above 6,000 ft |
|---|---|---|---|
| Pint Jars | 10 minutes | 15 minutes | 20 minutes |
| Quart Jars | 15 minutes | 20 minutes | 25 minutes |
Proper Sealing Techniques
Achieving a perfect seal is crucial for your dill pickles. Keep these tips in mind:
- Leave 1/2 inch headspace in each jar
- Wipe jar rims clean before placing lids
- Tighten bands fingertip-tight
- Listen for the distinctive “pop” indicating a successful seal
Pro tip: Pickles processed correctly can be stored at room temperature for up to one year!
Remember, temperature is key in pickle preservation. Keep water temperatures between 180ºF and 185ºF during canning. This ensures your homemade dill pickles stay safe and delicious.
Spices and Seasonings for Maximum Flavor
Making the perfect dill pickle recipe is more than cucumbers and brine. The right spices turn simple pickles into a flavor explosion. It’s a taste that will make your mouth dance.
When making your dill pickle recipe, think about these key spices. They add depth and character to your pickles:
- Dill seed: The classic pickle flavor foundation
- Whole black peppercorns: Adding subtle heat and complexity
- Mustard seeds: Introducing a tangy undertone
- Fresh garlic cloves: Providing rich, aromatic notes
- Red pepper flakes: Optional kick for spice lovers
“The secret to an incredible dill pickle is balance – each spice should complement, not overpower.” – Pickle Preservation Expert
You can make your dill pickle recipe your own by trying different spice mixes. Some people add allspice, celery seeds, or coriander for a unique taste.
Pro tip: Use a lot of fresh herbs like dill. But use dried spices carefully to keep the pickle’s natural taste.
| Spice | Flavor Profile | Recommended Quantity |
|---|---|---|
| Dill Seed | Classic Pickle Taste | 1-2 teaspoons per jar |
| Garlic | Robust Aroma | 2-3 cloves per jar |
| Peppercorns | Mild Heat | 5-7 whole peppercorns |
Your dill pickle recipe is like a canvas. Feel free to experiment and find the spice mix that you love!
Different Cutting Styles for Varied Pickle Types
When making pickle recipes with cucumbers, how you slice them changes everything. Each cut style has its own benefits for different uses, like sandwiches or snacks.
Cutting cucumber pickles is key to their taste and texture. It’s not just about looks. It’s about how well they soak up flavors. Professional pickle makers know that the right cut can make a big difference.
Pickle Spears: The Classic Cut
Pickle spears offer a hearty pickle experience. They’re great for:
- Garnishing sandwiches
- Creating bold deli-style pickle presentations
- Providing maximum crunch
Pickle Chips: Thin and Versatile
Chips are thin, round cucumber slices perfect for quick pickling. They’re good for:
- Faster brine penetration
- Even flavor distribution
- Perfect for burger and sandwich toppings
Sandwich Slices: Precision Cutting
For the best sandwich pickle, cut them lengthwise for even thickness. Pro tip: Cut them about 1/4 inch thick for the best balance of crunch and flavor.
“The secret to great pickles isn’t just in the brine—it’s in the cut.” – Pickle Enthusiast
Try out different cuts to find your favorite pickle recipe. Remember, even cuts mean even pickling and flavor.
Storage Tips and Shelf Life
Keeping your homemade dill pickles fresh is key. You need to store them right to keep the flavor and safety in check. With the right storage, your pickles can stay fresh and crunchy for a long time.
First, learn how to store your pickles properly:
- Unopened canned dill pickles can last up to 1 year in the pantry
- Refrigerator pickles stay best for 3-4 weeks
- Store-bought pickles can last 2-3 months when refrigerated
“The key to long-lasting pickles is maintaining proper storage conditions and checking for signs of spoilage.” – Pickling Expert
Look out for these signs of spoilage:
- Cloudy or discolored brine
- Visible mold
- Soft or mushy texture
- Unusual odors
- Fizzing or bubbling liquid
To keep your pickles fresh, store them in a cool, dark spot. If they’re in the fridge, make sure they’re covered in their brine. Always use clean tools to handle them to avoid contamination and keep them fresh longer.
| Pickle Type | Storage Location | Optimal Duration |
|---|---|---|
| Homemade Canned | Cool Pantry | Up to 1 Year |
| Refrigerator Pickles | Refrigerator | 3-4 Weeks |
| Commercial Pickles | Refrigerator | 2-3 Months |
If you’re unsure, it’s best to throw them away. A single sign of spoilage means it’s time to get rid of your pickles for your safety.
Troubleshooting Common Pickling Problems
Even experienced home canners face challenges when pickling. Knowing common issues helps make perfect dill pickles every time.
To keep pickles crisp and delicious, pay close attention to the pickling process. Several important factors can affect your success.
Maintaining Pickle Crispness
Keeping cucumbers crisp is key. Here are a few steps to help:
- Trim cucumber ends by at least 1/16th inch
- Use fresh cucumbers within 24 hours of harvesting
- Maintain fermentation temperature between 70-75°F
- Avoid overcooking during processing
Addressing Cloudy Brine Concerns
Cloudy brine can worry new picklers. But, it’s usually safe. Lactic acid fermentation and mineral content can cause it.
“The key to perfect pickles is understanding their unique fermentation process”
When pickling gets tough, try these tips:
- Use food-grade salt without anti-caking agents
- Filter water to reduce mineral content
- Maintain proper brine concentration
- Remove surface scum during fermentation
Choosing the right tools and ingredients is crucial for pickling success. Stay away from brass, copper, or zinc utensils to avoid discoloring your pickles.
Creative Ways to Use Your Dill Pickles
Dill pickles are super versatile. They can make any meal special. Your homemade pickles can make your cooking and snacks better.
Culinary Delights with Dill Pickles
Here are some fun ways to use dill pickles:
- Sandwich and Burger Toppings
- Appetizer Platters
- Salad Enhancers
- Cocktail Garnishes
Innovative Pickle Recipes
Try these tasty dill pickle ideas:
- Pickle Martini: Total time 5 minutes
- Dill Pickle Dip: Yield 3 cups
- Pickle Potato Salad: Serves 10
- Fried Dill Pickles: Yield 3-1/2 cups
| Recipe | Prep Time | Servings |
|---|---|---|
| Pickle Martini | 5 minutes | 1 serving |
| Dill Pickle Dip | 10 minutes | 3 cups |
| Pickle Potato Salad | 40 minutes | 10 servings |
“Pickles aren’t just a side dish – they’re a culinary adventure!” – Pickle Enthusiast
Don’t be afraid to try new things with your dill pickles. Chop them up for tartar sauce, use the brine for marinades, or add them to drinks. Your homemade pickles can be the key to making your dishes stand out.
Health Benefits and Nutritional Information
Dill pickles are more than a tasty snack. They are a low-calorie treat with surprising health benefits. These tangy treats offer a unique nutritional punch.
Nutritional Profile of Dill Pickles:
- Only 5 calories per pickle spear
- High in sodium: 326 mg per spear
- Contains beneficial probiotics (when fermented)
- Provides essential vitamins and minerals
Dill pickles offer several health benefits. The cucumber base is over 95% water, helping with hydration. They also provide important nutrients like potassium (170 mg per serving).
Potassium supports kidney, heart, muscle, and nerve function. It’s a key nutrient in dill pickles.
| Nutrient | Amount per Spear | Daily Value (%) |
|---|---|---|
| Calories | 5 | 0.25% |
| Sodium | 326 mg | 14% |
| Potassium | 170 mg | 4% |
| Vitamin K | Variable | 10% |
“Moderation is key when enjoying dill pickles due to their high sodium content.” – Nutrition Experts
While dill pickles have health benefits, watch your sodium intake. A single pickle can be about 25% of your daily sodium limit. People with high blood pressure should eat them in small amounts.
Fermented dill pickles offer an extra health boost. They contain probiotics like Lactobacillus. These probiotics may improve immune function and gut health.
They help with nutrient absorption and may reduce inflammation. This makes fermented dill pickles a great choice for your health.
Conclusion
Starting your dill pickle recipe journey is more than a cooking project. The pickle market in the U.S. is worth $3.1 billion a year. You’re joining a trend that excites home cooks everywhere. An easy dill pickle recipe can turn your kitchen into a place of creativity and tradition.
Making homemade pickles is more than just preserving food. It’s about having control, being creative, and connecting with a traditional food method. The pandemic made people more interested in DIY food, with pickling being a top choice for home chefs.
As you try out your dill pickle recipe, remember each jar is special. From picking the right cucumbers to mixing spices, your recipe will get better with time. Pickling is popular among Millennials and Gen Z, showing it’s a way to share food experiences across generations.
Enjoy the journey, share your pickles, and savor the tangy taste of your hard work. Your homemade pickles are a sign of your creativity and skill in the kitchen.
FAQ
What type of cucumbers work best for making dill pickles?
Kirby, Persian, and English cucumbers are great for pickling. They are smaller, firmer, and have fewer seeds. This makes your pickles crispier. Always pick fresh, firm cucumbers without blemishes for the best taste.
How long do homemade dill pickles last?
Homemade dill pickles in the fridge last 4-6 weeks. If you can them properly, they can last up to 18 months in a cool, dark place. Once you open them, eat them within 1-2 months for the best flavor.
Can I reduce the salt in my pickle recipe?
You can slightly cut down on salt, but it’s important for flavor and safety. Cutting salt too much can harm the pickles’ texture and safety. If you’re watching your sodium, use pickling salt and adjust it carefully, but don’t remove it completely.
Are homemade dill pickles healthier than store-bought?
Homemade pickles are often healthier because you choose the ingredients. You can avoid preservatives, lower sodium, and use better cucumbers. Fermented pickles also have probiotics that store-bought ones might not.
What’s the difference between refrigerator pickles and canned pickles?
Refrigerator pickles are quick to make and last 4-6 weeks in the fridge. They don’t need water bath processing. Canned pickles are processed in a water bath and last 12-18 months. They’re good to eat before opening.
How can I ensure my pickles stay crisp?
For crisp pickles, use fresh cucumbers and trim the blossom ends. Add calcium chloride or grape leaves to the jar. Choose firm cucumbers and process them quickly. Ice water baths before pickling also help keep them crunchy.
Can I reuse pickle brine?
You can reuse pickle brine once, but be careful. Make sure the previous batch was safely preserved and the brine looks clean. It’s safer to make a fresh brine for each batch of pickles.
What spices are traditional in dill pickle recipes?
Traditional spices include dill seed, mustard seed, black peppercorns, garlic, and red pepper flakes. Some recipes add bay leaves or celery seed for extra flavor. The goal is to find a mix that complements the cucumber base.
Homemade Dill Pickles
Equipment
- Clean glass mason jars with secure lids
- Large stock pot with a canning rack
- Canning jar lifter tongs
- Wide-mouth funnel
- Clean kitchen towels
Ingredients
- 2 pounds pickling cucumbers about 4 inches long
- 1 cup water
- 1 cup rice vinegar or white/apple cider vinegar with 5% acidity
- 1 1/2 tablespoons maple syrup or sugar
- 1 1/2 teaspoons fine sea salt
- 3 dill heads or 1 tablespoon dill seeds
- 2 cloves garlic peeled
- 1 tablespoon whole black peppercorns
- 1 tablespoon coriander seeds
- 1 tablespoon mustard seeds
- 1 tablespoon red pepper flakes optional
Instructions
- Wash cucumbers thoroughly and trim the blossom ends.
- Slice cucumbers into spears, chips, or sandwich slices as desired.
- In a pot, combine water, vinegar, salt, and sweetener. Bring to a simmer until salt dissolves.
- Sterilize canning jars and lids by boiling them for 10 minutes.
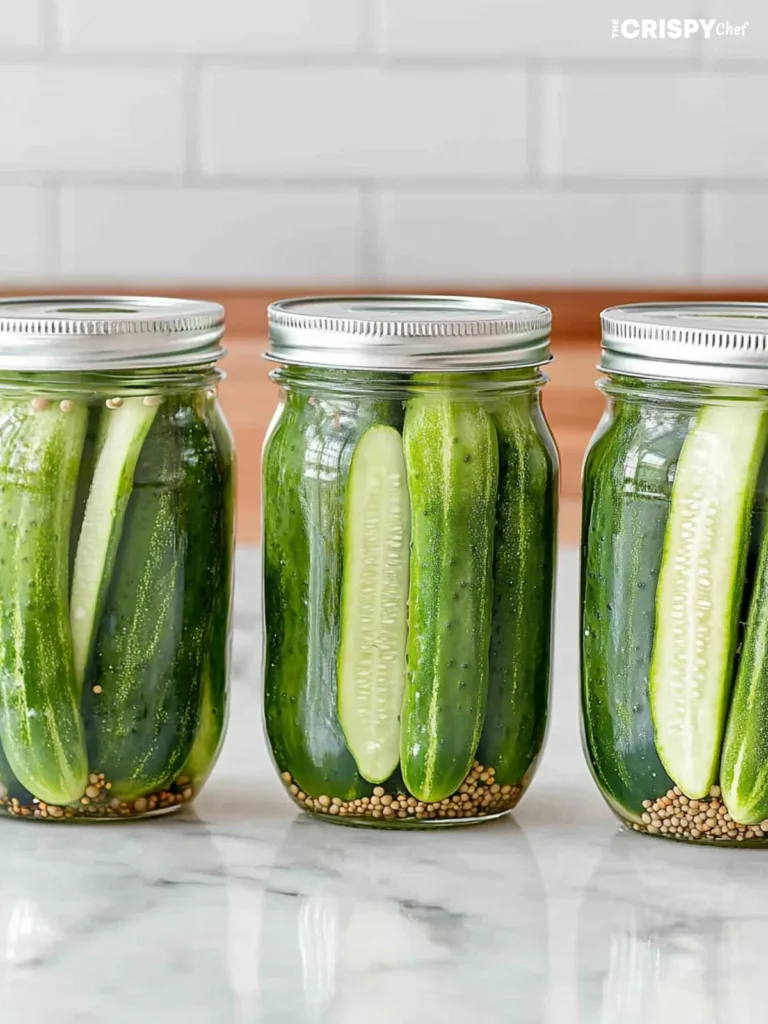
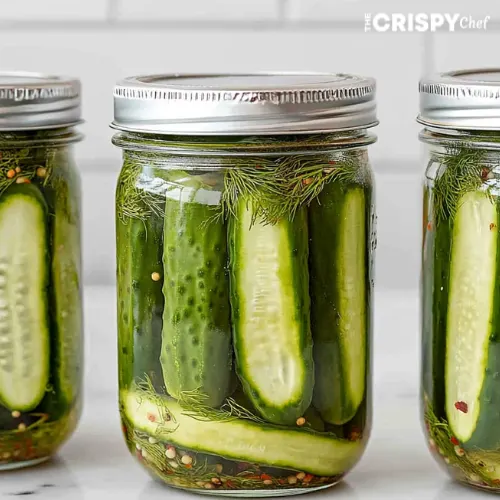
- Place dill, garlic, and spices into the sterilized jars.
- Pack the cucumbers tightly into the jars.
- Pour the hot brine over the cucumbers, leaving 1/2-inch headspace.
- Seal jars and let them cool to room temperature before refrigerating.
- Allow pickles to chill for at least 3 hours before serving. For best flavor, let them sit for 24 hours.
Notes
Nutrition
