Let me be honest with you – I don’t actually like eating candy corn. It’s too sweet, waxy, and tastes like sugar pretending to be candy. But candy corn fudge? That’s a completely different situation. Creamy, white chocolate fudge layered in those iconic orange, yellow, and white colors that actually tastes good instead of just looking cute. I made this last Halloween and converted three candy corn haters into candy corn fudge believers.
I brought a batch to work and my boss – who very loudly proclaims every year that candy corn is “garbage candy” – ate four pieces and asked for the recipe. When you can win over the candy corn skeptics, you know you’ve made something special. The secret is it looks like candy corn but tastes like quality fudge, not like you’re eating pure sugar wax.

Best part? No candy thermometer needed, no complex techniques, just melting and layering. If you can stir and wait for things to set, you can make this. It’s basically foolproof except for the part where you need patience to let each layer set before adding the next. Patience is the only real challenge here.
Why This Fudge Beats Actual Candy Corn
Real candy corn divides people into passionate lovers and equally passionate haters. But candy corn fudge somehow appeals to both camps. The haters appreciate that it actually tastes good. The lovers enjoy the nostalgic visual while getting better flavor and texture.
I made this for a Halloween potluck where someone else brought a giant bowl of actual candy corn that sat there untouched all night. My fudge plate was empty within 30 minutes. One person asked if I’d made it with real candy corn melted down and seemed relieved when I said no. The visual association is enough – you don’t need the actual candy involved.
Here’s why you need this fudge:
- Looks exactly like candy corn but tastes way better
- No candy thermometer or complicated techniques required
- Makes a huge batch perfect for gifting or parties
- Stores well for up to two weeks at room temperature
- Actually tastes like quality fudge, not waxy sugar
- Converts candy corn haters into fudge believers
Plus this works for people who think homemade fudge is too hard. This isn’t your grandmother’s cooked-on-the-stove fudge that requires precision timing. This is dump-and-melt fudge that’s nearly impossible to mess up :/
What You Need for Candy Corn Fudge
For the Base Recipe
Each color layer uses the same base with different food coloring.
Per Layer (you’ll make this three times):
- White chocolate chips (2 cups per layer – so 6 cups total)
- Sweetened condensed milk (⅔ cup per layer – two 14oz cans total)
- Vanilla extract (1 teaspoon per layer)
- Butter (2 tablespoons per layer)
Food Coloring:
- Orange gel food coloring (for bottom layer)
- Yellow gel food coloring (for middle layer)
- None for top white layer
Why these ingredients work: Sweetened condensed milk creates that creamy fudge texture without needing a candy thermometer. White chocolate gives you a neutral base to color. Butter adds richness and helps with smooth texture.
Substitutions that work:
- Can’t find white chocolate chips? Use white candy melts
- Want less sweet? Use dark chocolate for one layer instead
- Dairy-free? Use dairy-free white chocolate and coconut condensed milk
Equipment You Actually Need
- 9×9 inch baking pan
- Parchment paper or aluminum foil for lining
- Three microwave-safe bowls (one per layer)
- Spatula for spreading
- Sharp knife for cutting
That’s it. No candy thermometer, no special pans, no complicated tools.
How to Make Candy Corn Fudge
Step 1: Prep Your Pan
Line a 9×9 inch pan with parchment paper or aluminum foil, leaving overhang on two sides. This creates handles for lifting out the fudge later. Spray lightly with cooking spray.
This step is crucial – you need to be able to lift the fudge out to cut it cleanly. Trying to cut fudge while it’s still in the pan is a nightmare.
Step 2: Make the Orange Layer
Combine 2 cups white chocolate chips, ⅔ cup sweetened condensed milk, and 2 tablespoons butter in a microwave-safe bowl. Microwave in 30-second bursts, stirring between each, until completely melted and smooth. Usually takes 2-3 cycles.
Once smooth, stir in 1 teaspoon vanilla and orange gel food coloring. Start with a few drops and add more until you get that bright candy corn orange. Mix thoroughly so there are no streaks.
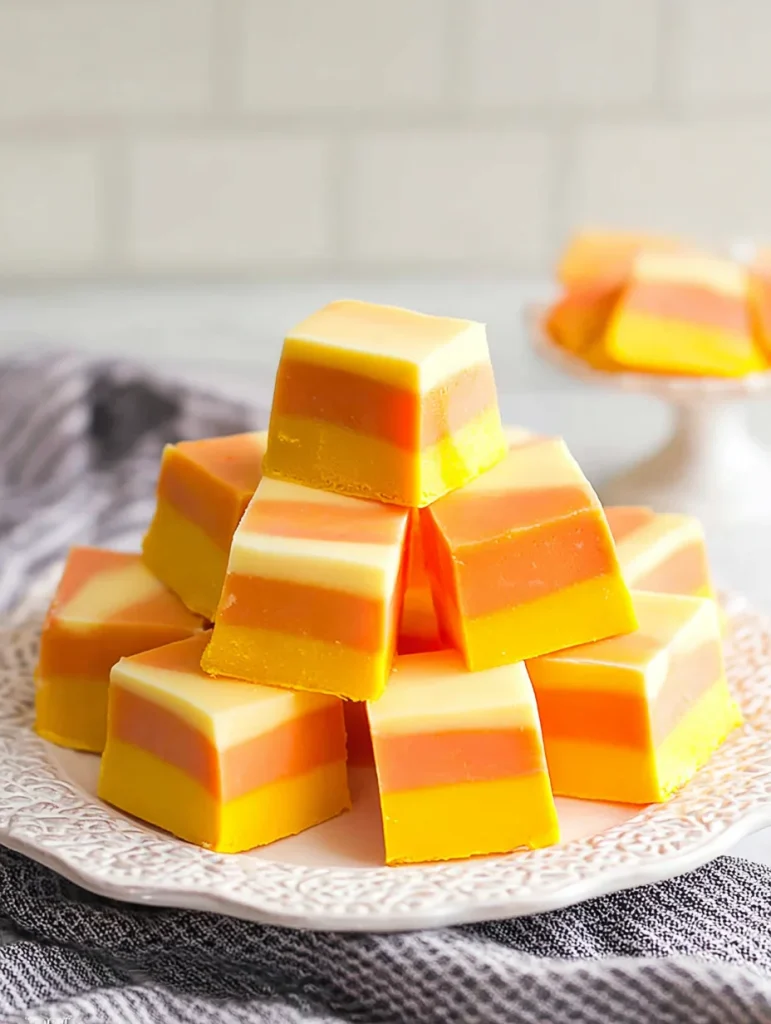
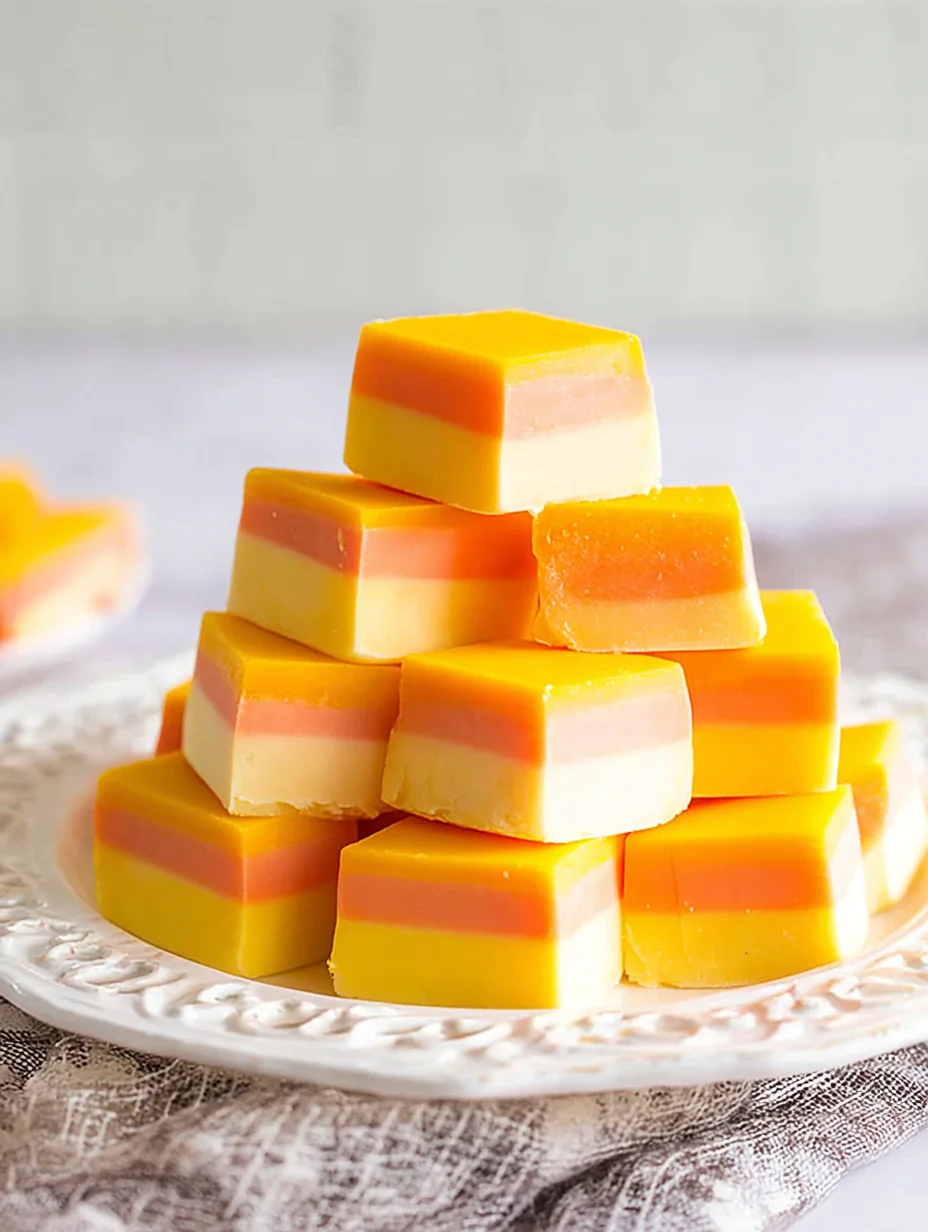
Pour into your prepared pan and spread evenly with a spatula. The layer should be about ½ inch thick.
Critical step: Refrigerate for 20-30 minutes until firm to the touch. Don’t skip this or the next layer will just blend into it and you’ll lose the distinct stripes. Set a timer. Go do something else. Be patient.
Step 3: Make the Yellow Layer
Repeat the exact same process – 2 cups white chocolate chips, ⅔ cup condensed milk, 2 tablespoons butter. Melt, stir in vanilla, add yellow food coloring until you get that candy corn yellow.
Check that your orange layer is firm. If you can touch it without making an indent, it’s ready. Pour the yellow mixture over the orange layer and spread evenly.
Back in the fridge for another 20-30 minutes. Yes, again. Patience is your friend here. The layers need to set separately or everything blends together into muddy brownish-orange mess.
Step 4: Make the White Layer
One more time – same process. 2 cups white chocolate chips, ⅔ cup condensed milk, 2 tablespoons butter, 1 teaspoon vanilla. This time skip the food coloring – you want it pure white.
Make sure the yellow layer is firm before adding the white layer on top. Spread evenly. This is your final layer so make it smooth and pretty.
Refrigerate for at least 2 hours or until completely firm throughout. You can speed this up by putting it in the freezer for about 45 minutes if you’re impatient like me.
Step 5: Cut and Serve
Once completely firm, use the parchment overhang to lift the entire fudge block out of the pan onto a cutting board.
Use a sharp knife to cut into squares or triangles. Triangles look more like actual candy corn pieces which is cute. For clean cuts, warm your knife under hot water, dry it, then slice. Wipe the knife between cuts.
You should get about 36-48 pieces depending on how large you cut them. Smaller pieces are better because this fudge is rich.
Store in an airtight container at room temperature for up to 2 weeks, or refrigerate for up to 3 weeks. The fudge stays soft and creamy at room temp, gets firmer when chilled. Both textures work.
Creative Variations Worth Trying
Peanut Butter Candy Corn Fudge
Add ½ cup peanut butter to each layer. The peanut butter-white chocolate combo tastes like peanut butter cups but looks like candy corn. Honestly might be better than the original.
Dark Chocolate Base Candy Corn
Use dark chocolate for the orange layer instead of colored white chocolate. Creates a richer, less sweet version that adults prefer. Keep yellow and white layers as white chocolate.
Candy Corn Swirl Fudge
Instead of distinct layers, dollop the three colors randomly and swirl with a knife for marbled effect. Less precise, still looks candy corn-ish, way faster since you don’t wait between layers.
Mini Candy Corn Fudge Bites
Use a mini muffin tin lined with paper cups. Layer the colors in each cup. Creates individual candy corn fudge portions that are perfect for gifting.
Cookies and Cream Candy Corn
Fold crushed Oreos into the white layer before it sets. Adds texture and cookies-and-cream flavor while maintaining the candy corn aesthetic.
Salted Candy Corn Fudge
Sprinkle flaky sea salt on the white layer before it sets completely. The salt cuts through the sweetness and adds sophistication to what’s essentially a novelty candy.
Candy Corn Fudge
Equipment
- 9×9 inch pan
- Parchment paper or foil
- Microwave-safe bowls 3 bowls for layers
- Spatula for spreading each layer
- Sharp Knife for cutting into pieces
Ingredients
- 6 cups white chocolate chips (2 cups per layer)
- 2 14 oz cans sweetened condensed milk (⅔ cup per layer)
- 3 tsp vanilla extract (1 tsp per layer)
- 6 tbsp butter (2 tbsp per layer)
- orange gel food coloring
- yellow gel food coloring
- cooking spray
- parchment paper or foil for lining pan
Instructions
- Line a 9×9 inch pan with parchment or foil, leaving overhang. Lightly spray with cooking spray. This helps remove the fudge cleanly after chilling.
- In a microwave-safe bowl, combine 2 cups white chocolate chips, ⅔ cup condensed milk, and 2 tbsp butter. Microwave in 30-second bursts, stirring between each, until fully melted and smooth. Add 1 tsp vanilla and orange food coloring. Mix well and pour into the prepared pan. Spread evenly and refrigerate 20–30 min until firm.
- Repeat the same process using yellow food coloring. Ensure the orange layer is firm before pouring. Spread yellow layer evenly and chill again 20–30 minutes until firm.
- Repeat again for the final white layer (no coloring this time). Pour over the yellow layer, smooth out, and refrigerate for at least 2 hours or until completely firm. Optional: freeze for 45 min to speed things up.
- Lift the fudge out using the parchment overhang and place on a cutting board. Cut into squares or triangles. For cleaner cuts, warm your knife under hot water and wipe between slices.
Notes
Frequently Asked Questions
My layers blended together instead of staying separate – what happened?
You didn’t wait long enough for each layer to firm up before adding the next. Each layer needs to be completely firm to the touch – at least 20-30 minutes in the fridge. Rushing this is the main way to mess up layered fudge.
Can I make this candy corn fudge ahead of time?
Absolutely. Make it up to 2 weeks ahead and store in an airtight container at room temperature. The fudge actually improves after sitting for a day as the flavors meld. Perfect for holiday prep.
My fudge is grainy instead of smooth – what went wrong?
You overheated the chocolate or didn’t stir enough while melting. Use short 30-second microwave bursts and stir thoroughly between each. Overheated chocolate seizes and gets grainy.
The colors aren’t vibrant enough – how do I fix this?
Use gel food coloring, not liquid. Gel is much more concentrated and won’t add excess moisture. Start with a small amount and add more until you get the brightness you want.
Can I cut this into triangle shapes like real candy corn?
Yes. Cut the fudge into strips, then cut each strip diagonally to create triangles. Orient them so the white is at the narrow end, orange at the wide end, just like real candy corn.
My fudge won’t come out of the pan – help?
You probably didn’t line it with parchment or foil with overhang. Try running a thin knife around the edges and placing the pan in warm water for 30 seconds to loosen it. Next time, line the pan properly.