Let me tell you about the time I made cookies that looked like actual bubbling cauldrons and people thought I’d hired a professional baker. I was at a Halloween party last year, someone asked how long these took to make, and when I said “maybe an hour total” they literally laughed in my face. Didn’t believe me until I walked them through it step by step. That’s the magic of cauldron cookies – they look like you attended culinary school but really you just stuck some candy in dough and called it a day.
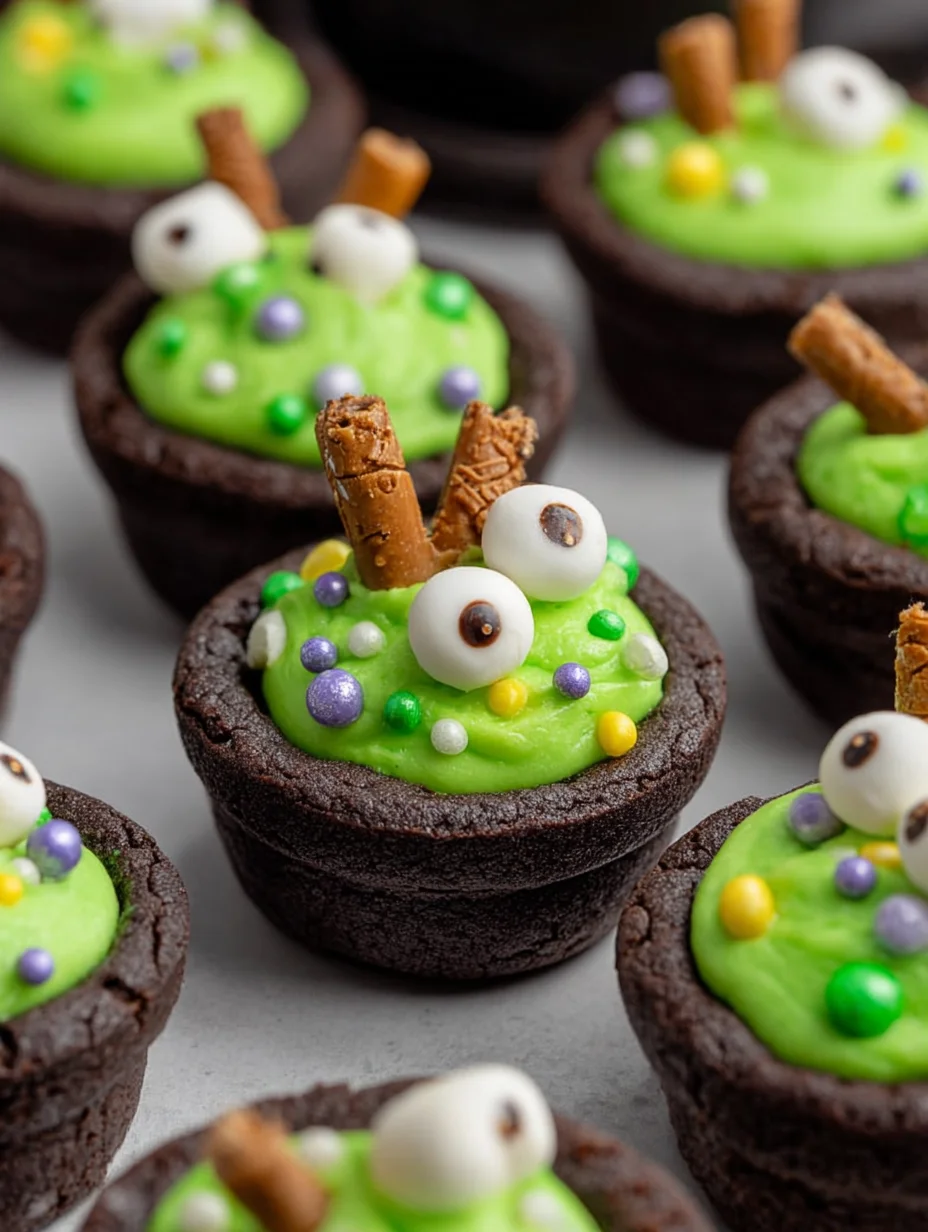
These are chocolate chip cookies shaped into mini cauldrons, filled with colorful “potion” (melted candy), and decorated with pretzel handles. The candy filling bubbles slightly while baking which creates this cool witch’s brew effect. Plus you can customize the potion colors for different spooky vibes. I made green ones and my nephew insisted they were real poison and refused to try one until his mom took a bite first. Peak Halloween energy.
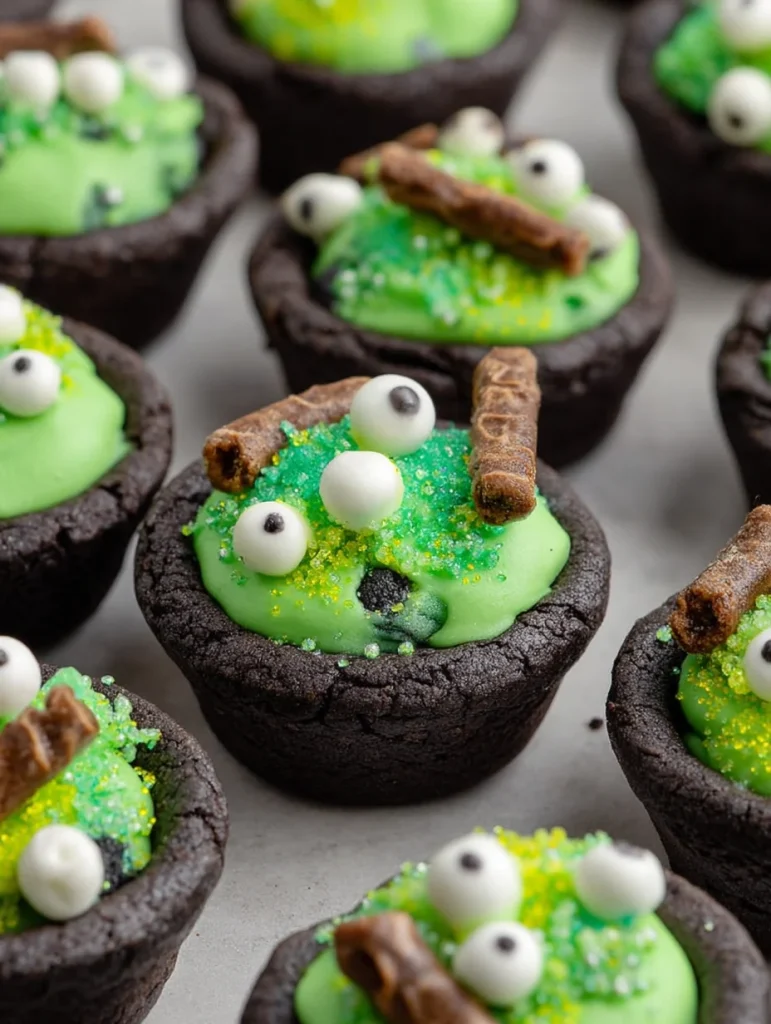
Best part? The actual cookie tastes incredible even without the decorations. Crispy edges, chewy center, loaded with chocolate chips. The cauldron shape is just bonus points for presentation.
Why These Cookies Beat Every Other Halloween Dessert
Halloween cookies usually fall into two categories – they look cool but taste like cardboard, or they taste good but look like you didn’t try. These cauldron cookies somehow nail both without requiring artistic talent or weird specialty ingredients you’ll never use again.
I made these for my coworker’s kid’s Halloween party because she begged me after seeing them on my Instagram story. Showed up with two dozen cauldron cookies and watched eight-year-olds lose their minds. One kid asked if they were “real magic” and honestly at that moment I felt like a wizard. When children think your baking is actual sorcery, you know you’ve succeeded.
Here’s why you need these cookies:
- They look way more complicated than they are
- The candy “potion” inside is basically free decoration
- Kids go absolutely crazy for the cauldron shape
- They’re sturdy enough to transport without breaking
- You can make the dough ahead and shape them later
- The pretzel handles stay crunchy after baking
Plus these work for people who claim sugar cookies are boring. These are chocolate chip cookies in disguise – way more flavor than those bland cutout cookies everyone makes. My friend who “doesn’t really like cookies” ate five and asked if I was selling them. I wasn’t, but her enthusiasm was flattering :/
What You Need for Cauldron Cookies
For the Cookie Dough
This is a modified chocolate chip cookie recipe that holds shape better than the traditional kind.
Dry Ingredients:
- All-purpose flour (2¼ cups – measure correctly or they’ll spread)
- Baking soda (1 teaspoon)
- Salt (½ teaspoon)
- Cocoa powder (2 tablespoons – makes them darker and more cauldron-like)
Wet Ingredients:
- Unsalted butter (1 cup – softened but not melted)
- Granulated sugar (½ cup)
- Light brown sugar (¾ cup, packed – keeps them chewy)
- Large eggs (2 – room temperature)
- Vanilla extract (2 teaspoons)
Mix-ins:
- Semi-sweet chocolate chips (1½ cups – mini chips work better for this)
- Black cocoa powder (optional but makes them darker – 1 tablespoon extra)
Why these ingredients work: The extra cocoa powder makes the dough darker so they look more like iron cauldrons. The ratio of brown to white sugar keeps them chewy but not so soft they lose shape. And using mostly brown sugar adds that molasses flavor that plays well with chocolate.
Substitutions that work:
- No black cocoa? Regular cocoa is fine, just less dramatically dark
- Dairy-free? Use vegan butter and dairy-free chocolate chips
- Want them gluten-free? Use 1:1 GF flour blend – works surprisingly well

For the Cauldron Shape and Filling
This is where the magic happens and it’s honestly easier than you think.
For Structure:
- Mini pretzel twists (for handles – about 48 pretzels)
- Muffin tin (regular size, for shaping)
For the Potion Filling:
- Jolly Rancher candies (green, purple, orange, red – whatever colors you want)
- Or hard candies in Halloween colors
- Or melting candy wafers if you prefer
Critical info: Use hard candies that melt, not gummy candies. Gummies just burn and smell terrible. Jolly Ranchers are perfect because they come in bright colors and melt into that glossy, translucent look that actually resembles bubbling potion.
For Decoration (Optional But Fun)
- Black decorating gel or edible marker
- Extra mini pretzels (to look like twigs for the fire)
- Orange and red candy melts (for “flames” under cauldrons)
- Edible glitter or disco dust (makes the potion sparkle)
You can go simple or elaborate here. The cookies look good either way, but adding flames underneath takes them from cool to absolutely show-stopping.
Equipment You Actually Need
- Stand mixer or hand mixer
- Regular muffin tin
- Cooking spray
- Small bowl for shaping
- Baking sheets
- Parchment paper
- Hammer or rolling pin (for crushing candy)
How to Make These Cauldron Cookies
Step 1: Make the Cookie Dough
Beat softened butter with both sugars for about 3 minutes until light and fluffy. This step matters – don’t rush it. Add eggs one at a time, then vanilla.
In a separate bowl, whisk together flour, baking soda, salt, and cocoa powder. Add dry ingredients to wet in two batches, mixing on low speed just until combined. Don’t overmix or your cookies will be tough instead of chewy.
Fold in chocolate chips by hand. The dough will be thick and slightly sticky – that’s correct. Chill it for at least 30 minutes so it’s easier to work with. Unchilled dough is too soft to shape properly.
Step 2: Prep Your Cauldron Molds
Preheat oven to 350°F. Flip a regular muffin tin upside down and spray the bottom of each cup with cooking spray. This is your mold for creating the cauldron shape.
Alternatively, you can use the outside of a small oven-safe bowl or ramekin if you don’t want to flip your muffin tin. Same concept – you’re draping dough over something round to create that pot shape.
Step 3: Shape Those Cauldrons
Take about 2 tablespoons of chilled dough and roll it into a ball. Flatten it into a circle about 3-4 inches across – it should look like a thick disc.
Drape the dough circle over the bottom of one muffin cup (or your chosen mold). Gently press and shape it so it forms a bowl/pot shape with the edges coming up slightly. The dough should cover the bottom and come up the sides.
Press two pretzel twists into opposite sides of the dough to create a handle. Push them in deep enough that they’ll stay put during baking.
Repeat with remaining dough, spacing them on your baking sheet so they don’t touch while baking. You should get about 20-24 cauldrons depending on size.
Step 4: Bake the Cauldron Shapes
Bake for 12-15 minutes until the edges look set and slightly darker. The cookies will still look soft in the center – that’s okay, they firm up as they cool.
Let them cool on the muffin tin for 5 minutes, then carefully remove and place on a wire rack to cool completely. They should hold their cauldron shape. If any lost their shape during baking, you can gently reshape them while still warm.
Step 5: Create the Candy Potion
While cookies cool, unwrap your Jolly Ranchers and separate by color. Put each color in a separate ziplock bag and crush them with a hammer or rolling pin. You want small pieces, not powder – think gravel-sized chunks.
Once cookies are completely cool, fill each cauldron about ⅔ full with crushed candy. You can use one color per cookie or mix colors for a swirled effect. Green and purple together looks properly witchy, IMO.
Step 6: Melt That Potion
Place filled cauldron cookies on a parchment-lined baking sheet. Bake at 350°F for 4-6 minutes, just until the candy melts and looks glossy and bubbling.
Watch them carefully. The candy goes from perfectly melted to burnt in like 30 seconds. You want it melted and smooth, not smoking. It’ll bubble slightly which creates that potion effect – this is what you want.
Remove from oven and let cool completely. The candy will harden as it cools into a glossy, translucent “potion” inside your cauldron. Don’t touch it while hot – melted sugar burns are no joke.
Step 7: Add Extra Decorations (Optional)
Once everything is cooled and hardened, you can add flames under the cauldrons using orange and red candy melts piped onto parchment. Let those harden, then carefully place cauldrons on top.
Or arrange mini pretzels under each cauldron to look like firewood. Use black decorating gel to draw smoke wisps coming from the potion. Add edible glitter to the candy center for sparkle.
Or keep it simple – they look great as is. These cauldron cookies don’t need elaborate decorations to be impressive.
Creative Variations That Actually Work
Witch’s Brew Cauldrons
Use bright green candy for classic poison look. Add gummy worms sticking out of the potion like they’re part of the spell. Kids love this gross-out factor.
Galaxy Potion Cauldrons
Mix blue, purple, and pink candies together for a swirled cosmic effect. Add edible glitter or disco dust while the candy is still melted. Results in these sparkly, otherworldly looking potions.
Peanut Butter Cauldrons
Replace half the butter in the cookie dough with peanut butter. The cookies taste amazing and the peanut butter-chocolate combo is undefeated. Fill with chocolate chips that melt instead of hard candy for a different texture.
White Chocolate Cauldrons
Use white chocolate chips in the dough instead of semi-sweet. Fill with white or clear candy for a ghostly effect. These look more elegant and less traditionally Halloween but still work for the season.
Mini Cauldron Bites
Use a mini muffin tin to make bite-sized versions. Perfect for parties where people want to try multiple desserts. Adjust baking time down to 8-10 minutes for the smaller size.
S’mores Cauldrons
Add graham cracker crumbs to the dough. Fill cauldrons with mini marshmallows and chocolate chips instead of hard candy. Broil for 30 seconds to toast the marshmallows. Different vibe, equally delicious.
Frequently Asked Questions
My cauldrons lost their shape and went flat – what happened?
Your dough was probably too warm when you shaped them, or you didn’t chill it long enough initially. Make sure the dough is cold before shaping and working quickly so your hands don’t warm it up too much. Also check your oven temperature – if it’s running hot, cookies spread before they set.
The candy filling leaked out during baking – why?
You overfilled the cauldrons or the candy melted too much. Fill them only about ⅔ full and watch carefully while the candy melts. Pull them out as soon as the candy looks liquified and glossy – don’t let it get so hot it becomes runny enough to leak.
Can I make these cauldron cookies ahead of time?
Yes. Make the cookie dough up to 3 days ahead and refrigerate, or freeze for up to 3 months. Bake and shape the cauldrons 1-2 days ahead and store in airtight containers. Add the candy filling and melt it the day you’re serving for best results – the candy stays glossy and fresh-looking.
My pretzel handles fell off during baking – how do I prevent this?
Press them deeper into the dough before baking. They need to be embedded pretty well to stay put. If they keep falling off, you can also “glue” them on after baking using melted chocolate as adhesive.
What if I don’t have Jolly Ranchers?
Any hard candy works – Lifesavers, lollipops, hard fruit candies, even rock candy. Just make sure it’s actual hard candy that melts, not gummies or soft candies. Candy melts also work but don’t give you that translucent bubbling effect.
The candy cracked when I tried to crush it – is there a better method?
Put the candies in a ziplock bag and fold a dish towel over it before crushing. This contains the mess and prevents candy shards from flying everywhere. Use quick, firm hits with the hammer rather than grinding motion. You want chunks, not powder.
How do I store leftover cauldron cookies?
Store in a single layer in an airtight container at room temperature for up to 5 days. Don’t stack them or the candy center might stick to other cookies. The candy stays hard and glossy if stored properly. Don’t refrigerate – condensation makes everything weird.
Cauldron Cookies
Equipment
- Stand mixer or hand mixer
- Regular muffin tin
- Cooking spray
- Baking sheets
- Parchment paper
- Hammer or rolling pin For crushing candy
- Small bowl or ramekin As alternate cauldron mold
Ingredients
- 2.25 cups all-purpose flour
- 1 tsp baking soda
- 0.5 tsp salt
- 2 tbsp unsweetened cocoa powder
- 1 cup unsalted butter (softened)
- 0.5 cup granulated sugar
- 0.75 cup light brown sugar (packed)
- 2 large eggs (room temp)
- 2 tsp vanilla extract
- 1.5 cups semi-sweet mini chocolate chips
- 1 tbsp black cocoa powder (optional)
- 48 mini pretzel twists
- Jolly Ranchers or hard candies (crushed, assorted colors)
- black decorating gel or edible marker (optional)
- orange and red candy melts (optional flame decor)
- edible glitter (optional)
Instructions
- Cream butter and sugars for 3 minutes. Add eggs one at a time, then vanilla. In another bowl, whisk flour, baking soda, salt, and cocoa powder. Add dry to wet in batches. Fold in chocolate chips. Chill dough for at least 30 minutes.
- Preheat oven to 350°F. Flip muffin tin upside down and grease bottoms. Alternatively, use ramekins or small bowls as molds.
- Roll chilled dough into 2-tbsp balls and flatten into 3–4" discs. Drape over muffin tin cups and shape into bowl-like cauldrons. Add two pretzel handles to each. Space them apart on baking sheet.
- Bake for 12–15 minutes until edges are set. Let cool 5 minutes on mold, then transfer to rack. Reshape warm cookies if needed.
- Crush Jolly Ranchers into gravel-size chunks. Fill each cookie ⅔ full with crushed candy in desired color combinations.
- Bake again at 350°F for 4–6 minutes until candy is melted and bubbling. Let cool fully before decorating or moving.
- Optionally, pipe candy melts as flames under cauldrons. Add edible glitter, mini pretzels, or decorating gel for extra spooky details.
Notes
My Final Thoughts on These Cookies
I’ve made a lot of Halloween cookies over the years. Elaborate royal icing designs that took hours. Cookies that required seventeen specialty cutters. Those 3D cookies that looked cool but tasted mediocre and were annoying to eat. Most of them were fine but honestly felt like more trouble than they were worth.
These cauldron cookies are different. They hit that perfect spot where they look impressive enough to wow people but don’t require you to have pastry chef skills or spend your entire day in the kitchen. That’s the sweet spot for holiday baking – maximum impact, reasonable effort.
Last Halloween I made these for my daughter’s classroom party. Teachers usually get stuck eating terrible store-bought cupcakes and dry sugar cookies, so when I showed up with cauldron cookies one teacher literally asked if I was available for hire. I’m not running a bakery, but the fact that she thought these were professional-level made my entire week.
What I love most is watching people’s reactions when they realize the “potion” inside is actual melted candy. There’s this moment of surprise followed by delight that never gets old. It’s like a magic trick you can eat.
Make these for your Halloween party and become the person everyone remembers. Make them with kids – the shaping and decorating parts are genuinely fun. Make them for yourself because sometimes you deserve cookies that look like tiny witch cauldrons.
Just make them, because showing up to Halloween with plain chocolate chip cookies when you could bring actual cauldron cookies filled with bubbling magic potion is honestly kind of a waste of October. Your Halloween baking game is about to reach legendary status with like an hour of work.
Now go create some cookie cauldrons and prepare for people to ask if you’re secretly a witch. The answer is no, you just know how to melt candy inside cookie dough shaped like pots. But the mystique is fun so maybe don’t explain it too clearly 🙂