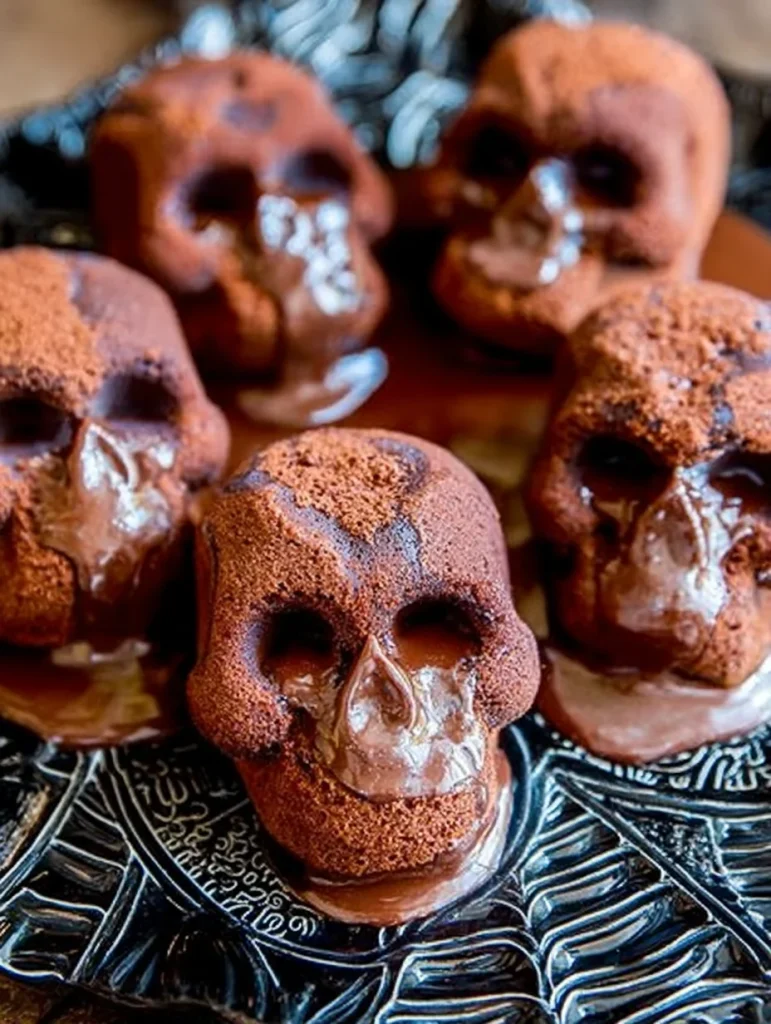
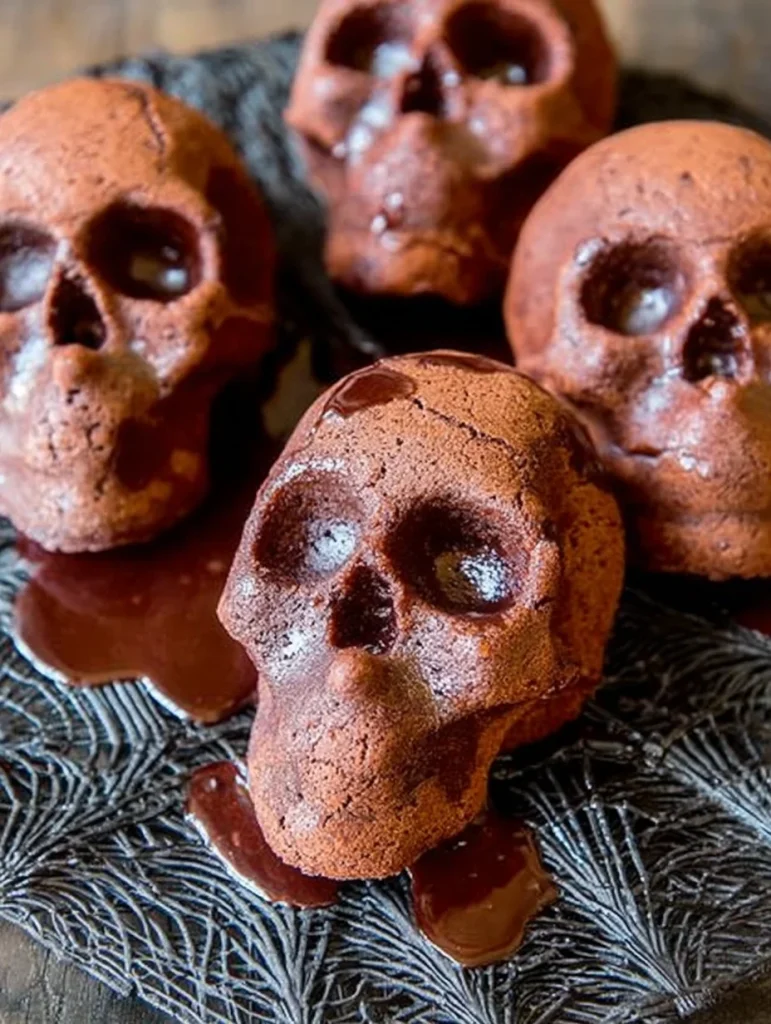
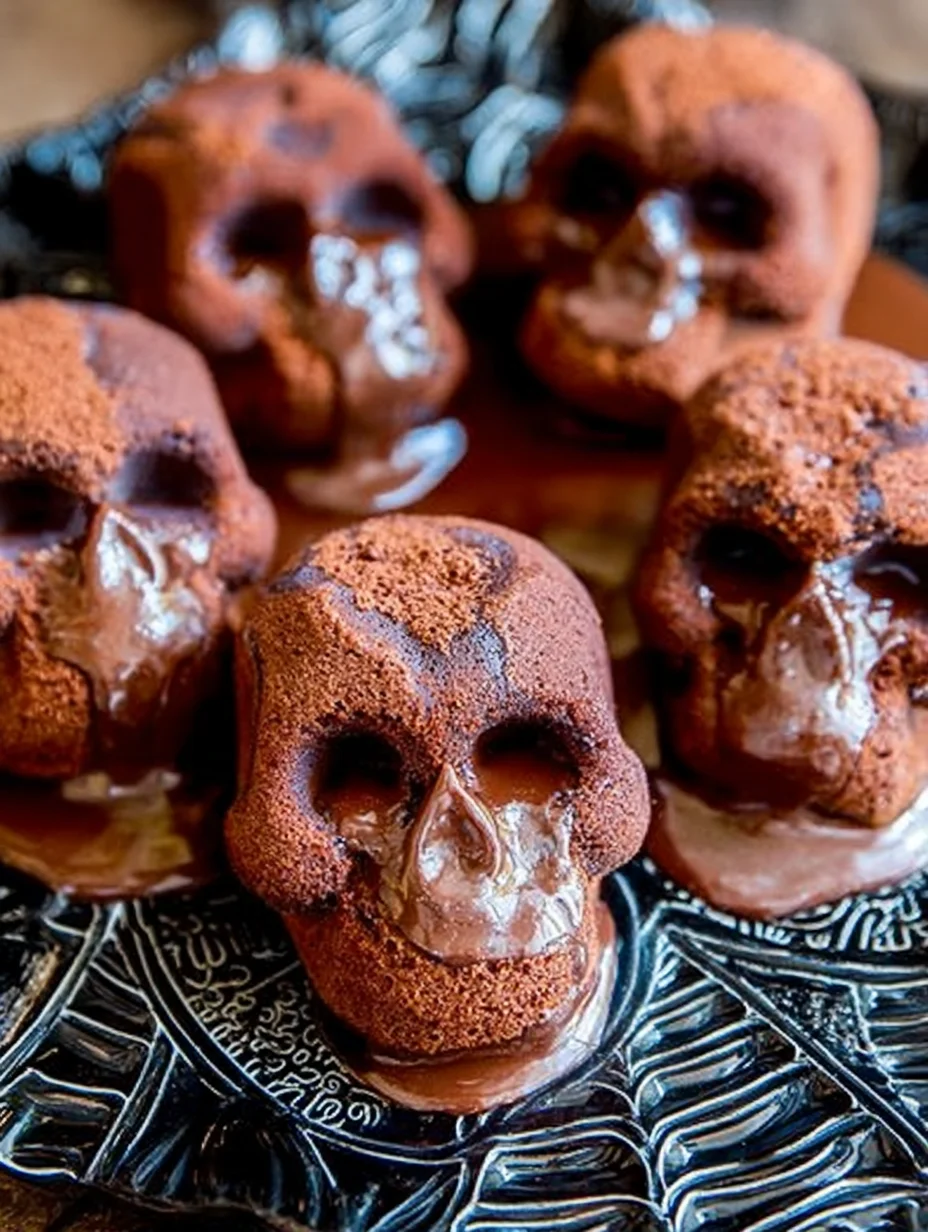
Look, I’m gonna be straight with you – most molten lava cakes are overrated restaurant desserts that cost $12 and taste like microwaved brownie batter. But chocolate lava skull cakes? These are different. They’re actually easy to make at home, they look insanely cool with that skull shape, and when you crack them open that chocolate lava oozes out like something from a horror movie. In the best way possible.
I made these for a Halloween dinner party last year and the reaction when I cracked the first one open was priceless. My friend literally gasped. Another person pulled out their phone to film it. For a dessert that took me maybe 45 minutes total, that’s pretty solid return on investment, IMO.
The secret is using skull-shaped molds and nailing that perfect baking time so the center stays molten while the outside sets. Sounds fancy but honestly? If you can melt chocolate and crack an egg, you can make these.
Why These Skull Cakes Beat Regular Lava Cakes
Most lava cakes come in boring ramekins and taste fine but look like nothing special. These skull cakes deliver on presentation AND flavor without requiring pastry school skills or weird ingredients you’ll never use again.
I brought these to my cousin’s “grown-up Halloween” party where everyone was trying to outdo each other with elaborate dishes. Someone made beef Wellington shaped like a coffin, another person did a whole charcuterie graveyard. I showed up with chocolate skulls that bled molten chocolate when you broke them and honestly? Mine got the most attention. Sometimes simple executed well beats complicated executed okay.
Here’s why you need these cakes:
- The skull shape is automatically creepy and impressive
- That molten center creates genuine wow factor
- They taste like fancy restaurant dessert but cost maybe $2 per serving
- You can prep them ahead and bake right before serving
- Rich enough that one is plenty – perfect portion control
- Kids think they’re cool, adults think they’re sophisticated
Plus these work for people who claim they don’t like “fussy” desserts. There’s no frosting to pipe, no layers to assemble, no decorating skills required. The skull mold does all the visual work for you :/
What You Need for Chocolate Lava Skull Cakes
For the Cakes
This is a straightforward recipe that relies on quality chocolate and proper technique.
Chocolate Base:
- Semi-sweet or dark chocolate (6 oz – use real chocolate, not chips)
- Unsalted butter (½ cup – European style is richer if you have it)
Dry Ingredients:
- All-purpose flour (½ cup)
- Powdered sugar (1 cup)
- Cocoa powder (2 tablespoons – for extra chocolate depth)
- Salt (¼ teaspoon)
Wet Ingredients:
- Large eggs (2 whole)
- Egg yolks (2 additional – this is key for richness)
- Vanilla extract (1 teaspoon)
- Espresso powder (½ teaspoon – optional but amplifies chocolate)
Why these ingredients work: The extra egg yolks create that custardy, molten center. Using real chocolate instead of cocoa powder alone gives you better flavor and texture. And that small amount of flour keeps them structured enough to unmold while staying gooey inside.
Substitutions that work:
- No espresso powder? Skip it, still tastes great
- Gluten-free? Use almond flour or 1:1 GF blend – texture changes slightly but works
- Dairy-free? Use vegan butter and dairy-free chocolate
For the Molds
This is what makes them skulls instead of just regular lava cakes.
- Skull-shaped silicone molds (individual serving size – usually 6-8 per set)
- Or skull-shaped metal molds if you prefer
- Cooking spray or butter for greasing
- Cocoa powder for dusting molds
Critical info: Silicone molds are easier for beginners because you can flex them to release the cakes. Metal molds give sharper details but require more careful greasing. Either works – just make sure they’re individual serving size, not one giant skull.
For Serving and Decoration
- Powdered sugar (for dusting)
- Fresh raspberries or strawberries (the “blood” accompaniment)
- Raspberry or strawberry sauce (drizzle around the plate)
- Whipped cream or vanilla ice cream (cuts the richness)
- Edible gold leaf or silver dust (if you’re feeling fancy)
You can keep it simple or go all out with plating. The skull shape is impressive enough that you don’t need elaborate decorations.
How to Make These Lava Skull Cakes
Step 1: Prep Your Molds
This step matters more than you think. Generously butter or spray your skull molds, getting into all the detail areas. Dust with cocoa powder, tapping out the excess. This coating helps the cakes release cleanly and adds visual depth to the skull details.
Preheat your oven to 425°F. Yes, that’s hot. The high temperature sets the outside quickly while keeping the center molten.
Step 2: Melt the Chocolate and Butter
Combine chopped chocolate and butter in a microwave-safe bowl. Microwave in 30-second bursts, stirring between each, until completely smooth. Usually takes 2-3 cycles total. Don’t rush this or you’ll burn the chocolate.
Let the mixture cool for about 5 minutes – you don’t want it so hot that it cooks the eggs when you add them.
Step 3: Mix the Batter
In a separate bowl, whisk together eggs, egg yolks, and powdered sugar for about 2 minutes until slightly thickened and pale. This step adds air and helps create that perfect texture.
Add vanilla and espresso powder if using. Pour in the cooled chocolate mixture and fold gently until combined.
Sift in flour, cocoa powder, and salt. Fold just until no dry streaks remain. Don’t overmix – you want the batter smooth but you’re not trying to develop gluten here.
The batter will be thick and glossy. If it seems too thick, that’s correct – it needs to hold the skull shape.
Step 4: Fill Those Skulls
Divide batter evenly among your prepared molds, filling them about ¾ full. The cakes will rise slightly but not dramatically – you want enough room for expansion without overflow.
Tap the molds gently on the counter to release any air bubbles. This prevents holes in your finished skulls.
Step 5: The Crucial Bake
Bake for 12-14 minutes. This timing is critical. The edges should be set and pulling away slightly from the molds. The centers should still jiggle when you gently shake the pan.
Here’s the thing: Underbaking is better than overbaking. Underbaked = molten center (the goal). Overbaked = solid chocolate cake (fine but not lava cake).
Every oven is different, so watch carefully. When in doubt, pull them at 12 minutes. You can always bake longer but you can’t un-bake.
Step 6: The Nerve-Wracking Unmold
Let the cakes cool in the molds for exactly 1 minute. Not longer – they’ll stick. Not shorter – they’ll fall apart.
Place a serving plate upside down over each mold. Flip quickly and confidently. Let gravity do the work. If using silicone molds, you can gently flex the edges to help release.
The skull should slide out cleanly with all the details intact. If one sticks, gently wiggle the mold – don’t force it or the skull will break.
Step 7: Serve Immediately
These chocolate lava skull cakes are best served warm, within 5 minutes of unmolding. Dust with powdered sugar for contrast against the dark chocolate.
When you cut into them or break them open, that molten center should ooze out. That’s the money shot everyone’s waiting for. Serve with raspberry sauce pooled around the skull like blood, or fresh berries on the side.
Creative Variations Worth Trying
White Chocolate Ghost Cakes
Use white chocolate instead of dark chocolate. Add a tiny bit of black food coloring to create gray “ghost” cakes. The molten center will be white chocolate ganache – different vibe, equally impressive.
Peanut Butter Lava Skulls
Add 2 tablespoons peanut butter to the chocolate mixture. Or stuff a frozen peanut butter ball in the center before baking for a peanut butter lava core. The peanut butter-chocolate combo is undefeated.
Salted Caramel Center
Place a frozen caramel square in the center of each mold before adding batter. The caramel melts and creates a salted caramel lava center instead of pure chocolate. Next level delicious.
Mint Chocolate Skulls
Add ½ teaspoon mint extract to the batter. Serve with chocolate mint sauce. Tastes like fancy after-dinner mints but in skull form. Works well for more sophisticated Halloween parties.
Orange Chocolate Lava Cakes
Add 1 tablespoon orange zest to the batter. The orange-chocolate combo is subtle and sophisticated. Serve with candied orange peel for extra impact.
Chocolate Lava Skull Cakes
Equipment
- Skull-shaped silicone or metal molds
- Mixing bowls
- Whisk or spatula
- Sifter
- Cooking spray or butter
- Cocoa powder (for dusting)
Ingredients
- 6 oz semi-sweet or dark chocolate (chopped, not chips)
- 0.5 cup unsalted butter
- 0.5 cup all-purpose flour
- 1 cup powdered sugar
- 2 tbsp cocoa powder
- 0.25 tsp salt
- 2 large eggs
- 2 egg yolks
- 1 tsp vanilla extract
- 0.5 tsp espresso powder (optional)
- as needed butter or cooking spray (for molds)
- as needed cocoa powder (for dusting molds)
- optional powdered sugar (for dusting)
- optional raspberry sauce or fresh berries (for serving)
Instructions
- Generously butter or spray your skull molds and dust with cocoa powder, tapping out excess. Preheat oven to 425°F.
- Melt chopped chocolate and butter in 30-second bursts in microwave-safe bowl. Stir until smooth and cool for 5 minutes.
- Whisk eggs, yolks, and powdered sugar until slightly thick and pale. Add vanilla and espresso powder. Stir in cooled chocolate mixture. Sift in flour, cocoa, and salt. Fold just until combined.
- Divide batter evenly into molds, filling about ¾ full. Tap molds gently to remove air bubbles.
- Bake for 12–14 minutes. Edges should be set and centers slightly jiggly. Underbaking is better than overbaking.
- Let cakes cool in molds for exactly 1 minute. Invert onto plates and gently release. Use silicone molds for easier unmolding.
- Serve warm. Dust with powdered sugar and drizzle raspberry sauce or plate with fresh berries for a spooky effect.
Notes
Frequently Asked Questions
My lava cakes came out completely solid – what happened?
You overbaked them. The centers should still jiggle slightly when you pull them from the oven. Try reducing baking time by 1-2 minutes next batch. Remember they continue cooking slightly after you remove them.
Can I make these chocolate lava skull cakes ahead of time?
Yes. Fill the molds and refrigerate unbaked for up to 24 hours. Let them sit at room temperature for 15 minutes before baking. Add 1-2 minutes to baking time since they’ll be cold. Don’t bake ahead – they need to be fresh.
The skulls stuck in the molds and broke apart – how do I prevent this?
You didn’t grease the molds enough, or you waited too long before unmolding. Butter every single crevice of those molds generously. And unmold at exactly 1 minute after removing from oven – timing matters here.
My centers weren’t molten enough – they were just soft cake
You baked them 1-2 minutes too long. The line between molten center and fully baked is thin. Next time pull them when the edges are set but centers still look slightly underdone. They’ll continue cooking as they cool.
Can I use regular muffin tins instead of skull molds?
Sure, but then they’re just regular lava cakes without the Halloween skull aesthetic. The whole point is the creepy skull shape. But functionally yes, any individual mold works – adjust baking time as needed.