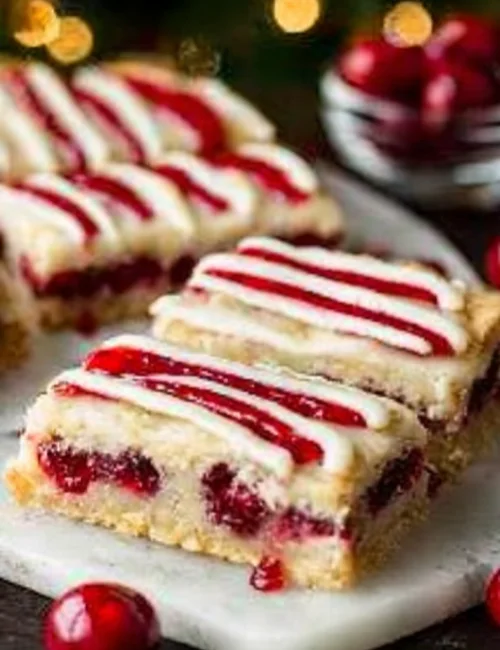
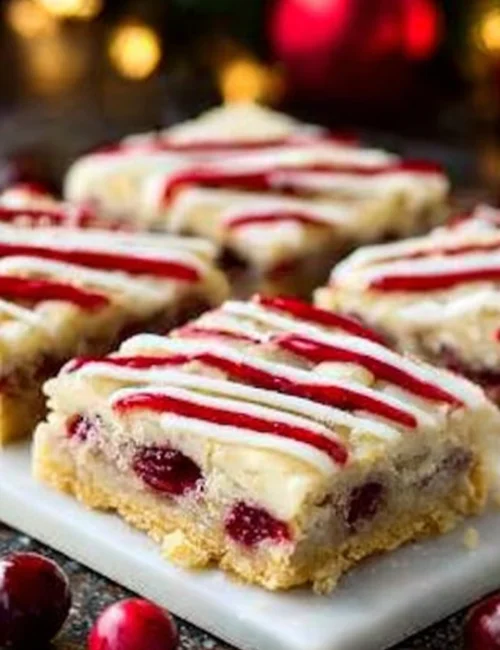
The perfect dessert to bring some cheer to your holiday gatherings is a delightful treat made with cherries. These Christmas cherry bars are sweet, soft, and so easy to make. They warm up any occasion, whether it’s a cozy family dinner or a festive get-together. Your loved ones will appreciate the creamy cherry filling paired with a tender crust.
Why You Will Love This Christmas Cherry Bars
These bars are a hit with children and adults alike, making them a great family-friendly dessert. They are simple to prepare, using everyday ingredients you likely have on hand. With minimal prep and a blissful taste, you’ll find them perfect for the busy holiday season. Plus, who can resist the lovely flavor of cherries paired with a hint of almond?
How to Make Christmas Cherry Bars
Making these cherry bars is straightforward and enjoyable. You start by creating a crumbly crust and baking it to golden perfection. Then, you spread out a generous layer of cherry pie filling, add a drizzle of sweet glaze, and bake it all again. It’s as simple as that!
What You Need
- 1 cup unsalted butter, softened
- 1/2 cup granulated sugar
- 2 cups all-purpose flour
- 1/4 teaspoon salt
- 1 can (21 oz) cherry pie filling
- 1/2 teaspoon almond extract
- 1 cup powdered sugar
- 2-3 tablespoons milk
- 1/2 teaspoon almond extract (for glaze)
Step-by-Step
- Preheat your oven to 350°F (175°C). Grease a 9×9 inch baking pan.
- In a large bowl, cream together the softened butter and granulated sugar until smooth.
- Gradually mix in the flour and salt until the mixture is crumbly.
- Press the mixture into the bottom of the prepared pan to form a crust.
- Bake for 15-20 minutes or until the edges are golden.
- Remove from the oven and spread the cherry pie filling evenly over the crust.
- In another bowl, combine powdered sugar, milk, and almond extract to make a glaze. Drizzle over the cherry filling.
- Bake again for another 15-20 minutes.
- Allow to cool before cutting into squares and serving.
How to Serve Christmas Cherry Bars
These bars are best enjoyed at room temperature and are delightful on their own. You can add a scoop of vanilla ice cream for that extra creamy touch, or serve them with a mug of warm cocoa. They’re perfect for holiday parties, family gatherings, or just a cozy night in.
How to Store Christmas Cherry Bars
To keep your bars fresh, place them in an airtight container in the fridge. They can last for up to a week. If you want to freeze them, cut them into squares and layer them between sheets of wax paper in a freezer-safe container. They’ll stay good for about two months. When ready to eat, let them thaw in the fridge or room temperature.
Recipe Tips
- Use softened butter for easy mixing.
- Don’t skip the almond extract; it adds a lovely flavor.
- Make sure the crust is golden before adding the cherry filling.
- Allow the bars to cool completely before cutting for neat squares.
- Feel free to use other fruit pie fillings if you want a different flavor.
Variations & Swaps
- Substitute cherry pie filling with blueberry or peach for a different fruit taste.
- Make it gluten-free by using almond flour or a gluten-free flour blend.
- For a chocolate twist, stir some cocoa powder into the crust mixture.
FAQs
Can I make these bars ahead of time?
Yes, you can prepare these bars a day in advance. Just store them in the fridge and serve them at room temperature. They taste just as good the next day!
Can I freeze these cherry bars?
Absolutely! Once cooled, cut the bars and wrap them individually. Store them in a freezer-safe container for up to two months. Thaw them before serving for the best taste.
What should I do if my glaze is too thick?
If your glaze turns out too thick, simply add more milk a tablespoon at a time until you reach your desired consistency. Drizzle it over the cherry filling for that delightful touch.
What can I serve with these bars?
They are lovely on their own but pair wonderfully with whipped cream or a scoop of ice cream. A sprinkle of powdered sugar on top also makes them extra special.
Are there common mistakes I should avoid?
One common mistake is overbaking the crust. Keep an eye on it, as a golden edge is what you want. Also, remember to let the bars cool fully before cutting to avoid messy squares.
Christmas Cherry Bars
Ingredients
For the crust
- 1 cup unsalted butter, softened Use softened for easy mixing.
- 1/2 cup granulated sugar
- 2 cups all-purpose flour
- 1/4 teaspoon salt
For the filling
- 1 can 21 oz cherry pie filling
For the glaze
- 1 cup powdered sugar
- 2-3 tablespoons milk Adjust to achieve desired glaze consistency.
- 1/2 teaspoon almond extract For glaze
Flavoring
- 1/2 teaspoon almond extract Adds a lovely flavor.
Instructions
Preparation
- Preheat your oven to 350°F (175°C). Grease a 9×9 inch baking pan.
- In a large bowl, cream together the softened butter and granulated sugar until smooth.
- Gradually mix in the flour and salt until the mixture is crumbly.
- Press the mixture into the bottom of the prepared pan to form a crust.
- Bake for 15-20 minutes or until the edges are golden.
Assembly
- Remove from the oven and spread the cherry pie filling evenly over the crust.
- In another bowl, combine powdered sugar, milk, and almond extract to make a glaze. Drizzle over the cherry filling.
- Bake again for another 15-20 minutes.
- Allow to cool before cutting into squares and serving.