
You know that moment when your craving for chicken tenders hits hard, but you’re staring at your oven wondering if you can actually make something that doesn’t taste like cardboard? Yeah, I’ve been there too. The good news? Crispy baked chicken tenders aren’t just possible—they’re absolutely game-changing when you know what you’re doing.
I used to be the person who thought baked chicken was synonymous with “boring and dry.” Boy, was I wrong. After countless kitchen experiments (and a few disasters I don’t like to talk about), I’ve cracked the code on getting that perfect golden crunch without drowning everything in oil.
Why Baked Beats Fried Every Time
Look, I get it. Fried chicken tenders have that nostalgic appeal—crispy, indulgent, and undeniably delicious. But here’s the thing: baked chicken tenders can be just as crispy without leaving you feeling like you need a nap afterward.
When you bake chicken tenders properly, you’re getting all the satisfaction with none of the guilt. No messy oil splatters on your stovetop, no wondering if you’re slowly poisoning yourself with reused frying oil, and definitely no standing over a hot stove feeling like you’re in a sauna.
The secret lies in understanding how heat circulation works in your oven. Ever notice how convection ovens produce crispier results? That’s because moving air helps moisture evaporate from the surface, creating that coveted crunch we’re all after.
The Health Factor (Without Being Preachy)
I’m not here to lecture you about calories—we’re all adults here. But the reality is that baked chicken tenders use significantly less oil than their fried counterparts. You’re talking about maybe a tablespoon of oil versus cups of the stuff.
Plus, you control exactly what goes into your coating. No mystery ingredients, no preservatives you can’t pronounce, just real food that actually tastes good.

The Science Behind the Perfect Crisp
Want to know why some people nail crispy baked chicken while others end up with soggy disappointment? It’s all about moisture management and heat distribution.
When you coat chicken in breadcrumbs or flour, you’re essentially creating a barrier. The trick is making sure that barrier gets hot enough to form a crust while the inside stays juicy. Sounds simple, right? Well, it would be if everyone didn’t mess up the fundamentals.
Temperature Matters More Than You Think
Most people bake their chicken tenders at around 375°F and wonder why they’re not getting restaurant-quality results. Here’s what I learned the hard way: 425°F is your sweet spot. This higher temperature creates rapid moisture evaporation on the surface while keeping the interior from overcooking.
The math is pretty straightforward—higher heat means faster crust formation, which means less time for the chicken to dry out. It’s like the difference between a quick sear and a slow braise, except we’re talking about coating texture.
Essential Ingredients for Maximum Crispiness
You don’t need a grocery list longer than your arm to make incredible baked chicken tenders. But the ingredients you do choose? They matter more than you might think.
The Chicken Itself
Start with chicken tenderloins if you can find them. They’re literally designed for this purpose—uniform thickness, naturally tender, and they cook evenly. If you’re stuck with chicken breasts, just slice them into strips about ¾ inch thick.
Fresh chicken always beats frozen when it comes to texture. Frozen chicken releases more moisture as it cooks, which can sabotage your crispy coating efforts. Trust me on this one—I’ve learned from experience 🙂
Building the Perfect Coating System
This is where most people either shine or completely fail. You need three stations:
• Flour Station: All-purpose flour seasoned with salt, pepper, and garlic powder • Egg Station: Beaten eggs (sometimes I add a splash of buttermilk for extra tang) • Coating Station: This is where the magic happens
For the coating, I’ve experimented with everything from crushed cornflakes to panko breadcrumbs. Here’s what actually works:
Panko breadcrumbs mixed with regular breadcrumbs give you the best texture. Panko provides those big, crunchy pieces while regular breadcrumbs fill in the gaps. Add some grated Parmesan cheese if you’re feeling fancy—the cheese helps with browning and adds another layer of flavor.
The Step-by-Step Process That Actually Works
Ready for the part where I walk you through exactly how to make these? No fluff, no unnecessary steps, just the method that’s never failed me.
Prep Work (Don’t Skip This Part)
Pat your chicken completely dry with paper towels. I mean completely—any surface moisture is going to steam instead of crisp. Season the chicken strips with salt and let them sit for 15 minutes. This draws out even more moisture and helps the coating stick better.
Preheat your oven to 425°F and line a baking sheet with parchment paper. Some people use aluminum foil, but parchment prevents sticking better and promotes more even browning.
The Coating Process
Set up your three stations in order: flour, egg, coating. Work with one piece at a time and don’t rush this part. Seriously, this is where patience pays off.
- Dredge in flour: Shake off excess—you want a light, even coating
- Dip in egg: Let excess drip off
- Press into breadcrumb mixture: Really press it in there. The coating should stick to the chicken, not fall off when you pick it up
Place each coated tender on your prepared baking sheet, making sure they don’t touch each other. Overcrowding leads to steaming, and steaming is the enemy of crispy.
The Baking Magic
Here’s a trick most people don’t know: lightly spray or brush the tops with oil before baking. This helps the coating brown and crisp up beautifully. You’re not deep-frying here, just giving the surface a little help.
Bake for 15-20 minutes, flipping once halfway through. You’ll know they’re done when they hit 165°F internal temperature and the coating is golden brown and crispy.
Common Mistakes That Kill Your Crispiness
I’ve made every mistake in the book, so let me save you some frustration. These are the things that separate amazing baked chicken tenders from mediocre ones.
The Moisture Trap
Using wet chicken is mistake number one. I don’t care how much of a hurry you’re in—pat that chicken dry and season it ahead of time. The salt draws out moisture, which is exactly what you want.
Coating Crimes
Too much flour in your dredging station creates a gummy coating. Eggs that are too thick (or have shells in them—we’ve all been there) don’t coat evenly. And breadcrumbs that are too fine won’t give you the texture you’re looking for.
Temperature Troubles
Baking at too low a temperature is like trying to toast bread on the “barely warm” setting. You’ll get cooked chicken, sure, but you won’t get that satisfying crunch that makes the whole effort worthwhile.
Flavor Variations That’ll Blow Your Mind
Once you’ve mastered the basic technique, you can get creative with seasonings and coatings. The world is your oyster—or in this case, your chicken tender.
Spicy Options
Add cayenne pepper and paprika to your flour mixture for heat. Mix some hot sauce into your egg wash for extra kick. Or go full nuclear and add crushed red pepper flakes to your breadcrumb coating.
International Vibes
Italian-style: Add dried herbs like oregano and basil to your coating, plus extra Parmesan cheese Asian-inspired: Mix some sesame seeds and a touch of garlic powder into your breadcrumbs Southern comfort: Add a little buttermilk to your egg wash and some paprika to everything
The Unexpected Winners
Crushed pretzels make an incredible coating—salty, crunchy, and totally unexpected. Cereal like cornflakes or even crushed crackers can work too. I’ve even experimented with crushed nuts (hello, pecan-crusted chicken tenders).
Serving and Storage Tips
You’ve just made the perfect batch of crispy baked chicken tenders. Now what? How you serve and store them can make or break the whole experience.
Serving Immediately
The absolute best way to eat these is straight from the oven when they’re still crispy and hot. But life doesn’t always work that way, does it?
If you need to keep them warm, place them on a wire rack in a 200°F oven. This prevents the bottoms from getting soggy while maintaining that crispy texture.
Storage and Reheating
Leftover chicken tenders (if there are any) can be stored in the refrigerator for up to 3 days. The key to reheating is using your oven, not the microwave. FYI, microwaving will turn your crispy coating into rubber faster than you can say “food waste.”
Reheat at 375°F for about 5-8 minutes, or until they’re heated through and the coating crisps back up.
Why This Method Works Better Than Others
I’ve tried every technique out there—from double-breading to using mayonnaise instead of eggs (don’t ask). This method consistently produces the crispiest, most flavorful results because it focuses on the fundamentals that actually matter.
The higher baking temperature creates rapid surface dehydration, which is essential for crispiness. The three-step coating process ensures maximum adhesion and coverage. And the combination of breadcrumb types gives you both texture and structural integrity.
Most importantly, this method is foolproof once you understand the principles. You’re not relying on timing or luck—you’re using science to get consistent results every time.
The Final Verdict
Look, I could tell you that making crispy baked chicken tenders is rocket science, but that would be doing you a disservice. It’s not complicated—it just requires attention to detail and understanding why each step matters.
The difference between good and great baked chicken tenders comes down to moisture control, proper coating technique, and the right temperature. Master those three things, and you’ll never order delivery chicken tenders again.
So next time someone tells you that baked chicken can’t compete with fried, just smile and invite them over for dinner. Because once they taste what you can do with an oven and some basic technique, they’ll be asking for your recipe. And honestly? That’s the best compliment any home cook can get 🙂

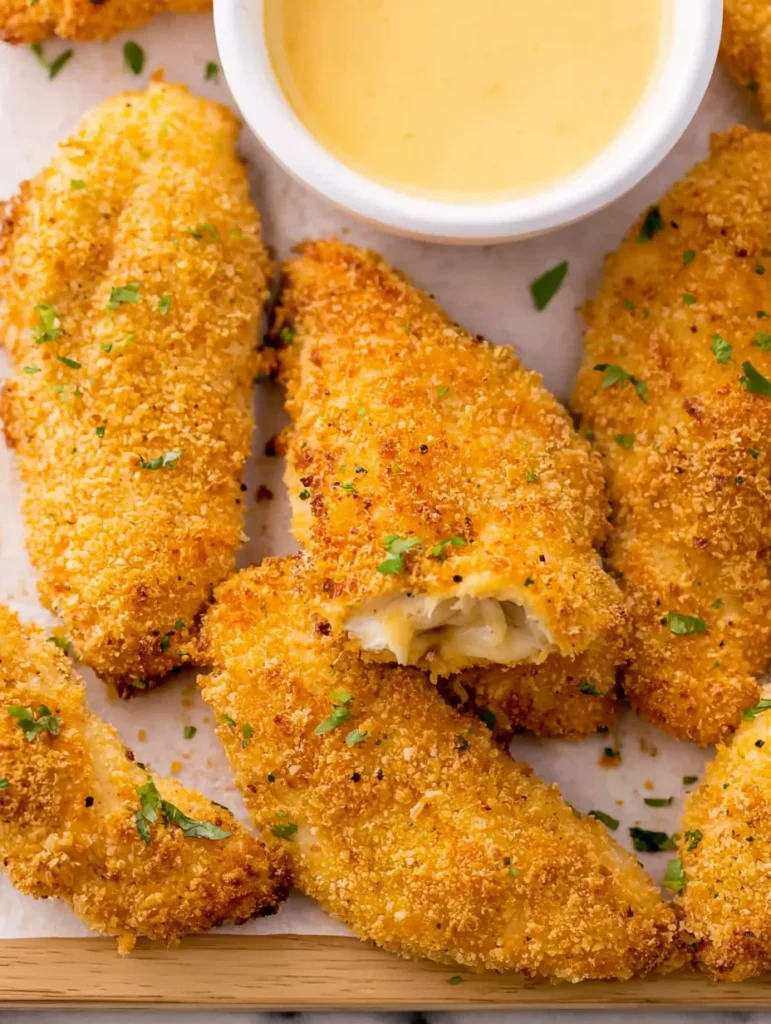
Crispy Baked Chicken Tenders
Equipment
- Baking sheet
- Parchment paper
- Mixing bowls
- Tongs
- Wire rack (optional)
- Oven
Ingredients
- 1 ½ lbs chicken tenderloins or chicken breasts sliced into strips
- 1 cup all-purpose flour
- 1 tsp salt
- ½ tsp black pepper
- 1 tsp garlic powder
- 2 large eggs
- Optional: 1 tbsp buttermilk
- ¾ cup panko breadcrumbs
- ¼ cup regular breadcrumbs
- ¼ cup grated Parmesan cheese
- Cooking spray or oil for brushing
Instructions
- Preheat oven to 425°F (220°C). Line a baking sheet with parchment paper.
- Pat chicken dry with paper towels. Season with salt and let rest for 15 minutes.
- Set up your coating stations:
- Bowl 1: Flour mixed with salt, pepper, garlic powder
- Bowl 2: Beaten eggs (add buttermilk if using)
- Bowl 3: Panko + regular breadcrumbs + Parmesan
- Dredge each chicken piece in flour, then dip in egg, then press into breadcrumb mix. Ensure coating sticks well.
- Place coated tenders on the baking sheet, spaced apart.
- Lightly spray or brush tops with oil.
- Bake for 15-20 minutes, flipping halfway, until golden and internal temp reaches 165°F (74°C).
- Serve hot for best crispiness.


One Comment