Look, I’m not gonna sugarcoat this – most Halloween brownies are basic. Someone throws orange sprinkles on a box mix and calls it festive. Or they add so much food coloring that your tongue turns colors for three days. It’s lazy and honestly kind of insulting to Halloween.
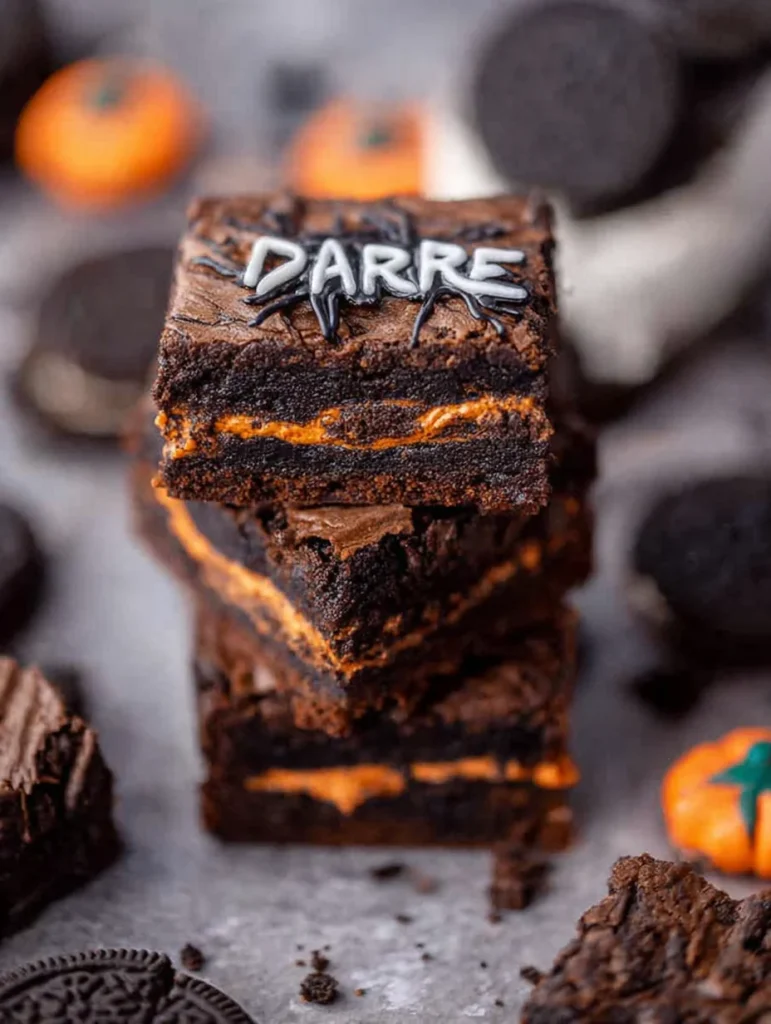
Then I discovered Halloween Oreo brownies and my whole perspective changed. We’re talking fudgy, rich brownies with whole Oreos baked inside, topped with a cookies and cream layer that’s both creepy and delicious. I brought these to work last Halloween and my boss literally hid two in her desk drawer for later. When your boss is hoarding your brownies, you know you’ve made something worth talking about.

The best part? They’re stupidly easy to make but look like you spent all day on them. The Oreos stay crunchy in the middle, the brownie stays fudgy, and the topping can be decorated however your creative brain wants. Plus they cut into perfect squares that don’t fall apart when you try to serve them, which is more than I can say for most homemade brownies.
Why These Oreo Brownies Beat Regular Halloween Treats
Ever notice how Halloween desserts are either too complicated or too boring? Like, you’re either making a three-tier spiderweb cake that requires engineering knowledge, or you’re just adding orange frosting to something and hoping for the best. These Oreo brownies hit that perfect middle ground.
I made these for my nephew’s Halloween party last year. He’s eleven and brutally honest about everything – if food isn’t good, he’ll tell you to your face. He ate three of these brownies, asked if I could make them for his birthday (in March), and told his friends I was “actually a really good cook.” From an eleven-year-old boy, that’s basically a Michelin star.
Here’s why you’re gonna want these in your life:
- Oreos make everything better, this is just facts
- The brownie base is legitimately fudgy, not cakey
- They look impressive without requiring artistic talent
- You can customize the toppings for different spooky themes
- They feed a crowd – one 9×13 pan serves like 20 people
- They actually taste better the next day after the flavors meld
Plus these work for people who claim they’re “not really dessert people.” The Oreos add texture that makes them more interesting than regular brownies. My friend who only eats fruit for dessert tried one of these and ended up taking four home in a ziplock bag :/
What You Need for Halloween Oreo Brownies
For the Brownie Base
Don’t even think about using a box mix here. Homemade takes like five extra minutes and tastes infinitely better.
Chocolate Components:
- Unsalted butter (¾ cup – use the good stuff)
- Semi-sweet chocolate chips (1½ cups – divided)
- Cocoa powder (½ cup – Dutch-processed for deeper color)
Dry Ingredients:
- All-purpose flour (¾ cup – not too much or they get cakey)
- Salt (½ teaspoon)
- Baking powder (¼ teaspoon – tiny amount for slight lift)
Wet Ingredients:
- Granulated sugar (1 cup)
- Light brown sugar (½ cup – adds moisture)
- Large eggs (3 – room temperature)
- Vanilla extract (2 teaspoons)
- Espresso powder (1 teaspoon – optional but amplifies chocolate)
Why these ingredients matter: The combination of melted chocolate and cocoa powder gives you maximum chocolate flavor. Brown sugar keeps them chewy instead of dry. And that espresso powder? Nobody tastes coffee, but it makes the chocolate taste more intense. Science is cool sometimes.
Substitutions that work:
- No espresso powder? Skip it, brownies still work
- Want them gluten-free? Use 1:1 GF flour blend
- Dairy-free? Use vegan butter and dairy-free chocolate chips
For the Oreo Layer
This is non-negotiable. Regular Oreos or Halloween Oreos both work.
- Oreo cookies (1 package – about 36 cookies)
- Save some for topping decoration
- Halloween Oreos have orange filling which looks cool but tastes identical
Critical info: Don’t use Double Stuf Oreos for the layer that goes in the brownies. Too much cream filling makes them soggy. Regular Oreos hold up better during baking. But you can absolutely use Double Stuf for the topping if you want.
For the Cookies and Cream Topping
This is where you can get creative with the Halloween theme.
- Cream cheese (8 oz – full-fat, softened)
- Powdered sugar (2 cups)
- Heavy cream or milk (2-3 tablespoons)
- Crushed Oreos (½ cup)
- Orange and black gel food coloring
- Extra whole or broken Oreos for decoration
- Candy eyes, gummy worms, whatever spooky stuff you want
Why cream cheese topping works: It’s stable enough to spread easily but rich enough to taste good. Buttercream is too sweet with brownies. Ganache is too heavy. Cream cheese frosting is the Goldilocks option – just right.
Equipment You Actually Need
- 9×13 inch baking pan
- Parchment paper (life-changing for removal)
- Microwave-safe bowl
- Electric mixer or strong arms
- Offset spatula for spreading
- Sharp knife for cutting (warm it under hot water first)
How to Make These Halloween Brownies
Step 1: Prep Your Pan and Oven
Preheat oven to 350°F. Line your 9×13 pan with parchment paper, leaving overhang on two sides. This creates handles for lifting out the brownies later – trust me, this makes serving so much easier.
Spray the parchment lightly with cooking spray. Some people skip this step and regret it when brownies stick.
Step 2: Make the Brownie Batter
Melt butter and 1 cup chocolate chips together in the microwave – 30 second bursts, stirring between each. Don’t rush this or you’ll burn the chocolate and have to start over. Ask me how I know.
Once melted and smooth, stir in both sugars. The mixture will look grainy and weird – that’s completely normal. Let it cool for about 5 minutes so you don’t scramble the eggs in the next step.
Add eggs one at a time, stirring well after each. The batter should get glossy and thick. Add vanilla and espresso powder if using. In a separate bowl, whisk together flour, cocoa powder, salt, and baking powder.
Fold dry ingredients into wet ingredients until just combined. Don’t overmix – stop when you don’t see dry flour anymore. Fold in remaining ½ cup chocolate chips.
Step 3: Layer in Those Oreos
Pour about half the brownie batter into your prepared pan, spreading it evenly. This is your base layer.
Arrange whole Oreos on top in rows – you should fit about 20-24 cookies depending on how tight you pack them. They can touch each other, that’s fine. Press them down slightly into the batter.
Pour remaining brownie batter over the Oreos, spreading carefully to cover them. Some Oreos might peek through – that’s totally okay and actually looks cool when baked.
Step 4: Bake These Bad Boys
Bake for 30-35 minutes. They’re done when a toothpick inserted between Oreos comes out with moist crumbs, not wet batter. The Oreo sections will seem slightly underdone – that’s correct because the cookies create air pockets.
Critical step: Let them cool completely in the pan before adding topping. Warm brownies melt cream cheese frosting into a runny mess. Give it at least 2 hours or stick the pan in the fridge for 1 hour if you’re impatient like me.
Step 5: Make the Cream Cheese Topping
Beat softened cream cheese and powdered sugar together for 2-3 minutes until fluffy. Add heavy cream one tablespoon at a time until you get spreadable consistency – you might not need all 3 tablespoons.
Divide the frosting into bowls for coloring. Make one orange, one black, leave one white. Or do purple and green, or whatever Halloween colors you want. Mix crushed Oreos into the white portion for that cookies and cream effect.
Step 6: Decorate Like It’s Halloween
Spread your colored frostings on top of the cooled brownies however you want. I like doing orange as the base layer, then adding black and white dollops to swirl through. Some people pipe stripes or spiderwebs. There’s no wrong answer here.
Decoration ideas:
- Press whole Oreos into the frosting at angles so they look like tombstones
- Add candy eyes randomly for a creepy effect
- Use black frosting to pipe spiderwebs
- Stick gummy worms coming out of the frosting
- Crush orange Oreos on top for texture
- Add Halloween sprinkles if you’re feeling basic (no shame)
Get creative or keep it simple – these Halloween Oreo brownies look good either way, IMO.
Step 7: Chill and Cut
Refrigerate for at least 30 minutes to let the frosting set. Use the parchment overhang to lift the entire brownie slab out of the pan onto a cutting board.
Wipe your knife clean between cuts for neat edges. I usually get 20-24 squares depending on how generous I’m feeling. Smaller squares if it’s a big party, bigger squares if it’s just family.
Creative Variations Worth Trying
Mint Oreo Halloween Brownies
Use mint Oreos instead of regular. Add ½ teaspoon mint extract to the brownie batter. Color the frosting green and black for a different Halloween vibe. The mint-chocolate combo is undefeated.
Peanut Butter Oreo Brownies
Use peanut butter Oreos and add ½ cup peanut butter to the brownie batter. The peanut butter-chocolate-cookie combination is honestly better than the original but people get weirdly defensive about it.
S’mores Oreo Halloween Treats
Add mini marshmallows and graham cracker pieces to the batter. Use regular Oreos or chocolate cream Oreos. Toast marshmallows on top with a kitchen torch before serving for drama.
Red Velvet Oreo Brownies
Use red velvet Oreos and add red food coloring to the batter. Top with cream cheese frosting (hold the Oreo crumbs). Draw spooky designs with black frosting. Different aesthetic, still Halloween appropriate.
White Chocolate Oreo Brownies
Use Golden Oreos and white chocolate chips instead of semi-sweet. Add white chocolate to the topping too. Ghost-themed decorations work better with the lighter color scheme.
Cookies and Cream Cheesecake Brownies
Double the cream cheese layer and bake it on top of the Oreo layer before adding the top brownie layer. Basically you’re making brownie-Oreo-cheesecake-brownie layers. Extra work but absolutely worth it for special occasions.
Frequently Asked Questions
My brownies came out cakey instead of fudgy – what happened?
You either overbaked them or used too much flour. Brownies continue cooking as they cool, so pull them when the toothpick has moist crumbs, not when it’s clean. Also make sure you’re measuring flour correctly – spoon it into the cup, don’t scoop.
Can I make these Halloween Oreo brownies ahead of time?
Yes. Make them 1-2 days ahead and store covered in the fridge. They actually taste better after sitting because the Oreos soften slightly and the flavors blend. Don’t add decorative toppings until the day you’re serving – candy eyes and gummy worms get weird after sitting in frosting overnight.
The Oreos sank to the bottom instead of staying in the middle – why?
Your bottom brownie layer was probably too thin. Make sure you’re using half the batter underneath the Oreos. Also press the Oreos down gently so they nestle into the batter rather than sitting on top. They should be partially submerged.
Can I use a different size pan?
You can use an 8×8 pan but the brownies will be super thick and need longer baking time – check at 40 minutes. A larger pan makes thinner brownies that bake faster. The 9×13 is really ideal for the right thickness-to-Oreo ratio.
Do I have to use cream cheese frosting or can I use something else?
You can use buttercream or even just melted chocolate. Cream cheese frosting tastes better with the richness of brownies, but buttercream is easier to work with if you’re doing elaborate piping. Ganache is too heavy and makes everything too rich, honestly.
How do I store leftover Oreo brownies?
Keep them in an airtight container in the fridge for up to 5 days. The cream cheese frosting needs to stay cold. Bring to room temperature for 15-20 minutes before eating if you prefer them less chilled. You can also freeze unfrosted brownies for up to 3 months.
Can I make these without the Oreo layer?
Sure, but then they’re just regular brownies with Oreo frosting. The whole Oreos baked into the brownie is what makes these special. If you skip them, you’re basically making a different recipe. But your kitchen, your rules.

Halloween Oreo Brownies
Equipment
- 9×13-inch baking pan
- Parchment paper
- Microwave-safe bowl
- Electric mixer or whisk
- Offset spatula
- Sharp Knife warm under water for clean cuts
Ingredients
- 3/4 cup unsalted butter
- 1 1/2 cups semi-sweet chocolate chips, divided
- 1/2 cup Dutch-processed cocoa powder
- 3/4 cup all-purpose flour
- 1/2 tsp salt
- 1/4 tsp baking powder
- 1 cup granulated sugar
- 1/2 cup light brown sugar
- 3 large eggs, room temperature
- 2 tsp vanilla extract
- 1 tsp espresso powder (optional)
- 1 package regular Oreos (about 36 cookies)
- 8 oz cream cheese, softened
- 2 cups powdered sugar
- 2–3 tbsp heavy cream or milk
- 1/2 cup crushed Oreos (for frosting)
- as needed orange and black gel food coloring
- as needed whole/broken Oreos, candy eyes, gummy worms, Halloween sprinkles
Instructions
- Preheat oven to 350°F. Line a 9×13 pan with parchment and lightly spray with cooking spray.
- Melt butter and 1 cup chocolate chips in microwave. Stir in both sugars, let cool 5 mins. Add eggs one at a time, then vanilla and espresso powder.
- Whisk flour, cocoa, salt, and baking powder. Fold into wet mixture. Stir in remaining ½ cup chocolate chips.
- Spread half of the brownie batter in pan. Arrange whole Oreos in a grid, press gently. Cover with remaining batter and smooth over.
- Bake for 30–35 mins, until toothpick between Oreos has moist crumbs. Cool completely before frosting.
- Beat cream cheese and powdered sugar 2–3 mins. Add cream to loosen. Divide and color as desired. Mix crushed Oreos into white portion.
- Spread frosting over cooled brownies. Decorate with Oreos, eyes, candy, or frosting designs. Chill 30 mins to set.
- Lift brownies using parchment, cut with a warm knife. Wipe blade between slices. Serve at room temp.
Notes
My Final Thoughts on These Brownies
I’ve made probably fifty different brownie recipes over the years. Brownies with nuts, brownies with caramel, brownies with cream cheese swirls, those fancy espresso brownies that require tempering chocolate. They were all fine. Some were even great.
But these Halloween Oreo brownies are the ones I make multiple times every October. They’re the ones my friends specifically request. They’re the ones that made my normally picky sister-in-law admit that maybe I do know how to bake after all.
Last Halloween I made a double batch because I knew one pan wouldn’t be enough. I hid the second pan in the garage fridge thinking I’d bring it out later. My husband found them within two hours and ate four before I caught him. The man has a brownie radar, I swear.
What makes these brownies work is they don’t try to be something they’re not. They’re not pretending to be health food or trying to be fancy French pastry. They’re just really good brownies with Oreos in them, dressed up for Halloween. Sometimes the simple approach is the best approach.
Make these for your Halloween party and watch them disappear before the pizza. Make them for yourself and eat them straight from the pan while watching scary movies. Make them to bribe someone – it’ll work, I’ve used this tactic successfully multiple times.
Just make them, because eating plain brownies on Halloween when you could be eating Oreo-stuffed brownies with cookies and cream frosting is honestly kind of sad. Your October dessert situation is about to get significantly better.
Now go create some brownie magic and prepare for people to ask if you own a bakery. The answer is no, you just followed a recipe and let chocolate do its thing. But you don’t have to admit that these only took like 45 minutes of actual work 🙂