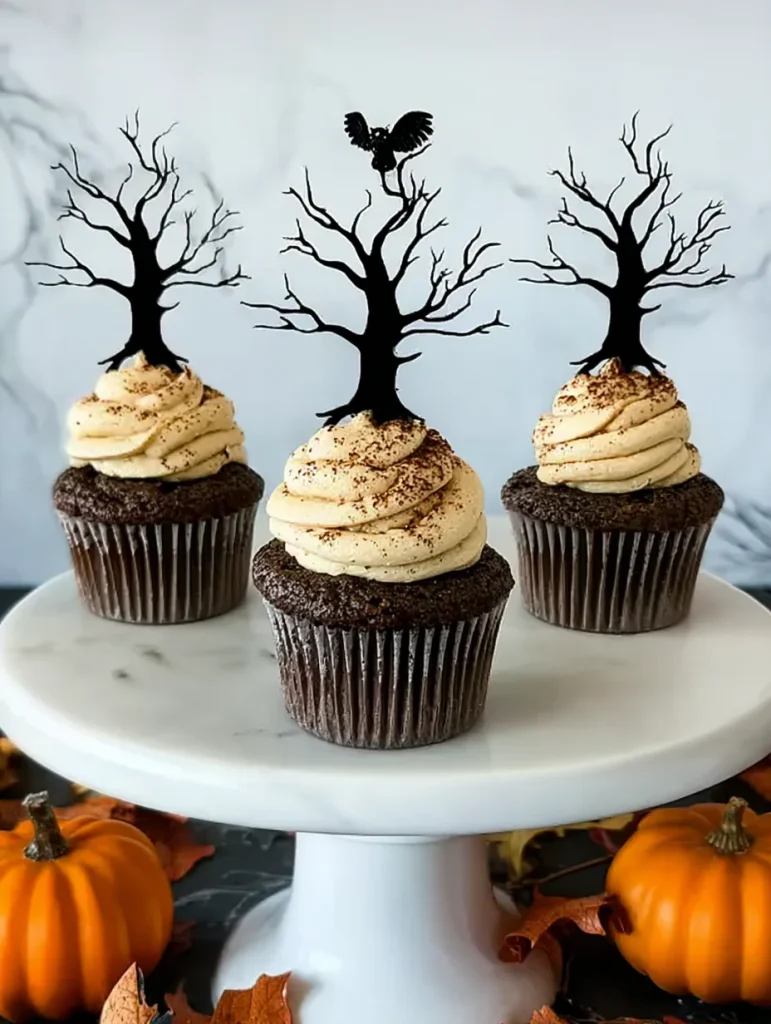
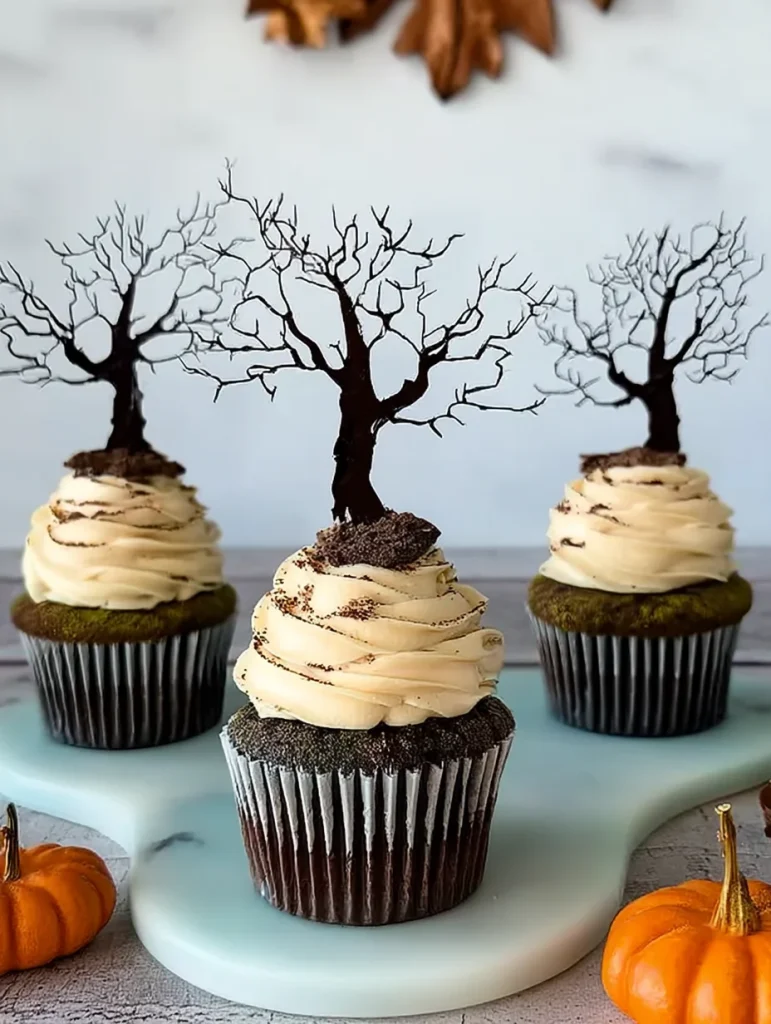
Let me tell you about the time I made haunted forest cupcakes and people thought I’d hired a professional decorator. These are chocolate cupcakes topped with green frosting, cookie “dirt,” and little pretzel trees that look like a creepy forest scene. I made them for a Halloween party last year and overheard someone say “whoever made these must have so much time on their hands.” I made them during halftime of a football game. Takes maybe an hour total, most of that is baking time.
The genius here is that the decoration looks elaborate but you’re literally just sticking pretzels and cookies in frosting. That’s it. No piping skills, no fondant sculptures, no artistic ability required. You arrange some broken cookies to look like dirt, stick pretzel sticks in to look like dead trees, maybe add a plastic skeleton or candy pumpkin. Boom, haunted forest.
Best part? They actually taste good instead of being all looks and no flavor. Chocolate cupcake, buttercream frosting, crunchy cookie topping – it’s a solid dessert that happens to look like a Halloween scene.
Why These Cupcakes Beat Other Themed Desserts
Most themed cupcakes require frosting skills I simply don’t have. Perfect swirls, smooth surfaces, intricate piping – no thanks. These haunted forest cupcakes bypass all that because the “messy forest floor” aesthetic is the point. Uneven frosting? That’s terrain. Random cookie crumbs? That’s dirt and debris. You literally cannot mess up the decoration because imperfection makes it look more realistic.
I made these for my coworker’s kid’s Halloween party alongside someone who’d made perfect fondant-covered cupcakes that looked like tiny works of art. Mine looked like chaotic forest scenes. Guess which ones the kids went crazy for? The messy, fun ones with stuff sticking out that they could pick off and eat separately. Sometimes “perfectly decorated” is the enemy of “actually fun.”
Here’s why you need these cupcakes:
- The messy decoration is literally the aesthetic – you can’t fail
- Each cupcake becomes a tiny edible scene
- Kids love the interactive element of “forest” toppings
- Actually tastes good, not just Instagram bait
- Customizable – add whatever spooky elements you want
- Way easier than they look
Plus these work for people who think decorated cupcakes are “too much work.” The frosting doesn’t need to be perfect. The decorations are just stuff you stick in. It’s genuinely low-stress decorating :/
What You Need for Haunted Forest Cupcakes
For the Cupcakes
Simple chocolate cupcakes work best – they’re the “dark forest floor” base.
Dry Ingredients:
- All-purpose flour (1½ cups)
- Cocoa powder (½ cup – the darker the better)
- Baking soda (1 teaspoon)
- Baking powder (½ teaspoon)
- Salt (½ teaspoon)
Wet Ingredients:
- Granulated sugar (1 cup)
- Vegetable oil (½ cup)
- Large eggs (2)
- Buttermilk (¾ cup)
- Hot coffee or water (½ cup – makes chocolate deeper)
- Vanilla extract (1 teaspoon)
Why these ingredients work: Oil keeps cupcakes moist longer than butter. Hot liquid blooms the cocoa for intense chocolate flavor. Simple recipe that delivers actual chocolate taste, not just brown cake.
For the “Forest Floor” Frosting
Green buttercream creates the mossy forest floor look.
- Unsalted butter (1 cup – softened)
- Powdered sugar (4 cups)
- Heavy cream (3-4 tablespoons)
- Vanilla extract (2 teaspoons)
- Green gel food coloring (for forest floor color)
- Brown gel food coloring (optional for dirt patches)
Critical info: Make the green darker and more muted, not bright lime. You want forest floor moss, not artificial grass. Mix in a tiny bit of brown or gray to tone down the brightness.
For the Forest Scene Decorations
This is where the magic happens with minimal effort.
Trees:
- Pretzel sticks or rods (the “dead trees”)
- Pocky sticks (chocolate-covered pretzel sticks work too)
- Pirouette cookies (rolled wafer cookies look like logs)
Ground Cover:
- Crushed Oreos (the dirt and rocks)
- Crushed chocolate graham crackers (more dirt)
- Green coconut flakes (moss effect)
- Crushed chocolate cookies (general ground debris)
Spooky Elements:
- Candy pumpkins (mini ones)
- Plastic skeletons or bones (tiny Halloween decorations)
- Candy ghosts or bats
- Milano cookies (tombstones if you break them in half)
- Gummy worms (peeking out of the dirt)
You don’t need all of these – pick 4-5 elements and work with those.
Equipment You Actually Need
- Muffin tin and cupcake liners (brown or black look best)
- Mixing bowls
- Electric mixer for frosting
- Piping bag or knife for frosting
- Small bags for crushing cookies
How to Make Haunted Forest Cupcakes
Step 1: Bake the Cupcakes
Preheat oven to 350°F. Line muffin tin with cupcake liners – brown or black liners enhance the forest aesthetic.
Mix all dry ingredients in one bowl. Whisk all wet ingredients in another. Pour wet into dry and stir just until combined. Don’t overmix or you’ll get tough cupcakes.
Fill liners ⅔ full. Bake 18-20 minutes until toothpick comes out clean. Cool completely before frosting – warm cupcakes make frosting melt into soup.
Step 2: Make the Green Frosting
Beat softened butter for 2 minutes until fluffy. Add powdered sugar one cup at a time, beating between additions. Add vanilla and heavy cream, beat on high for 3 minutes until light and fluffy.
Add green food coloring gradually. You want mossy forest green, not bright green. Start with a small amount and add more until you get an earthy, muted green tone. Mix in a tiny drop of brown or gray to make it look more natural and less artificial.
If making “dirt patches,” separate some frosting and tint it brown before filling your piping bag.
Step 3: Frost the Cupcakes
Spread or pipe frosting onto each cooled cupcake. You don’t need perfect swirls – uneven, textured frosting actually looks more like terrain. Use a knife or offset spatula to create peaks and valleys in the frosting.
Some cupcakes can be all green, some can have brown dirt patches mixed in. Variety makes the forest scene more interesting. Think forest floor with patches of moss and exposed dirt.
The frosting should be generous – you need enough to anchor all your decorations.
Step 4: Add the Ground Cover
While frosting is still soft, sprinkle crushed Oreos over the surface to create dirt and rocks. Don’t cover the entire cupcake – leave some green showing through.
Add crushed graham crackers for more dirt texture. If using green coconut flakes for moss, sprinkle them in patches, not uniformly.
Press the crumbs gently into the frosting so they stick but don’t sink completely. You want texture, not a flat surface.
Step 5: Plant Your Forest
Now comes the fun part. Stick pretzel sticks into the frosting at angles to look like bare, dead trees. Group 2-3 pretzels together in some cupcakes, single trees in others. Vary the heights for more realistic forest look.
Add Pocky sticks or Pirouette cookies as fallen logs. Lean them against the pretzel trees or lay them across the cupcake.
Step 6: Add Spooky Elements
Place tiny candy pumpkins at the base of trees. Add small plastic skeletons partially buried in the cookie crumbs. Stick Milano cookie halves upright in the frosting to look like tombstones – you can write “RIP” on them with black frosting if you’re feeling ambitious.
Add gummy worms peeking out of the dirt. Place candy bats or ghosts among the trees. Let plastic spiders crawl across the scene.
Design tip: Not every cupcake needs every element. Some can be simple forest scenes, others can have more spooky decorations. Variety is more interesting than uniformity.
These haunted forest cupcakes look best when each one is slightly different – like walking through different parts of a forest where some areas are creepier than others.
Creative Variations Worth Trying
Graveyard Cupcakes
Focus more on tombstones (Milano cookies) and skeleton decorations. Use gray frosting instead of green. Add “RIP” messages with black gel. Less forest, more cemetery.
Enchanted Forest
Use brighter green frosting and add colorful candy mushrooms, butterfly decorations, edible flowers. Same concept but magical instead of spooky. Works for non-Halloween events too.
Snowy Haunted Forest
Use white frosting for snow-covered ground. Keep the pretzel trees and add white sprinkles for snow. Candy ghosts fit this aesthetic perfectly. Spooky winter forest vibe.
Pumpkin Patch Cupcakes
Orange frosting for pumpkin patch dirt. Cover with crushed graham crackers. Add lots of mini candy pumpkins and green frosting piped as vines. Different seasonal theme, same technique.
Swamp Scene Cupcakes
Dark green-brown frosting. Crushed Oreos for muddy ground. Add gummy frogs, plastic alligators, blue gel piping for water. Swampy instead of forest-y.
Miniature Haunted Forest
Use mini cupcakes and smaller decorations. Toothpicks instead of pretzel sticks for trees. Creates tiny forest scenes perfect for parties where people want bite-sized options.

Haunted Forest Cupcakes
Equipment
- Muffin tin
- Cupcake liners Brown or black preferred
- Mixing bowls
- Electric mixer For buttercream
- Spatula or piping bag For applying frosting
- Small bags or food processor For crushing cookies
Ingredients
- 1½ cups all-purpose flour
- ½ cup cocoa powder (dark preferred)
- 1 tsp baking soda
- ½ tsp baking powder
- ½ tsp salt
- 1 cup granulated sugar
- ½ cup vegetable oil
- 2 large eggs
- ¾ cup buttermilk
- ½ cup hot coffee or water
- 1 tsp vanilla extract
- 1 cup unsalted butter (softened)
- 4 cups powdered sugar
- 3–4 tbsp heavy cream
- 2 tsp vanilla extract (for frosting)
- to tint green gel food coloring
- to tone brown gel coloring (optional)
- as needed pretzel sticks, Pocky, or Pirouette cookies
- as needed crushed Oreos or chocolate graham crackers
- as needed green coconut flakes (optional)
- as needed candy pumpkins, skeletons, gummy worms, etc.
Instructions
- Preheat oven to 350°F. Line muffin tin with dark cupcake liners. Mix dry ingredients in one bowl. In another bowl, whisk sugar, oil, eggs, buttermilk, coffee, and vanilla. Combine wet and dry ingredients just until mixed. Fill liners ⅔ full. Bake 18–20 minutes. Cool completely.
- Beat butter until fluffy. Add powdered sugar gradually. Mix in cream and vanilla. Beat until smooth. Tint with green gel food coloring for mossy forest color — tone down with brown or gray if needed.
- Frost cupcakes with a piping bag or spatula. Texture the surface to resemble terrain — no need for perfect swirls.
- Sprinkle crushed cookies, graham crackers, and optional green coconut onto frosting. Press gently to stick but keep textured look.
- Stick pretzel sticks upright as trees. Add broken Pocky or Pirouettes as logs. Vary angles and height for realism.
- Finish with spooky candy: pumpkins, ghosts, gummy worms, or skeletons. Not every cupcake needs every element — variation is good!
Notes
Frequently Asked Questions
My decorations keep falling over – how do I fix this?
Your frosting is either too soft or too thin. Make sure it’s thick and stable before adding decorations. Refrigerate frosted cupcakes for 10 minutes to firm up the frosting before adding heavy decorations like pretzels.
The crushed cookies are sliding off – why?
You added them after the frosting started setting. Add cookie crumbs while the frosting is still soft and press them gently to help them stick. Once frosting crusts over, crumbs won’t adhere.
Can I make these haunted forest cupcakes ahead of time?
Bake cupcakes 2-3 days ahead and store unfrosted. Make frosting 2 days ahead and refrigerate. Decorate the day you’re serving for best results – some decorations get soft or fall over if assembled too early.
My green frosting looks too bright and fake – how do I fix it?
Add a tiny amount of brown or gray food coloring to mute it. Natural forest green has brown undertones, not pure bright green. Start with a toothpick amount and mix thoroughly.
Where do I find tiny Halloween decorations for the forest scene?
Dollar stores, craft stores, and Amazon sell bags of tiny Halloween decorations. Look for miniature skeletons, pumpkins, and tombstones. Or just use candy and cookies – no plastic decorations needed.
Do the pretzel trees get soggy in the frosting?
Eventually yes, after 12-24 hours. These are best made and served the same day. If you need to make ahead, add the pretzel decorations right before serving.