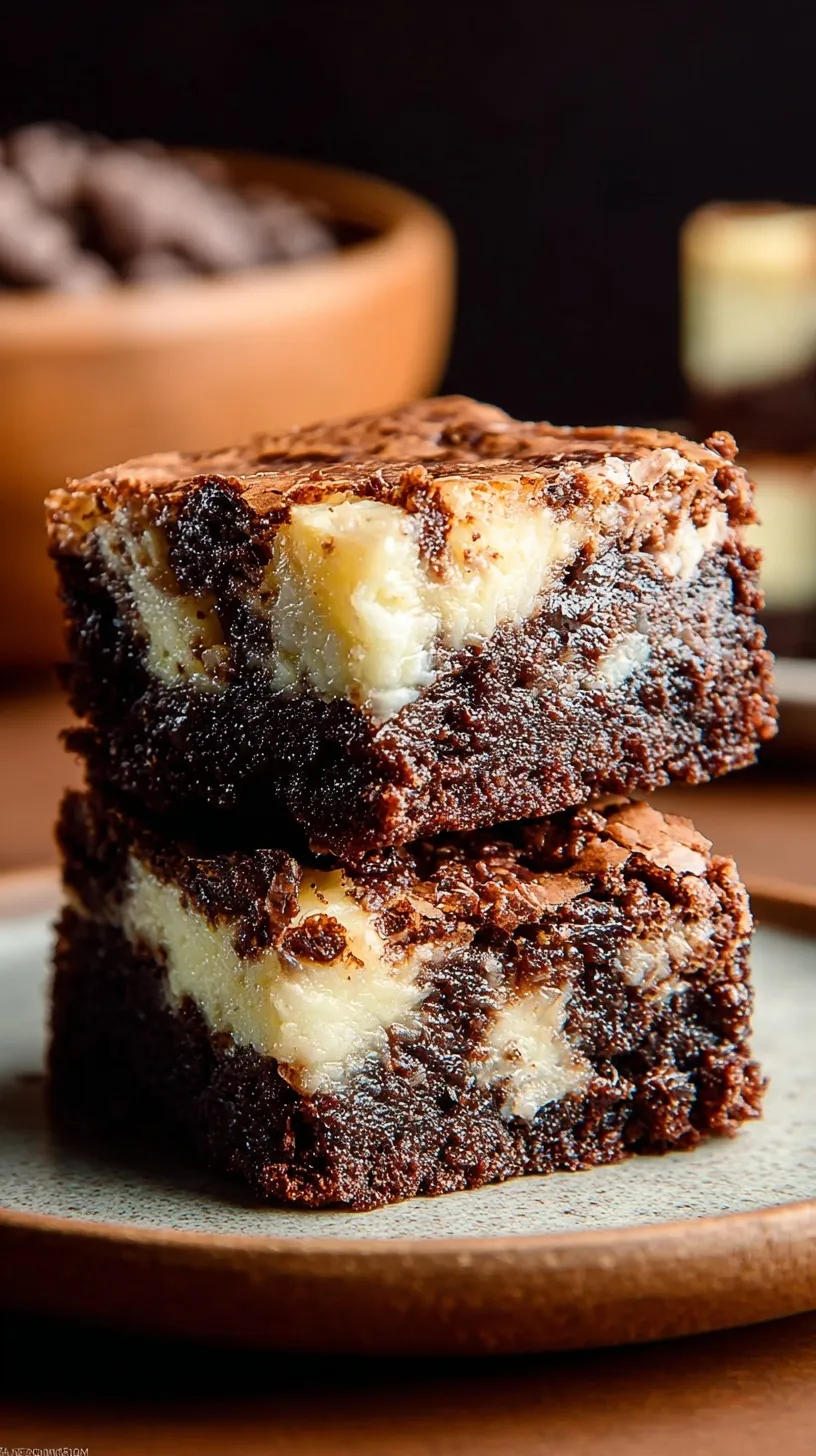
Looking for a tropical treat that feels like a vacation in every bite? These Coconut Cheesecake Brownies are the answer to your dessert dreams. They combine rich chocolate with a creamy, coconut-filled center. Your family will absolutely love this simple, impressive treat. It is the perfect way to end a sunny summer afternoon.
Why You’ll Love These Coconut Cheesecake Brownies
These brownies are a total winner for any summer gathering. The fudgy chocolate base balances the light coconut perfectly. It looks fancy but takes very little effort to make. You get two classic desserts in one delicious square. Everyone will ask you for the recipe at your next potluck.
Simple Method
Making these is much easier than it looks. You will prepare a quick brownie batter first. Then, you whip up a simple coconut cream cheese topping. Swirling them together is the best part! Even beginners can master this beautiful marbled look with ease.
Ingredients You’ll Need
Most of these items are likely in your pantry right now.
- 1/2 cup unsalted butter, melted
- 1 cup granulated sugar
- 1/3 cup unsweetened cocoa powder
- 1/4 teaspoon salt
- 1 teaspoon vanilla extract
- 3 large eggs, divided
- 1/2 cup all-purpose flour
- 8 ounces cream cheese, softened
- 1/4 cup granulated sugar (for cheesecake)
- 1/2 teaspoon coconut extract
- 1 cup shredded sweetened coconut
Step-by-Step Directions
- Preheat oven to 350°F (175°C) and grease an 8×8 inch square baking pan.
- In a medium mixing bowl, whisk together melted butter, 1 cup sugar, cocoa powder, salt, and vanilla extract.
- Whisk in 2 eggs, one at a time, until the batter is glossy and smooth.
- Gently fold in the flour until no white streaks remain. Reserve 1/4 cup of this batter and spread the remainder into the prepared pan.
- In a separate bowl, beat the softened cream cheese and 1/4 cup sugar until smooth and aerated.
- Add the remaining egg and coconut extract to the cream cheese mixture, beating until fully incorporated.
- Fold the shredded coconut into the cream cheese mixture.
- Spread the coconut cheesecake mixture evenly over the brownie layer in the pan.
- Dollop the reserved 1/4 cup of brownie batter over the cheesecake layer and use a knife to swirl the two batters together.
- Bake for 30 to 35 minutes, or until a toothpick inserted into the center comes out with a few moist crumbs.
- Cool completely in the pan on a wire rack before slicing into 16 squares.
Best Ways to Enjoy It
Serve these squares chilled for the best texture. They look beautiful on a white platter for a summer party. You can add a few fresh raspberries on the side for a pop of color. Pair a square with a glass of cold milk for the kids. It is a guaranteed crowd-pleaser at any gathering.
Keep It Fresh
Store any leftovers in an airtight container in the fridge. They will stay delicious for up to five days. You can also freeze these brownies for up to three months. Just wrap them tightly in plastic wrap first. Thaw them in the fridge overnight before you plan to serve them.
Tips for Best Results
- Use room temperature cream cheese to avoid any lumps.
- Line your pan with parchment paper for easy removal.
- Do not overbake the brownies to keep them moist and fudgy.
- Use a plastic knife to get the cleanest cuts when slicing.
- For a summer twist, add a little lime zest to the coconut.
- Double the batch for a larger holiday crowd.
- Whisk the eggs well to get that shiny brownie top.
Easy Flavor Ideas
- Swap the milk chocolate for dark cocoa for a richer taste.
- Add chopped almonds to the brownie layer for a crunch.
- Use unsweetened coconut if you prefer a less sweet treat.
- Mix in chocolate chips for extra indulgence.
Common Questions
Can I make these ahead of time?
Yes, these actually taste better after chilling in the fridge. Make them the night before your big event. This helps the cheesecake layer set perfectly.
How do I know when they are done?
Insert a toothpick into the center of the pan. It should come out with a few moist crumbs. Avoid overbaking so the chocolate stays soft.
I hope these tropical treats bring a little sunshine to your kitchen. They are perfect for sharing with the people you love. Happy cooking!
— Lidia
Coconut Cheesecake Brownies
Ingredients
- 1/2 cup unsalted butter, melted
- 1 cup granulated sugar
- 1/3 cup unsweetened cocoa powder
- 1/4 teaspoon sal t
- 1 teaspoon vanilla extract
- 3 large eggs , divided
- 1/2 cup all -purpose flour
- 8 ounces cream cheese, softened
- 1/4 cup granulated sugar (for cheesecake)
- 1/2 teaspoon coconut extract
- 1 cup shredded sweetened coconut
Instructions
- Preheat oven to 350°F (175°C) and grease an 8x8 inch square baking pan or line with parchment paper.
- In a medium mixing bowl, whisk together melted butter, 1 cup sugar, cocoa powder, salt, and vanilla extract.
- Whisk in 2 eggs, one at a time, until the batter is glossy and smooth.
- Gently fold in the flour until no white streaks remain. Reserve 1/4 cup of this batter and spread the remainder into the prepared pan.
- In a separate bowl, beat the softened cream cheese and 1/4 cup sugar until smooth and aerated.
- Add the remaining egg and coconut extract to the cream cheese mixture, beating until fully incorporated.
- Fold the shredded coconut into the cream cheese mixture.
- Spread the coconut cheesecake mixture evenly over the brownie layer in the pan.
- Dollop the reserved 1/4 cup of brownie batter over the cheesecake layer and use a knife to swirl the two batters together.
- Bake for 30 to 35 minutes, or until a toothpick inserted into the center comes out with a few moist crumbs.
- Cool completely in the pan on a wire rack before slicing into 16 squares.