I’m gonna level with you – most Halloween cookies are a scam. They look cute in photos but taste like cardboard shaped into pumpkins. I’ve wasted hours decorating cookies that ended up hard as rocks or so sweet they made my teeth hurt just looking at them.
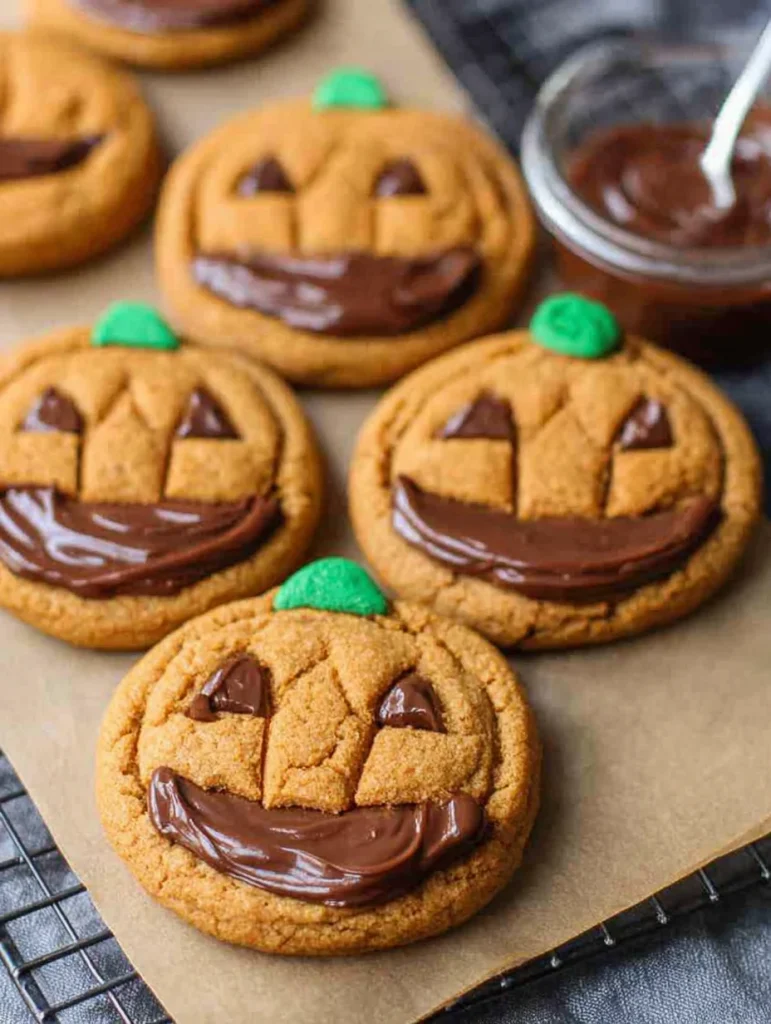
Then I figured out these milk chocolate stuffed jack-o-lantern cookies and honestly? Game changer. They’re soft, chewy, have actual chocolate hidden inside, and they look impressive without requiring artistic talent. I brought these to my kid’s school party last year and the teacher pulled me aside to ask if I was “in the baking business professionally.” Lady, I work in IT, but these cookies are apparently that convincing.

The secret is stuffing them with chocolate chunks before baking so you get this melty surprise in the middle. Plus the pumpkin spice actually tastes good instead of overpowering everything. And those jack-o-lantern faces? Way easier to pipe than you think, even if your handwriting looks like a doctor’s.
Why These Cookies Beat Every Store-Bought Option
Halloween cookies usually fall into two categories – the ones that look good but taste terrible, or the ones that taste okay but look like a five-year-old decorated them. These jack-o-lantern cookies somehow nail both without requiring you to have a degree in food styling.
I made these for a neighborhood party where everyone brings something. My neighbor is one of those people who makes everything from scratch and judges everyone else’s contributions silently but obviously. She ate three of these cookies and asked if I’d gotten them from some fancy bakery downtown. When I told her I made them, she literally didn’t believe me until I showed her photos of my messy kitchen. That’s the power of a cookie that looks professional but isn’t.
Here’s why you need these cookies in your life:
- The chocolate center stays melty even when the cookies cool
- They’re actually soft and chewy, not dry and crumbly
- The pumpkin spice is subtle – doesn’t taste like a candle
- Kids can help with the decorating part
- They travel well to parties without breaking
- Store for up to a week and stay fresh
Plus these work for people who claim sugar cookies are boring. The stuffed chocolate element makes them more interesting than your standard decorated cookie. My friend who “doesn’t really like cookies” ate four and tried to take extras home :/
What You Need for Chocolate Stuffed Jack-O-Lantern Cookies
For the Cookie Dough
This isn’t your basic sugar cookie recipe – we’re adding pumpkin spice and using brown butter for depth.
Dry Ingredients:
- All-purpose flour (2¾ cups – don’t use self-rising)
- Baking soda (1 teaspoon)
- Cream of tartar (1 teaspoon – this keeps them soft)
- Ground cinnamon (1½ teaspoons)
- Ground ginger (½ teaspoon)
- Ground nutmeg (¼ teaspoon)
- Ground cloves (⅛ teaspoon – tiny amount, big impact)
- Salt (½ teaspoon)
Wet Ingredients:
- Unsalted butter (1 cup – we’re browning half of this)
- Granulated sugar (1 cup)
- Light brown sugar (½ cup, packed)
- Large eggs (2 – room temperature)
- Vanilla extract (2 teaspoons)
- Orange gel food coloring
Why these ingredients work: The cream of tartar is crucial for that soft, chewy texture. Without it, you get crispier cookies. The combination of white and brown sugar gives you structure plus moisture. And browning half the butter adds this nutty, caramel-like flavor that makes people wonder what your secret ingredient is.
Substitutions that work:
- No cream of tartar? Use an extra ½ teaspoon baking powder (not quite the same but close)
- Want pumpkin flavor too? Add 2 tablespoons pumpkin puree with the wet ingredients
- Dairy-free? Use vegan butter – works surprisingly well here
For the Chocolate Filling
This is what makes these cookies special instead of just another decorated cookie.
- Milk chocolate bars (8 oz – not chips, actual bars you chop)
- Semi-sweet chocolate chips (½ cup – optional for extra chocolate)
- Flaky sea salt (for sprinkling – trust me on this)
Critical info: Use actual chocolate bars that you chop into chunks, not chocolate chips. Chips are designed to hold their shape during baking – bars melt better and create that gooey center you want. I prefer milk chocolate because it’s sweeter and plays well with the spices, but dark chocolate works if you’re into that.
For Decorating
- Black decorating gel or melted chocolate
- Orange sanding sugar (optional but makes them sparkly)
- Green candy melts or frosting (for stems)
You can skip the fancy decorations and just use a fork to draw faces in the dough before baking. Results in a more rustic look but still clearly jack-o-lanterns. Perfect for when you’re short on time.
Equipment You Actually Need
- Two baking sheets
- Parchment paper or silicone mats
- Cookie scoop (2 tablespoon size for consistency)
- Small piping bag or plastic bag with corner cut
- Wire cooling rack
How to Make These Stuffed Halloween Cookies
Step 1: Brown That Butter
Take ½ cup (8 tablespoons) of butter and put it in a light-colored saucepan over medium heat. Watch it carefully – it’ll melt, then foam, then the foam will subside and you’ll see brown bits forming at the bottom. Swirl the pan constantly.
When it smells nutty and the color turns golden brown, immediately pour it into a bowl to stop the cooking. Let it cool to room temperature – this takes about 30 minutes. If you’re impatient, stick it in the fridge for 10 minutes but watch it so it doesn’t solidify.
Mix the cooled brown butter with the remaining ½ cup softened butter. This combination gives you both that nutty flavor and the right texture for cookies.
Step 2: Make the Cookie Dough
Beat your butter mixture with both sugars for 2-3 minutes until light and fluffy. Add eggs one at a time, then vanilla. Mix in orange food coloring until you get the pumpkin shade you want – start with a little and add more.
In another bowl, whisk together all your dry ingredients. Add dry to wet in two batches, mixing just until combined. Don’t overmix or your cookies will be tough. The dough will be soft and slightly sticky.
Chill the dough for at least 30 minutes. I know it’s annoying, but unchilled dough spreads too much and you’ll get flat, weird-shaped cookies instead of plump jack-o-lanterns.
Step 3: Prep Your Chocolate Chunks
Chop your chocolate bars into roughly ½-inch chunks. They don’t need to be perfect – irregular shapes actually melt better and create more interesting pockets of chocolate. If using additional chocolate chips, toss them together with the chunks.
Step 4: Stuff and Shape These Cookies
Preheat oven to 350°F. Line your baking sheets with parchment paper.
Use a 2-tablespoon cookie scoop to portion out dough. Flatten each ball slightly in your palm, place 2-3 chocolate chunks in the center, then wrap the dough around the chocolate completely. Roll it back into a ball shape, making sure no chocolate is poking through.
Critical step: Place balls on baking sheet about 3 inches apart – they spread. Press each ball down slightly so they’re disc-shaped, not perfect spheres. This helps them bake evenly.
If using orange sanding sugar, sprinkle it on top before baking for extra sparkle.
Step 5: Bake These Bad Boys
Bake for 11-13 minutes. They should look slightly underdone in the center when you pull them out – the edges will be set but centers still soft. They continue cooking on the pan after you remove them from the oven.
Let them cool on the baking sheet for 5 minutes – they’re too soft to move right away and will fall apart. Then transfer to a wire rack to cool completely before decorating.
Patience alert: Decorating warm cookies makes the black gel melt and run. Wait until they’re completely cool or your jack-o-lantern faces will look like they’re melting. Which is actually kinda appropriate for Halloween but probably not what you’re going for.
Step 6: Draw Those Jack-O-Lantern Faces
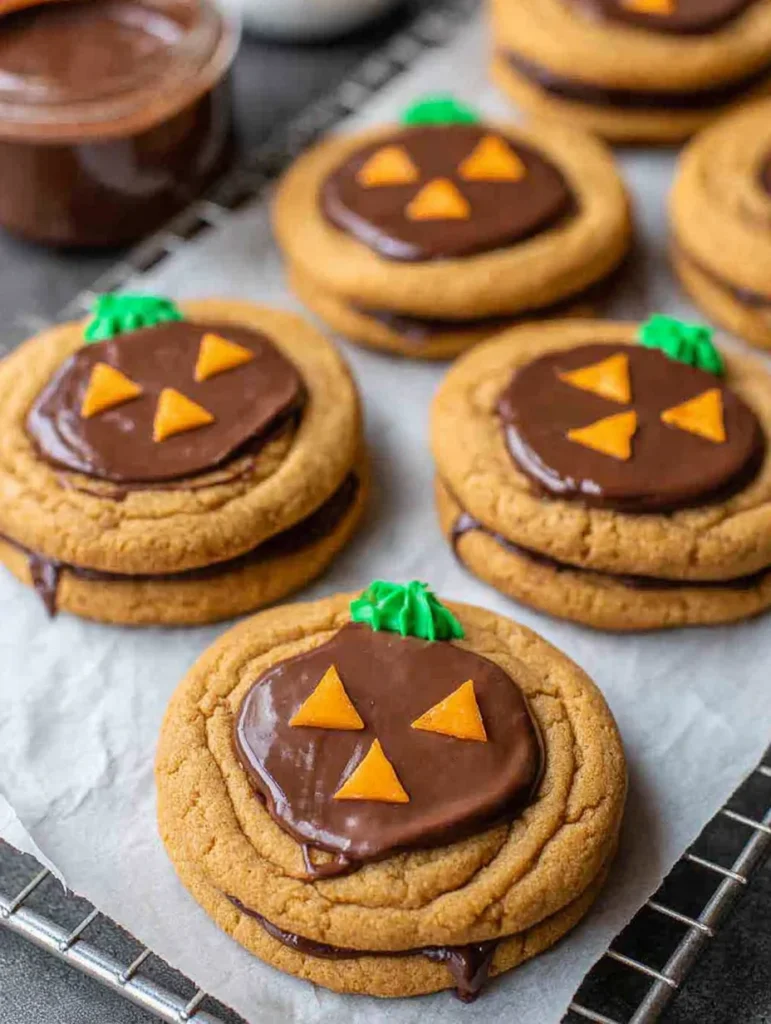
Once cookies are completely cool, use black decorating gel or melted chocolate in a piping bag to draw faces. Triangle eyes, triangle nose, jagged smile – classic jack-o-lantern style.
Get creative here. Make some happy, some scary, some surprised. I like making at least one with a goofy face because it makes people smile. Kids especially love the silly ones.
For stems, pipe a small green dot or shape at the top of each cookie. Or skip this entirely – they’re clearly pumpkins even without stems, IMO.
Let the decorations set for about 15 minutes before stacking or storing. The gel sets faster than melted chocolate, FYI.
Creative Variations That Actually Work
White Chocolate Stuffed Ghost Cookies
Skip the orange coloring and pumpkin spice. Stuff with white chocolate chunks and draw ghost faces instead of jack-o-lanterns. Different holiday vibe, same amazing texture.
Dark Chocolate Orange Cookies
Use dark chocolate chunks and add 1 tablespoon orange zest to the dough. The orange-chocolate combo is sophisticated enough for adult parties. Still draw pumpkin faces for Halloween theme.
Peanut Butter Cup Stuffed Pumpkins
Stuff each cookie with a miniature peanut butter cup instead of chocolate chunks. Press them in deep so they’re completely covered. The peanut butter stays melty and amazing.
Nutella Stuffed Jack-O-Lanterns
Put a teaspoon of Nutella in the center of each cookie instead of chocolate chunks. Freeze the Nutella in small dollops first so it’s easier to stuff. Results in a gooey hazelnut center.
Caramel Stuffed Pumpkin Cookies
Use soft caramel candies as filling – unwrap them and press one into each cookie center. The caramel gets melty and creates a different kind of gooey surprise. Add a sprinkle of sea salt on top before baking.
Cinnamon Roll Pumpkin Cookies
Mix cinnamon and sugar together, spread it on flattened cookie dough, roll it up jelly-roll style, then slice into rounds. Skip the chocolate. Tastes like cinnamon rolls meets pumpkin cookies. Draw faces on top anyway because why not.
Frequently Asked Questions
My chocolate is leaking out during baking – what am I doing wrong?
You’re probably not sealing the dough completely around the chocolate. Make sure the chocolate chunks are fully enclosed with no gaps or thin spots. Also don’t overfill – 2-3 chunks per cookie max. And make sure your dough is properly chilled before baking.
Can I make the dough ahead of time?
Yes. Refrigerate dough for up to 3 days or freeze for up to 3 months. If frozen, thaw in the fridge overnight before using. You can also shape and stuff the cookies, freeze them on a baking sheet, then transfer to a freezer bag. Bake from frozen, adding 2-3 minutes to baking time.
These milk chocolate stuffed jack-o-lantern cookies spread too much – how do I fix that?
Your butter was probably too warm or you didn’t chill the dough long enough. Make sure dough is chilled for at least 30 minutes before baking. Also check your oven temperature with a thermometer – if it’s running cool, cookies spread before they set.
Can I use chocolate chips instead of chopped chocolate bars?
You can, but the chips won’t melt as well. They’re formulated to hold their shape during baking. Chocolate bars create that gooey, melty center that makes these cookies special. If you only have chips, mix them with some chopped chocolate bars for best results.
How do I store these cookies to keep them soft?
Store in an airtight container with a slice of bread. The bread releases moisture that keeps cookies soft. Replace the bread slice every couple days. They stay fresh at room temperature for up to a week. Don’t refrigerate – it dries them out.
My jack-o-lantern faces look terrible – any tips?
Practice on parchment paper first to get the hang of the piping. Keep faces simple – triangle eyes and nose, jagged smile. You don’t need elaborate designs. And remember, wonky faces actually look more charming and handmade. Perfectly uniform faces look store-bought and kinda boring.
Can kids help make these cookies?
Definitely. Kids can help mix ingredients, stuff the chocolate (with supervision), and especially draw the faces. The face-decorating is perfect for kids because there’s no wrong way to do it. Just keep them away from the hot oven and the browning butter part.

Milk Chocolate Stuffed Jack-O-Lantern Cookies
Equipment
- Two baking sheets
- Parchment paper or silicone mats
- Cookie scoop (2 tbsp size)
- Small piping bag or plastic bag for decorating
- Wire cooling rack
- Saucepan (light-colored) for browning butter
Ingredients
- 2 3/4 cups all-purpose flour
- 1 tsp baking soda
- 1 tsp cream of tartar
- 1 1/2 tsp ground cinnamon
- 1/2 tsp ground ginger
- 1/4 tsp ground nutmeg
- 1/8 tsp ground cloves
- 1/2 tsp salt
- 1 cup unsalted butter (½ browned, ½ softened)
- 1 cup granulated sugar
- 1/2 cup light brown sugar, packed
- 2 large eggs, room temperature
- 2 tsp vanilla extract
- as needed orange gel food coloring
- 8 oz milk chocolate bars, chopped
- 1/2 cup semi-sweet chocolate chips (optional)
- to taste flaky sea salt (for topping)
- as needed black decorating gel or melted chocolate
- as needed orange sanding sugar (optional)
- as needed green candy melts or frosting (for stems)
Instructions
- Melt ½ cup butter in a light-colored pan until browned. Let cool to room temp. Mix with remaining ½ cup softened butter.
- Beat butter and sugars until fluffy. Add eggs, vanilla, and orange food coloring. Mix until smooth.
- Whisk dry ingredients separately, then combine with wet in two batches. Mix until just combined. Chill dough 30 minutes.
- Chop chocolate bars into ½-inch chunks. Mix with optional chocolate chips if desired.
- Preheat oven to 350°F. Scoop dough, flatten, place chocolate chunks inside, and wrap dough around to seal. Roll into balls and slightly flatten. Sprinkle with sanding sugar if using.
- Bake 11–13 minutes until edges are set but centers still soft. Cool on sheet for 5 mins, then transfer to rack.
- Once cool, pipe jack-o-lantern faces with black gel or melted chocolate. Add green stems with frosting or candy melts if desired. Let decorations set before stacking or storing.
Notes
My Final Thoughts on These Cookies
I’ve baked a lot of Halloween cookies over the years. Sugar cookies with royal icing that took hours to decorate. Shortbread cookies that looked pretty but tasted like nothing. Those Pinterest-perfect cookies that required seventeen specialty tools and crushed my soul when they turned out wrong.
But these milk chocolate stuffed jack-o-lantern cookies are the ones I make every single year now. They’re reliable. They taste incredible. They look impressive without making me want to throw my piping bag across the kitchen.
Last Halloween I made a double batch because I knew my family would demolish them. My brother, who claims he doesn’t like “fancy” cookies and usually just eats Oreos, ate seven of these in one sitting and asked if I’d mail him some. Seven cookies. In one sitting. That’s the power of chocolate-stuffed cookies with actual flavor.
What I love most is that they deliver on the promise. They look like they’ll be good, and then you bite into one and hit that melty chocolate center and they’re actually better than expected. That never happens with Halloween treats. Usually it’s the opposite – looks amazing, tastes disappointing.
Make these for your Halloween party and watch them disappear before the savory snacks. Make them for yourself and hide some before your family finds them. Make them to win over people who claim they don’t like cookies – it’ll work, I’ve seen the conversion happen in real time.
Just make them, because eating dry store-bought cookies on Halloween when you could be eating soft, chocolate-stuffed pumpkin cookies is basically a crime against October. Your cookie jar deserves better, and so do you.
Now go create some jack-o-lantern cookie magic and prepare for people to ask where you bought them. The answer is nowhere, you made them yourself, and yes they can have the recipe but only if they promise to actually make them instead of just saving it and never using it like everyone does 🙂