
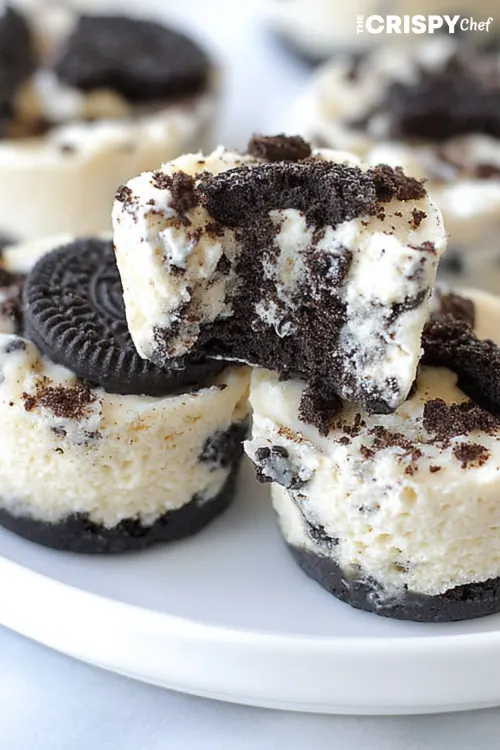
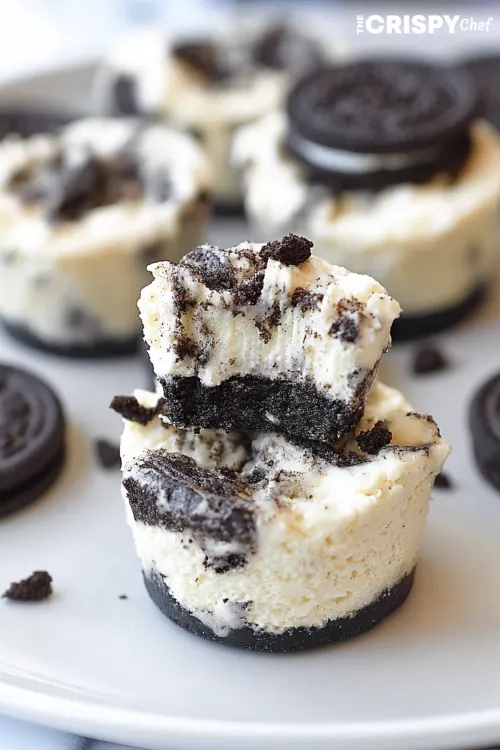
These Oreo no bake cheesecake cups are seriously my new obsession. Made these yesterday for my sister’s birthday gathering and they disappeared in like 5 minutes flat. No joke! What makes these little cups of heaven so special is that perfect combo of crunchy Oreo base with that creamy, dreamy cheesecake layer. Plus, you don’t even need to turn on your oven! Who wants to bake when it’s 90 degrees outside anyway? Keep reading to find out how to make these amazing treats that’ll have everyone asking for seconds.
What You’ll Need for These Oreo No Bake Cheesecake Cups
For the Crust:
- Oreo cookies – about 24 cookies, the regular kind works best but double-stuffed are fine too! Don’t bother scraping out the cream filling – use the whole cookie!
- Melted butter – helps bind everything together. Salted or unsalted is fine, whatever you’ve got.
- Pinch of salt – optional but helps balance the sweetness if you’re using unsalted butter
For the Cheesecake Filling:
- Cream cheese – full-fat works best here! Trust me, this isn’t the time to go low-fat. Make sure it’s room temp or you’ll end up with lumps.
- Powdered sugar – sweetens without making the filling grainy. You can adjust up or down depending how sweet you like things.
- Vanilla extract – just a bit for flavor, but don’t skip it! Makes a huge difference.
- Heavy whipping cream – whipped to stiff peaks gives that perfect fluffy texture
- More Oreos – chopped up for mixing into the filling
For Topping:
- Whipped cream – store-bought is fine if you’re in a hurry!
- Crushed Oreos – for that perfect finishing touch
- Chocolate sauce – totally optional but looks super impressive

How to Make Oreo No Bake Cheesecake Cups
Step 1: Prep the Oreo Crust
- Grab a ziplock bag and fill it with Oreos. Crush them using a rolling pin or bottom of a heavy cup. Don’t pulverize them – some small chunks are good!
- Mix the crushed Oreos with melted butter until it looks like wet sand.
- Divide mixture between 8-10 serving cups or glasses, pressing down firmly with the back of a spoon.
- Pop in fridge while you make the filling.
Step 2: Make the Cheesecake Filling
- Beat the room temp cream cheese until smooth and creamy (about 2 min).
- Add powdered sugar and vanilla, mix until combined.
- In separate bowl, whip the cream until stiff peaks form.
- Gently fold whipped cream into cream cheese mixture until smooth.
- Stir in chopped Oreo pieces – don’t overmix or you’ll lose all the air!
Step 3: Assemble Your Cups
- Take your cups with the chilled crust from the fridge.
- Spoon or pipe the cheesecake filling on top of each crust.
- Refrigerate for at least 2 hours (overnight is even better).
- Right before serving, top with whipped cream, sprinkle with crushed Oreos, and drizzle with chocolate sauce if using.
Done! The hardest part is waiting for them to chill tbh.
Delicious Variations of Oreo No Bake Cheesecake Cups
- Mint Chocolate – use mint Oreos instead of regular and add 1/4 tsp peppermint extract to the filling
- Peanut Butter Lover’s – mix 1/4 cup peanut butter into the filling and use peanut butter Oreos for the crust
- Berry Blast – add fresh strawberries or raspberries between the crust and filling layers
- Caramel Delight – drizzle caramel sauce between layers and on top
- Chocolate Overload – add 2 tbsp cocoa powder to the filling and top with chocolate chips
Your Burning Questions Answered
Can I make Oreo no bake cheesecake cups ahead of time?
Absolutely! These actually taste better when made a day ahead. You can make them up to 3 days in advance – just add the toppings right before serving for the freshest look.
How long do Oreo no bake cheesecake cups last in the fridge?
They’ll stay good in the fridge for about 4-5 days. The crust might get a little softer over time but they’ll still taste amazing!
Can I freeze these Oreo no bake cheesecake cups?
Yes! Freeze them without the toppings in an airtight container for up to 3 months. Thaw in the fridge overnight and add fresh toppings before serving.
What can I use instead of heavy cream?
In a pinch, you can use 8oz of Cool Whip instead of whipping your own cream. The texture will be a bit different but still delicious!
My filling is too runny – what went wrong?
Probably didn’t whip the cream enough! Make sure you’re whipping to stiff peaks before folding into the cream cheese. Also, your cream cheese might’ve been too warm.
Can I make this recipe without dairy?
Yep! Use dairy-free cream cheese, dairy-free whipped topping, and vegan butter. Most Oreos are actually accidentally vegan already!
What size cups should I use for these Oreo no bake cheesecake cups?
I like using 8oz clear plastic cups for parties or small mason jars for a cute presentation. Wine glasses work too for fancy occasions!
Final Thoughts
These Oreo no bake cheesecake cups honestly saved me so many times when I needed a quick dessert that still looks impressive. My mom always said good food doesn’t have to be complicated, and these cups prove her right!
What I love most about this recipe is how you can make it your own. My kids love helping crush the cookies and layering everything in the cups – it’s become our Friday night tradition during summer.
Give these a try next time you need something sweet without the hassle. I guarantee they’ll become your go-to dessert too! And don’t forget to let me know in the comments if you try any of the variations – I’m always looking for new flavor combos to try!

Oreo No Bake Cheesecake Cups
Equipment
- Mixing bowls
- Hand or stand mixer
- Ziplock bag and rolling pin
- Spoon or piping bag
- Measuring cups and spoons
- Serving cups (8oz or similar)
Ingredients
For the Crust:
- 24 Oreo cookies regular or double-stuffed
- 4 tbsp melted butter salted or unsalted
- Pinch of salt optional
For the Cheesecake Filling:
- 8 oz cream cheese full-fat, room temperature
- 1/2 cup powdered sugar adjust to taste
- 1 tsp vanilla extract
- 3/4 cup heavy whipping cream whipped to stiff peaks
- 6 Oreo cookies chopped
Topping:
- Whipped cream store-bought or homemade
- Crushed Oreos
- Chocolate sauce optional
Instructions
Make the Crust:
- a. Crush Oreos in a ziplock bag using a rolling pin (leave some chunks).
- b. Mix with melted butter until texture resembles wet sand.
- c. Divide mixture into 8-10 serving cups and press down with a spoon.
- d. Chill in fridge while making the filling.
Prepare Cheesecake Filling:
- a. Beat room temp cream cheese until smooth.
- b. Add powdered sugar and vanilla; mix until creamy.
- c. In a separate bowl, whip cream to stiff peaks.
- d. Fold whipped cream into cream cheese mixture.
- e. Gently stir in chopped Oreos.
Assemble:
- a. Spoon or pipe cheesecake filling into each cup over the crust.
- b. Refrigerate at least 2 hours (overnight is better).
- c. Before serving, top with whipped cream, crushed Oreos, and optional chocolate sauce.


4 Comments