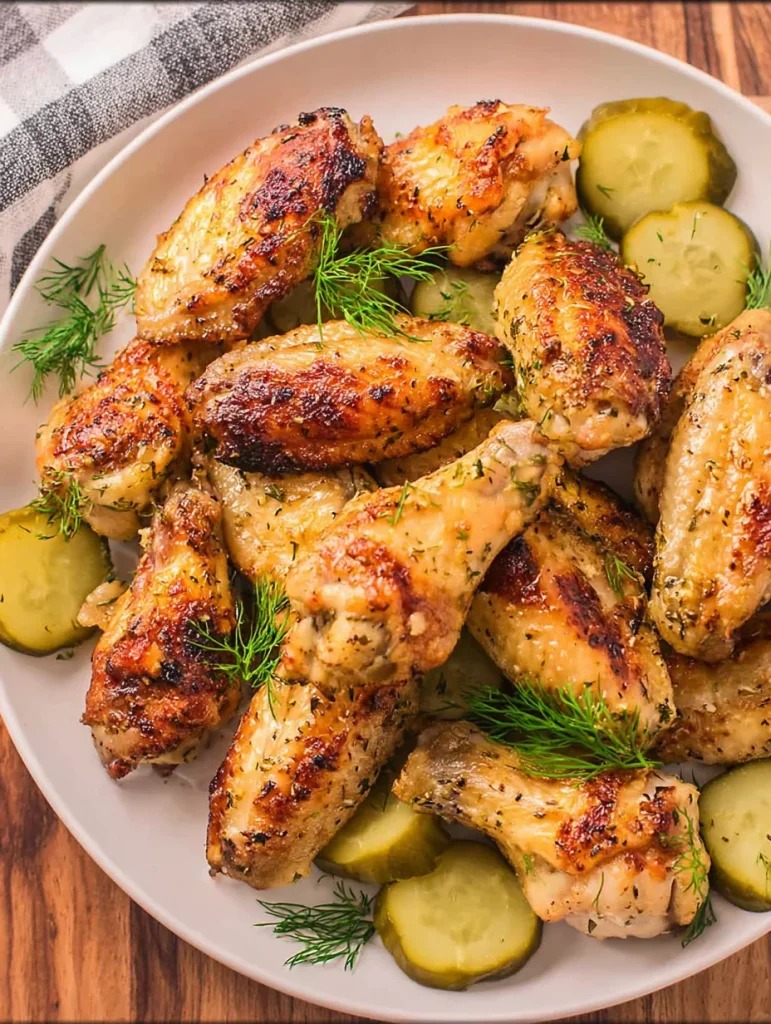
Pickle-brine chicken wings are basically the game-changing discovery that’ll make you wonder why anyone ever bothered with boring, unseasoned wings when you could have these incredibly juicy, tangy, flavor-packed beauties instead. I’m talking about wings so tender they practically fall off the bone, with this incredible depth of flavor that comes from hours of swimming in pickle brine before getting crisped to perfection. This isn’t some weird food trend that sounds gross—this is legitimate culinary brilliance that happens to use an ingredient most people throw away.
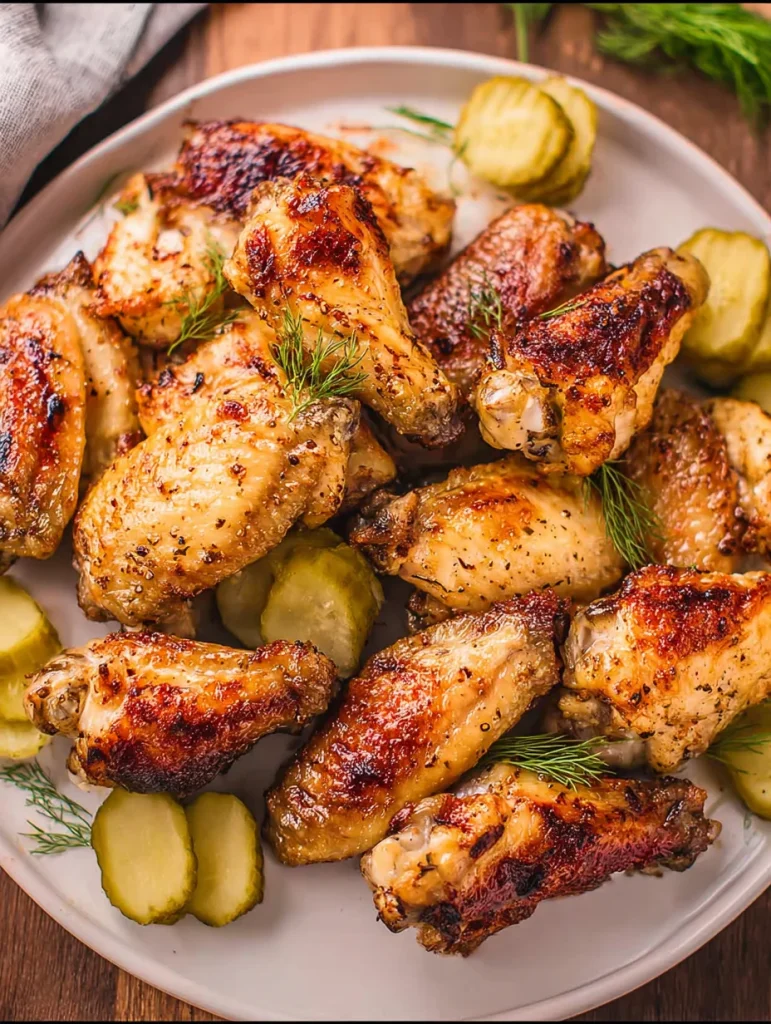
I discovered pickle-brine chicken wings during one of those “what am I going to do with all this leftover pickle juice” moments, and honestly, it was pure accidental genius. The acidity in the brine breaks down the proteins, creating the most tender wings you’ve ever eaten, while the salt and spices penetrate deep into the meat for flavor that goes way beyond skin-deep. Now I literally buy extra pickles just for the juice, and these wings have become my secret weapon for every party, tailgate, and “please bring something” gathering.
Why These Pickle-Brine Chicken Wings Will Make You Famous
• Incredibly tender and juicy – The brine works like magic to create the most succulent wings ever • Deep, complex flavor – Tangy, salty goodness that penetrates every bite • Secret ingredient advantage – Uses something most people throw away for gourmet results • Foolproof technique – Almost impossible to overcook or dry out brined wings • Conversation starter guaranteed – Everyone will demand to know your secret
What You’ll Need (Ingredients)
For the Pickle Brine:
- 3-4 lbs chicken wings (1.4-1.8kg) – split into flats and drumettes
- 2 cups dill pickle juice (480ml) – from a good jar of pickles
- 1 cup water (240ml) – to dilute slightly
- 2 tbsp kosher salt (if your pickle juice isn’t very salty)
- 1 tbsp brown sugar (15g) – balances the acidity
- 4 cloves garlic, smashed
- 1 bay leaf
For the Seasoning Rub:
- 2 tsp paprika – smoked paprika if you have it
- 1 tsp garlic powder
- 1 tsp onion powder
- 1 tsp black pepper
- ½ tsp cayenne pepper (adjust to taste)
- 1 tsp dried dill
- ½ tsp salt (taste first—the brine adds lots of salt)
For Cooking and Serving:
- 2 tbsp olive oil or melted butter
- Fresh dill sprigs for garnish
- Lemon wedges
- Ranch or blue cheese dressing for dipping
- Extra pickle spears for serving
Essential Equipment
- Large bowl or zip-top bag for brining
- Refrigerator space for 4-24 hours
- Large baking sheet with wire rack
- Paper towels for patting dry
- Tongs for handling wings
- Meat thermometer (optional but helpful)
Step-by-Step Instructions for Perfect Pickle-Brine Chicken Wings
Create Your Magical Brine
- Prepare wings – If using whole wings, split them into flats and drumettes. Pat completely dry with paper towels—this helps the brine penetrate better.
- Mix the brine – In a large bowl, combine pickle juice, water, kosher salt (if needed), brown sugar, smashed garlic, and bay leaf. Stir until sugar and salt dissolve completely.
- Taste and adjust – Sample your brine—it should taste salty and tangy but not overwhelmingly so. Add more water if it’s too intense, or more salt if it’s too mild.
The Magic Brining Process
- Submerge wings – Add wings to the brine, making sure they’re completely covered. Use a plate to weigh them down if needed.
- Refrigerate and wait – Cover and refrigerate for at least 4 hours, but ideally 12-24 hours. The longer they brine, the more tender and flavorful they become.
- Don’t over-brine – Don’t go longer than 24 hours or the wings can become too salty and the texture might get mushy.
Prep for Cooking Perfection
- Remove and dry – Take wings out of brine and pat completely dry with paper towels. This step is crucial for crispy skin.
- Let come to room temp – Allow wings to sit at room temperature for 30-45 minutes before cooking. Cold wings cook unevenly.
- Preheat oven – Heat your oven to 425°F (220°C) and set up a wire rack on a large baking sheet. The rack allows air circulation for crispier skin.
Season and Cook
- Mix seasoning rub – Combine paprika, garlic powder, onion powder, black pepper, cayenne, dried dill, and salt in a small bowl.
- Season wings – Drizzle wings lightly with olive oil, then sprinkle with seasoning rub, tossing to coat evenly.
- Arrange on rack – Place seasoned wings on the wire rack in a single layer, leaving space between each wing for air circulation.
Bake to Crispy Perfection
- Bake low, then high – Bake at 425°F for 20 minutes, then increase to 450°F (230°C) for another 15-20 minutes until skin is golden brown and crispy.
- Check for doneness – Internal temperature should reach 165°F (74°C), and juices should run clear when pierced.
- Rest briefly – Let wings rest for 5 minutes before serving—this prevents burns and lets juices redistribute.
Smart Cooking Variations
Grilled version: After brining, grill over medium-high heat for 20-25 minutes, turning frequently for even cooking.
Air fryer method: Cook at 375°F for 12 minutes, flip, then cook 8-10 more minutes until crispy.
Smoked wings: Smoke at 250°F for 1.5 hours, then finish at high heat for crispy skin.
Extra crispy: Toss with a little baking powder along with the seasoning for ultimate crispiness.
Buffalo style: Toss finished wings in buffalo sauce mixed with a little pickle juice for extra tang.
Pro Tips for Pickle-Brine Wing Success
• Use quality pickle juice – The flavor of your wings depends on the quality of your pickle juice. Choose a brand you actually like eating.
• Don’t skip the drying step – Wet wings won’t get crispy. Pat them thoroughly dry before seasoning.
• Wire rack is crucial – Wings sitting in their own fat won’t get crispy on the bottom. Always use a rack.
• Room temperature matters – Cold wings from the fridge cook unevenly. Let them warm up first.
• Save some pickle juice – Keep extra pickle juice for making quick pickled vegetables as a side dish.
Common Mistakes That’ll Ruin Your Wings
Over-brining – More than 24 hours can make wings too salty and affect texture. Set a timer!
Not drying properly – Wet wings steam instead of getting crispy. Pat them bone-dry before cooking.
Skipping the wire rack – Wings sitting on the pan get soggy bottoms instead of crispy skin all around.
Cooking from cold – Cold wings cook unevenly and take longer. Always bring to room temperature first.
Using low-quality pickle juice – Bad pickle juice makes bad wings. Use juice from pickles you’d actually eat.
Storage and Make-Ahead Magic
Brining ahead: Wings can brine for up to 24 hours, making this perfect for meal prep and entertaining.
Cooked storage: Leftover wings keep for 3-4 days in the fridge and are amazing cold or reheated.
Reheating: Crisp up leftover wings in a 400°F oven for 5-7 minutes to restore crispiness.
Freezing: Cooked wings freeze for up to 3 months. Thaw completely before reheating.
Perfect Game Day Pairings
These pickle-brine chicken wings pair beautifully with:
- Classic ranch or blue cheese dressing for cooling contrast
- Celery and carrot sticks for fresh crunch
- Potato salad or coleslaw for classic picnic vibes
- Cold beer or lemonade to balance the salty-tangy flavors
- Corn on the cob for summer cookout perfection
Nutritional Info (Per 4-Wing Serving)
Real talk about this indulgent treat
- Calories: 285
- Protein: 24g
- Carbohydrates: 2g
- Fat: 18g
- Sodium: 950mg (from the pickle brine)
- Satisfaction factor: Through the roof

Pickle-Brine Chicken Wings
Equipment
- Large bowl or zip-top bag for brining
- Refrigerator space for 4–24 hours
- Large baking sheet with wire rack
- Paper towels
- Tongs
- Meat thermometer (optional)
Ingredients
- 3-4 lbs chicken wings, split into flats and drumettes
- 2 cups dill pickle juice
- 1 cup water
- 2 tbsp kosher salt (optional, if juice isn’t salty)
- 1 tbsp brown sugar
- 4 cloves garlic, smashed
- 1 bay leaf
- 2 tsp paprika (smoked if available)
- 1 tsp garlic powder
- 1 tsp onion powder
- 1 tsp black pepper
- 1/2 tsp cayenne pepper (optional)
- 1 tsp dried dill
- 1/2 tsp salt (optional, taste before adding)
- 2 tbsp olive oil or melted butter
- fresh dill sprigs, for garnish
- lemon wedges
- ranch or blue cheese dressing
- extra pickle spears, for serving
Instructions
- Split wings into flats and drumettes if whole. Pat them dry with paper towels to help absorb the brine better.
- In a large bowl, mix pickle juice, water, salt, brown sugar, garlic, and bay leaf. Stir until salt and sugar dissolve.
- Submerge wings fully in brine. Cover and refrigerate for 4–24 hours. Do not exceed 24 hours.
- Remove wings from brine and pat completely dry. Let them come to room temp for 30–45 minutes.
- Preheat oven to 425°F (220°C). Set a wire rack on a large baking sheet and coat lightly with oil or cooking spray.
- Mix all rub spices in a small bowl. Drizzle wings with olive oil or melted butter, then toss with spice mix to coat evenly.
- Arrange wings in a single layer on the rack. Bake for 20 minutes at 425°F, then increase to 450°F and bake 15–20 more minutes until crispy and golden.
- Let wings rest for 5 minutes. Serve with ranch, lemon wedges, extra pickle spears, and garnish with dill.
Notes
Your Most Important Questions About Pickle-Brine Wings
Q: Do these pickle-brine chicken wings actually taste like pickles? A: They have a subtle tangy flavor that’s more complex than straight pickle taste. The brine adds depth and juiciness rather than overwhelming pickle flavor.
Q: What kind of pickle juice works best? A: Classic dill pickle juice is ideal. Avoid sweet pickle juice or anything with too many added spices. The juice should be garlicky and briny.
Q: Can I reuse pickle juice for brining? A: Don’t reuse brine that’s had raw chicken in it for food safety reasons. But you can save fresh pickle juice for multiple batches of vegetables or future wing brining.
Q: How long should I brine the wings? A: Minimum 4 hours, ideally 12-24 hours. Longer than 24 hours can make them too salty and affect texture.
Q: What if I don’t have a wire rack? A: You can use a broiler pan or even flip the wings halfway through cooking, but a wire rack really does give the best results for crispy skin all around. FYI, it’s worth investing in one for better wings!