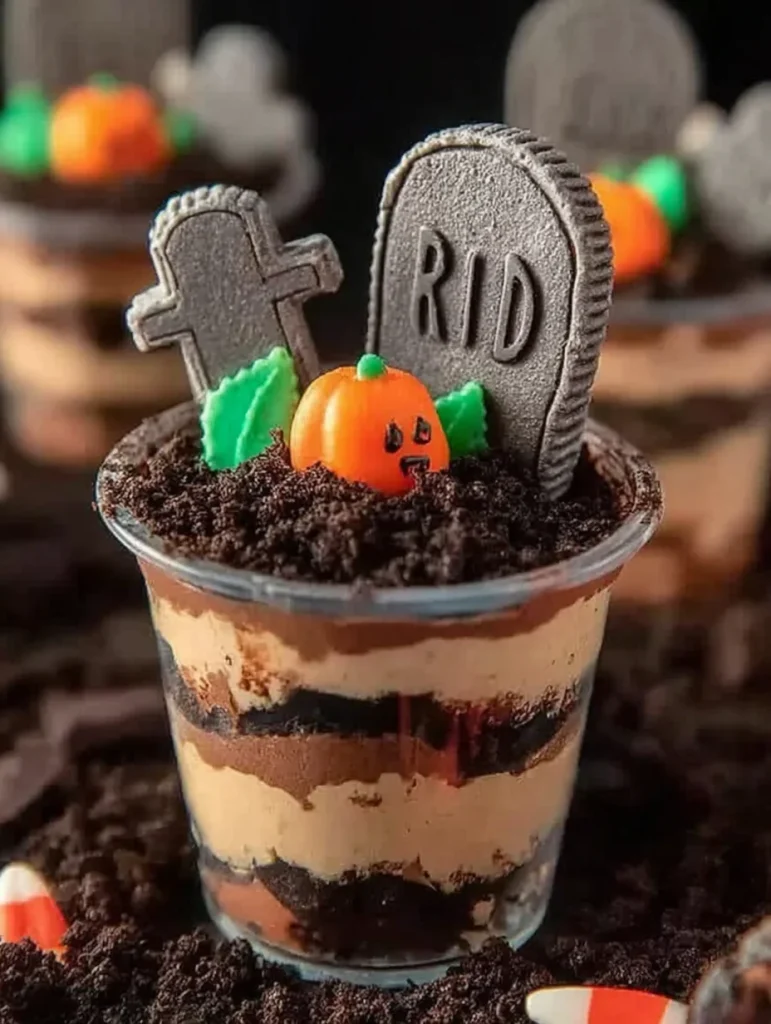
If you’re searching for a Halloween dessert that’s both spooky and scrumptious, Spooky Graveyard Dirt Cake Cups are a guaranteed crowd-pleaser. These single-serve desserts layer creamy chocolate pudding, crushed cookies, and sweet edible decorations to look just like mini haunted graveyards. They’re simple to make, kid-friendly, and full of chocolatey goodness — the perfect mix of eerie and adorable for any Halloween party.
Whether you’re hosting a haunted bash, classroom celebration, or movie night marathon, these graveyard cups are a creative (and delicious) way to get everyone into the spooky spirit. With crunchy cookie “dirt,” creamy pudding “mud,” and edible gravestones, they’re sure to be the hit of your Halloween dessert table.

Why You’ll Love This Recipe
- No-bake dessert: Quick and easy to assemble with zero oven time.
- Rich and creamy: Layers of smooth pudding, whipped topping, and cookie crumbs.
- Perfectly themed: Looks spooky but tastes like a classic chocolate treat.
- Kid-approved: Fun to make and decorate — great for Halloween activities.
- Make-ahead friendly: Chill until party time for stress-free serving.
Ingredients for Spooky Graveyard Dirt Cake Cups
For the Chocolate Layers
- 1 (3.9-ounce) box instant chocolate pudding mix
- 2 cups cold milk
- 4 ounces (½ block) cream cheese, softened
- ¼ cup powdered sugar
- ½ teaspoon vanilla extract
- 1 ½ cups whipped topping (like Cool Whip or homemade whipped cream)
For the “Dirt”
- 20 chocolate sandwich cookies (like OREOs), crushed into fine crumbs
For Decoration
- Milano cookies, graham crackers, or chocolate rectangles (for tombstones)
- Black writing gel or melted chocolate (to write “RIP”)
- Gummy worms or skeleton candy
- Candy pumpkins or edible bones
- Green-tinted coconut or frosting (for grass)
For Serving
- 6–8 clear plastic cups or small mason jars
Step-by-Step Instructions
Step 1: Make the Pudding Layer
In a large bowl, whisk together the chocolate pudding mix and cold milk until thickened (about 2 minutes). In a separate bowl, beat the cream cheese, powdered sugar, and vanilla until smooth. Gently fold in the pudding mixture and whipped topping until combined and creamy.
Step 2: Prepare the “Dirt”
Place the cookies in a food processor and pulse into fine crumbs. Or, crush them by hand in a sealed zip-top bag using a rolling pin.
Step 3: Assemble the Cups
Spoon a layer of cookie crumbs into the bottom of each cup (about 2 tablespoons). Add a generous layer of the pudding mixture, then top with another spoonful of cookie crumbs to create the look of dirt. Repeat if your cups are deep enough.
Step 4: Decorate the Graveyards
Use Milano cookies or graham crackers as tombstones — write “RIP” or spooky messages with black gel or melted chocolate. Press them gently into the top of each cup. Add gummy worms crawling out of the “dirt,” candy pumpkins, and edible bones or skeleton parts. Use green-tinted frosting or shredded coconut for grass.
Step 5: Chill and Serve
Refrigerate for at least 1 hour before serving to let the pudding set and flavors meld. Serve cold for the best texture and flavor.
Flavor and Texture Profile
Spooky Graveyard Dirt Cake Cups combine layers of silky, rich chocolate pudding with fluffy whipped topping and crunchy cookie “soil.” Every bite delivers that perfect balance of creamy and crunchy textures, with just the right level of sweetness. The decorations not only make them look fun and spooky but add a playful variety of flavors — from fruity gummy worms to buttery cookie tombstones.
They’re nostalgic, delicious, and delightfully messy — the best kind of Halloween treat!
Tips for Perfect Graveyard Dirt Cups
- Use instant pudding: It thickens quickly and has the best texture for layering.
- Chill before serving: Cold pudding layers set better and make decorating easier.
- Crush cookies finely: This gives the most realistic “dirt” texture.
- Get creative: Add candy ghosts, eyeballs, or chocolate “trees” for extra fright.
- Make a big batch: These disappear fast, especially with kids!
Make-Ahead and Storage Tips
- Make Ahead: Assemble cups (without toppings) up to 24 hours in advance. Add decorations before serving.
- Storage: Store covered in the refrigerator for up to 3 days.
- Freezing: Not recommended — pudding and whipped topping lose their creamy texture once frozen.
- Leftovers: Stir and enjoy like chocolate mousse the next day — still delicious!
Variations and Add-Ons
- Pumpkin Graveyard Cups: Use pumpkin pudding or add a layer of pumpkin cheesecake filling.
- Cookies & Cream Version: Swap chocolate pudding for vanilla and add crushed OREOs inside the layers.
- Gluten-Free Option: Use gluten-free sandwich cookies.
- Caramel Swirl: Add a drizzle of caramel sauce between pudding layers for a sweet surprise.
- Monster Graveyard: Decorate with candy eyeballs or gummy monsters for a creepier twist.
Serving Ideas
These spooky dessert cups are perfect for:
- Halloween parties: Easy to serve, no slicing required.
- Classroom treats: Fun, mess-free, and perfectly portioned.
- Movie nights: Serve with hot cocoa or cider.
- Trick-or-treat tables: Set up a “build your own graveyard” bar for guests to decorate.
- Potlucks or bake sales: Eye-catching and guaranteed to sell out fast!
Nutritional Snapshot
Each serving (based on 8 cups) contains approximately:
- Calories: 290
- Fat: 14g
- Carbohydrates: 35g
- Protein: 4g
- Sugar: 23g
Sweet, creamy, and perfect for sharing — they’re a Halloween indulgence everyone will love.
Frequently Asked Questions
Can I use store-bought pudding cups?
Yes! Skip the pudding step and layer store-bought chocolate pudding with whipped topping and crushed cookies.
Can I make a large version instead of individual cups?
Absolutely. Assemble in a trifle dish or 9×13-inch pan for a family-style dessert.
Can I use different cookies?
Yes, chocolate wafers, brownies, or crushed sandwich cookies all work great.
Can I make it dairy-free?
Use dairy-free pudding mix, almond milk, and whipped coconut topping.
Can kids help decorate?
Definitely! It’s a perfect hands-on Halloween activity for kids — they love adding the tombstones and worms.
Expert Tips for Success
- Layer neatly: Use a spoon or piping bag to get clean layers.
- Add color contrast: Bright candies and green “grass” make the decorations pop.
- Don’t skip chilling: It makes everything set and easier to eat.
- Label tombstones: Write fun messages like “Boo!” or “Here Lies My Diet” for laughs.
- Serve with mini spoons: Keeps the layers pretty and the mess minimal.
A Frightfully Fun Dessert for Halloween
These Spooky Graveyard Dirt Cake Cups are everything you want in a Halloween dessert — creepy, creamy, and downright delicious. They’re easy to make, easy to serve, and endlessly customizable, making them perfect for both kids and adults.
Each cup looks like a miniature haunted graveyard but tastes like pure chocolate heaven. From the crunchy cookie dirt to the smooth, pudding-rich layers and playful toppings, every bite is a sweet Halloween surprise.

Spooky Graveyard Dirt Cake Cups
Equipment
- Mixing bowls
- Electric hand mixer
- Spatula
- Food processor or rolling pin
- clear cups or jars
- decorating gel or piping bag
Ingredients
- 1 box (3.9 oz) instant chocolate pudding mix
- 2 cups cold milk
- 4 oz cream cheese, softened
- ¼ cup powdered sugar
- ½ tsp vanilla extract
- 1½ cups whipped topping (like Cool Whip)
- 20 chocolate sandwich cookies, crushed
- Milano cookies or graham crackers (for tombstones)
- black writing gel or melted chocolate
- gummy worms, candy pumpkins, edible bones or skeletons
- green-tinted coconut or frosting (for grass)
- 6–8 clear plastic cups or small mason jars
Instructions
- In a bowl, whisk pudding mix and cold milk until thickened (about 2 minutes). In a separate bowl, beat cream cheese, powdered sugar, and vanilla until smooth. Fold in the pudding and whipped topping until fully combined.
- Crush cookies into fine crumbs using a food processor or a rolling pin and zip-top bag.
- Layer 2 tablespoons of cookie crumbs into each cup, followed by pudding mixture, and top with more crumbs. Repeat if using deeper cups.
- Write “RIP” on cookies for tombstones. Insert into cups and add candy worms, pumpkins, bones, and green coconut or frosting as grass.
- Chill in the fridge for at least 1 hour. Serve cold for best taste and texture.
Notes
Final Thoughts
Spooky Graveyard Dirt Cake Cups are the ultimate Halloween crowd-pleaser — no-bake, no-fuss, and full of spooky charm. Fun to make, fun to decorate, and even more fun to eat, they bring just the right mix of fright and delight to any Halloween celebration.
Whether you’re whipping them up for a party, family night, or classroom event, these dirt cups will be the highlight of your dessert table — spooky, creamy, and scarily good!