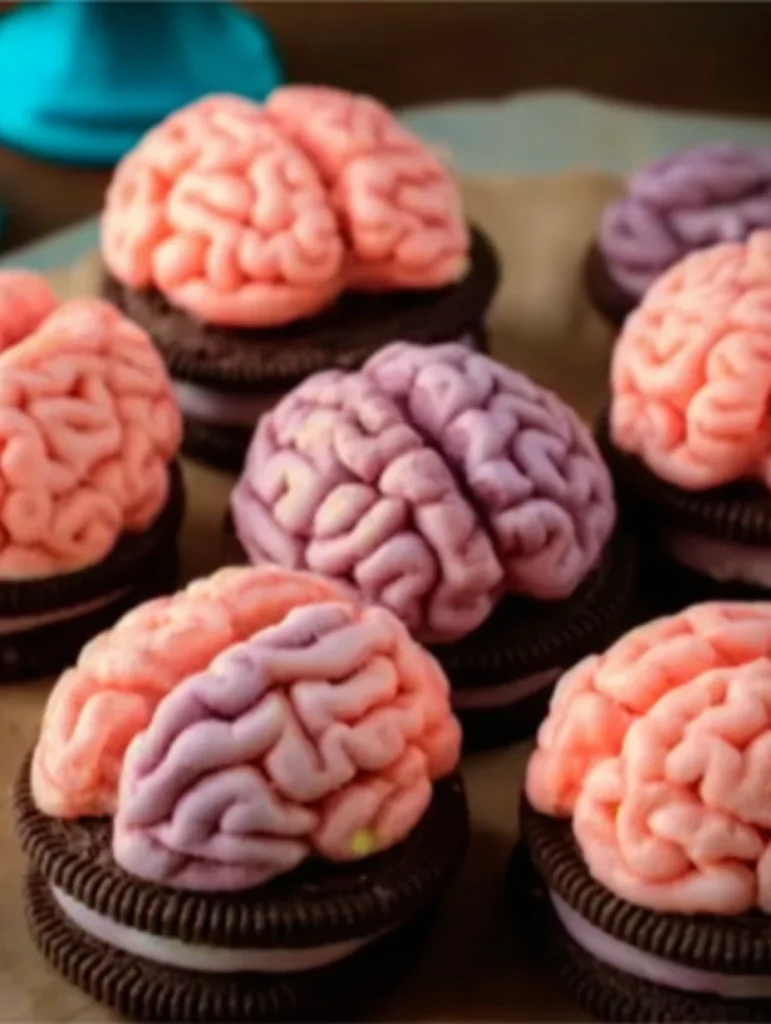
Looking for a fun and frightfully creative dessert to steal the show at your Halloween party? These Spooky Zombie Brain Cookies are the perfect mix of creepy and cute — soft, gooey cookies decorated to look like eerie, colorful brains! Beneath their ghastly frosting design lies a rich, buttery cookie that’s chewy on the inside, crisp on the edges, and deliciously sweet. With their bright “bloody” glaze and realistic brainy swirls, these cookies are guaranteed to grab attention on any Halloween dessert table.
They’re surprisingly easy to make and totally kid-approved. Whether you’re throwing a spooky bash, baking for a school party, or just indulging your inner mad scientist, these zombie brain cookies are a must-try for the season.

Why You’ll Love This Recipe
- Perfect for Halloween: Creepy and fun with just the right amount of spooky charm.
- Soft and chewy texture: Classic sugar cookies with a tender bite.
- Customizable designs: Use your favorite colors for zombie brains — green, gray, or pink!
- Fun to decorate: Great activity for kids or Halloween parties.
- Make-ahead friendly: Cookies can be baked ahead and decorated later.
Ingredients for Spooky Zombie Brain Cookies
For the Cookies
- 2 ¾ cups all-purpose flour
- ½ teaspoon baking powder
- ¼ teaspoon baking soda
- ½ teaspoon salt
- 1 cup (2 sticks) unsalted butter, softened
- 1 ¼ cups granulated sugar
- 1 large egg
- 2 teaspoons vanilla extract
- ¼ teaspoon almond extract (optional for flavor)
For the Frosting and Decoration
- 2 cups powdered sugar
- 2–3 tablespoons milk (as needed for consistency)
- ½ teaspoon vanilla extract
- Gel food coloring (green, gray, pink, or red)
- Red decorating gel or strawberry jam (for “bloody” effect)
- Piping bag with small round tip
Step-by-Step Instructions
Step 1: Preheat and Prepare
Preheat oven to 350°F (175°C). Line two baking sheets with parchment paper.
Step 2: Make the Cookie Dough
In a medium bowl, whisk together flour, baking powder, baking soda, and salt. In a large mixing bowl, beat butter and sugar together until light and fluffy (about 2–3 minutes). Add egg, vanilla, and almond extract and mix until combined.
Gradually add the dry ingredients to the wet ingredients, mixing on low speed until just combined. Do not overmix — the dough should be soft and pliable.
Step 3: Shape the Cookies
Scoop about 2 tablespoons of dough per cookie. Roll into balls, then shape each one into an oval “brain” shape by slightly elongating the ball. Place on prepared baking sheet, leaving about 2 inches between cookies.
Step 4: Bake and Cool
Bake for 9–11 minutes, or until edges are set and tops look slightly puffed. Do not overbake — they’ll firm up as they cool. Let cool completely on a wire rack before decorating.
Step 5: Make the Frosting
In a small bowl, whisk together powdered sugar, milk, and vanilla extract until smooth. Adjust consistency as needed — it should be thick enough to pipe but not runny. Divide frosting into bowls and tint each with gel food coloring (use gray, green, or pink for brains).
Step 6: Pipe the Zombie Brains
Transfer frosting to a piping bag fitted with a small round tip (or use a zip-top bag with a tiny corner snipped off). Pipe squiggly “brain” lines across each cookie: start from the center and work outward in tight curves to mimic brain ridges.
Step 7: Add Bloody Details
Once the frosting sets slightly, drizzle a small amount of red decorating gel or warmed strawberry jam between the brain folds for a gory, realistic effect. Let the cookies sit for 15–20 minutes to set.
Step 8: Serve and Enjoy
Arrange on a platter or spooky tray. Serve at room temperature for the best flavor and texture.
Flavor and Texture Profile
These Zombie Brain Cookies are buttery, sweet, and perfectly chewy with a soft center and light crisp edges. The sugar cookie base pairs beautifully with the vanilla frosting, which adds creamy sweetness and vibrant color. The red gel not only gives them that spooky, gory appearance but adds a fun fruity tang too.
Each bite offers the perfect balance of soft cookie, sugary glaze, and Halloween fun — they’re just creepy enough to thrill your guests without being too scary to eat!
Tips for Perfect Zombie Brain Cookies
- Use gel food coloring: It gives vibrant hues without thinning the icing.
- Chill the dough if it’s sticky: Refrigerate for 15 minutes before shaping.
- Don’t overbake: Slightly underbaked cookies stay soft and chewy.
- Pipe slowly: The slower you pipe, the more control you’ll have over the brain pattern.
- Add shine: Brush a bit of corn syrup or glaze over the “brains” for a wet, glossy look.
Make-Ahead and Storage Tips
- Make Ahead: Bake cookies up to 3 days in advance and store undecorated in an airtight container. Frost and decorate before serving.
- Storage: Keep decorated cookies in a single layer in airtight containers for up to 4 days.
- Freezing: Freeze unfrosted cookies for up to 2 months. Thaw, then decorate as desired.
Variations and Add-Ons
- Chocolate Zombie Brains: Add ¼ cup cocoa powder to the dough for a darker, richer base.
- Lemon Zombie Brains: Add 1 teaspoon lemon zest to the dough for a citrusy twist.
- Glowing Brains: Use neon green or purple frosting for a radioactive zombie look.
- Creepy Sprinkle Topping: Add Halloween sprinkles or edible glitter around the “brains.”
- Brain Sandwich Cookies: Spread frosting between two cookies for a monstrous treat.
Serving Suggestions
Serve Spooky Zombie Brain Cookies at:
- Halloween parties: A must-have on your spooky dessert table.
- Kids’ events: Fun, interactive treat for decorating activities.
- Movie nights: Perfect to snack on while watching zombie flicks.
- Bake sales: Eye-catching, seasonal, and guaranteed to sell out.
Nutritional Snapshot
Each cookie (based on 24 cookies) contains approximately:
- Calories: 180
- Fat: 8g
- Carbohydrates: 25g
- Protein: 2g
- Sugar: 14g
They’re a sweet indulgence — perfect for Halloween fun!
Frequently Asked Questions
Can I use store-bought sugar cookie dough?
Yes! Just shape and bake according to package directions, then decorate once cooled.
Can I use royal icing instead of buttercream?
Yes. Royal icing gives a firmer, shinier finish that holds the “brain” shape beautifully.
Can I skip the red gel?
Of course — you can leave the brains clean or drizzle melted white chocolate for a milder look.
Can kids help with decorating?
Absolutely! It’s a fun, creative project that kids love — let them design their own spooky brains.
Can I make them gluten-free?
Yes! Substitute your favorite 1:1 gluten-free baking flour for the all-purpose flour.
Expert Tips for Success
- Work in small batches: Frost a few cookies at a time so the icing doesn’t dry before adding gel.
- Keep frosting covered: It dries quickly, so cover bowls with plastic wrap between uses.
- Add brains while cookies are cool: Warm cookies will melt the icing.
- Go wild with designs: Try zombie green brains, neon pink alien brains, or sparkly monster brains.
- Store in a cool place: Avoid humidity to keep frosting from smudging.
A Deliciously Creepy Halloween Treat
These Spooky Zombie Brain Cookies are the perfect blend of creepy and creative — soft sugar cookies transformed into edible zombie brains with a few fun decorating tricks. They’re as delicious as they are horrifyingly cute, and they’ll be the talk of your Halloween table.
Whether you go for realistic gore or cartoonish fun, these cookies are an easy way to make your spooky celebration unforgettable.

Spooky Zombie Brain Cookies
Equipment
- Mixing bowls
- Electric mixer
- Rubber spatula
- Baking sheets
- Parchment paper
- Cooling rack
- piping bags
Ingredients
- 2¾ cups all-purpose flour
- ½ tsp baking powder
- ¼ tsp baking soda
- ½ tsp salt
- 1 cup unsalted butter, softened
- 1¼ cups granulated sugar
- 1 large egg
- 2 tsp vanilla extract
- ¼ tsp almond extract (optional)
- 2 cups powdered sugar
- 2–3 tbsp milk
- ½ tsp vanilla extract (for frosting)
- gel food coloring (green, gray, pink, red)
- red decorating gel or strawberry jam
- piping bag with small round tip
Instructions
- Preheat oven to 350°F (175°C) and line two baking sheets with parchment paper.
- Whisk together flour, baking powder, baking soda, and salt. In another bowl, beat butter and sugar until fluffy. Add egg, vanilla, and almond extract; mix well.
- Gradually combine dry and wet mixtures until a soft dough forms. Don’t overmix.
- Scoop dough (2 tbsp per cookie), roll into balls, then elongate into “brain” ovals. Place on baking sheet with space between.
- Bake for 9–11 minutes until edges are set. Let cool completely on wire rack.
- Mix powdered sugar, milk, and vanilla until smooth. Divide and color with gel food coloring. Frosting should be thick enough to pipe.
- Transfer frosting to piping bag. Pipe squiggly brain lines on each cookie starting from the center outward.
- Drizzle red gel or jam between brain lines for a bloody look. Let sit to set for 15–20 minutes.
- Arrange on platter or tray. Serve at room temperature for best texture.
Notes
Final Thoughts
Spooky Zombie Brain Cookies bring playful Halloween spirit to your kitchen — soft, buttery cookies topped with eerie frosting brains and just the right amount of spooky flair. They’re fun to make, fun to decorate, and even more fun to eat.
So, grab your piping bag and channel your inner mad scientist — it’s time to bake up a batch of delicious zombie brains that your guests (and the undead) won’t be able to resist!