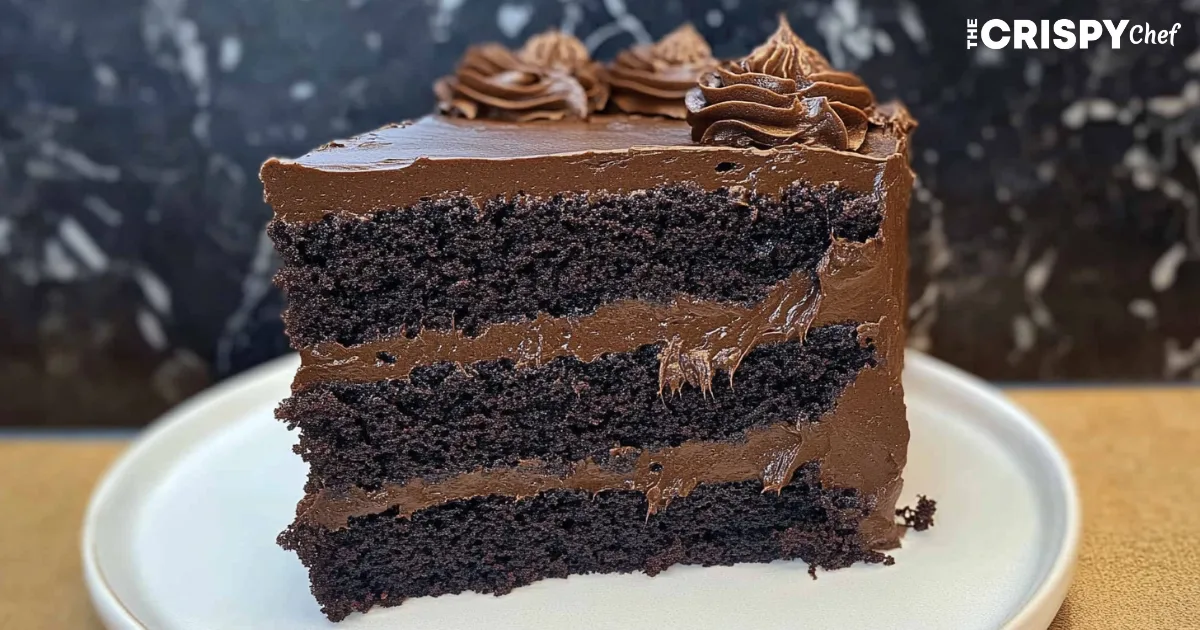
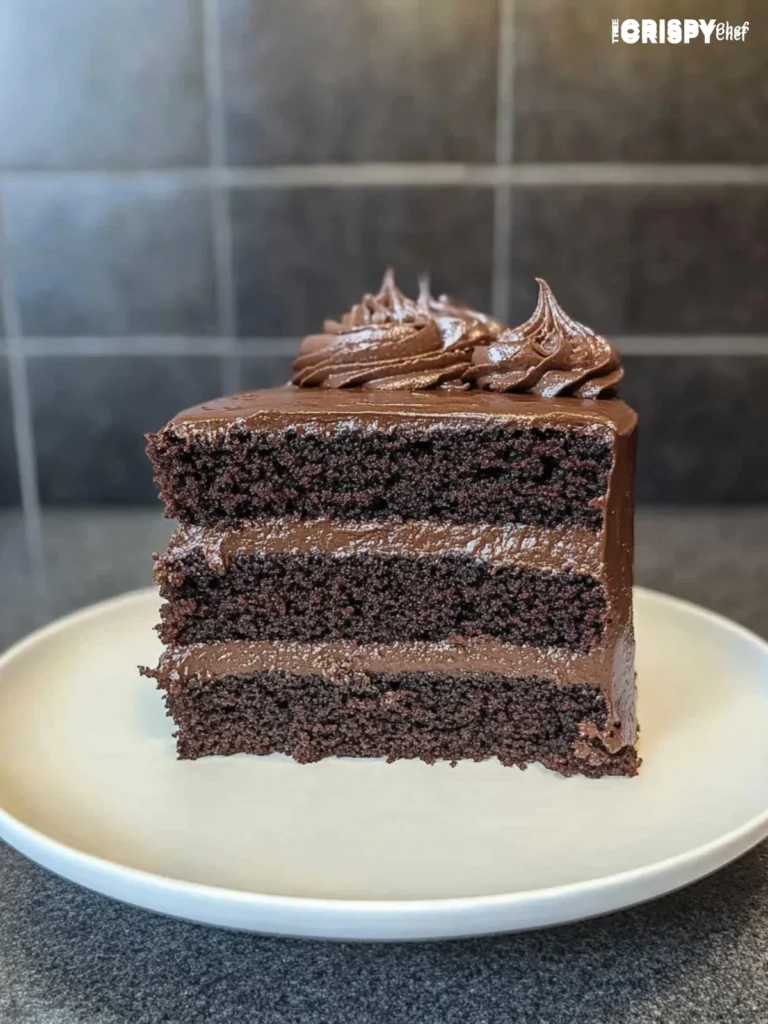
Explore the rich history of Brooklyn through a legendary dessert. The Brooklyn Blackout Cake has won the hearts of chocolate fans for years. It’s not just a sweet treat; it’s a piece of New York City’s baking history.
It was made famous by Ebinger’s bakery in Flatbush. This cake is a symbol of the city’s lively food scene. With its deep chocolate layers, rich pudding, and creamy frosting, it offers a taste experience like no other.
Key Takeaways
- Authentic recipe from historic Ebinger’s bakery
- Intense chocolate flavor in every layer
- Unique World War II-inspired cake design
- Perfect for serious chocolate enthusiasts
- Rich cultural history behind each slice
The Rich History of Ebinger’s Bakery and Brooklyn Blackout Cake
Ebinger’s Bakery is a treasure in Brooklyn’s heart. It started in 1898 and quickly became a favorite. It’s famous for its Brooklyn Blackout Cake.
The blackout cake’s story links to World War II. Brooklyn’s waterfront was key during the war. The military did secret power outages to help ships leave without being seen.
Origins During World War II
Blackout drills started in 1942 in New York City. They made the city dark, even famous spots like Coney Island. The cake’s name comes from these drills.
Legacy of Ebinger’s Famous Recipe
Ebinger’s grew fast. By 1970, it had 39 stores in Brooklyn. Their blackout cake was a hit:
- It had three moist devil’s food cake layers
- Was filled with chocolate pudding
- Was covered in dark chocolate frosting
- Was only good for 24 hours
Why It’s Called Blackout Cake
The cake’s name is a nod to the war. Its dark color reminded people of the blacked-out streets. It’s a tasty link to a big moment in history.
| Bakery Milestone | Year |
|---|---|
| Ebinger’s Founding | 1898 |
| Peak Locations | 39 (by 1970) |
| Bakery Closure | 1972 |
| Blackout Cake Origin | World War II Era |
Even though Ebinger’s closed in 1972, the blackout cake lives on. It still inspires bakers and food lovers everywhere.
Essential Ingredients for Your Brooklyn Blackout Cake
To make a true Brooklyn blackout cake, you need the right ingredients. They must bring out the deep, rich chocolate taste. Each part is key to the cake’s texture and flavor.
Your Brooklyn blackout cake recipe will have two main types of ingredients: dry and wet. Let’s look at what you’ll need:
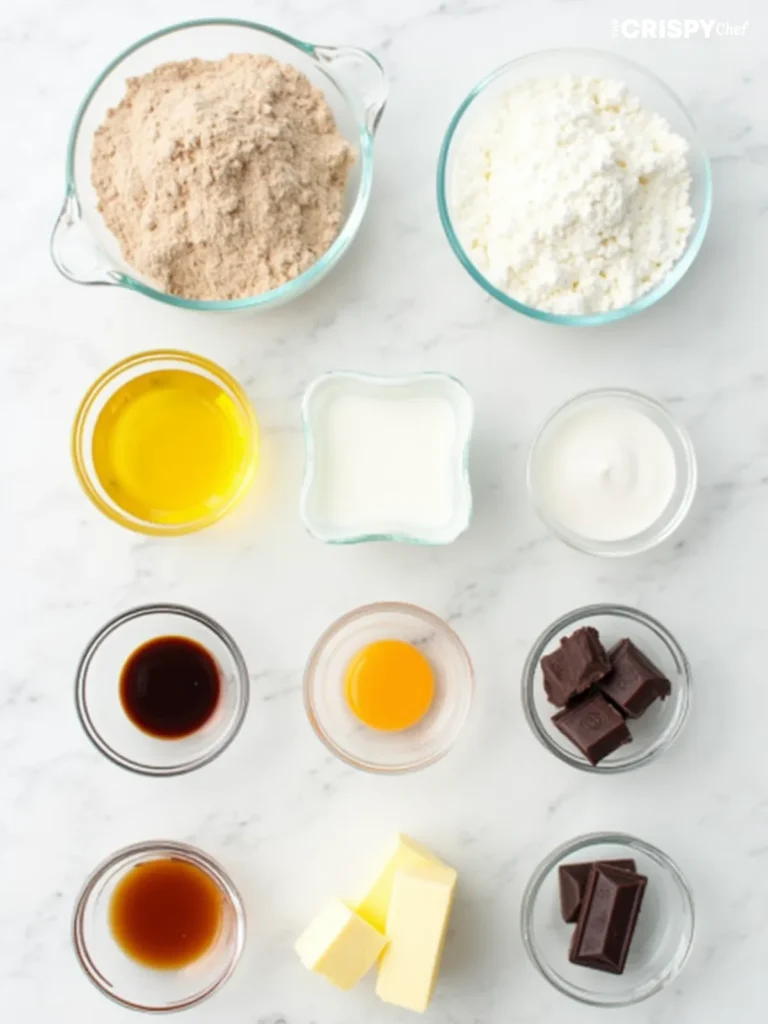
Dry Ingredients
- 1¾ cups all-purpose flour
- 2 cups white sugar
- ¾ cup Dutch-process cocoa powder
- 2 teaspoons baking soda
- 1 teaspoon baking powder
- 1 teaspoon salt
Wet Ingredients
- 1 cup buttermilk
- ½ cup vegetable oil
- 2 large eggs
- 1 teaspoon vanilla extract
- 1 cup hot brewed coffee
For the best Brooklyn blackout cake, use Dutch-process cocoa powder. It gives a richer color and deeper chocolate taste. This makes the cake stand out from other chocolate desserts.
“The secret is in the quality of your ingredients” – Brooklyn Baking Tradition
Choose fresh and high-quality ingredients. Your buttermilk should be fresh, eggs at room temperature, and cocoa powder recently bought. This ensures the best flavor for your cake.
Understanding the Three Main Components
To make a real Brooklyn blackout cake, you need to get three key things right. Each part is important for the cake’s deep flavor and soft texture.
The Brooklyn chocolate cake is a detailed dessert with layers that need careful attention. Let’s look at the three main parts that make this classic dessert so special.
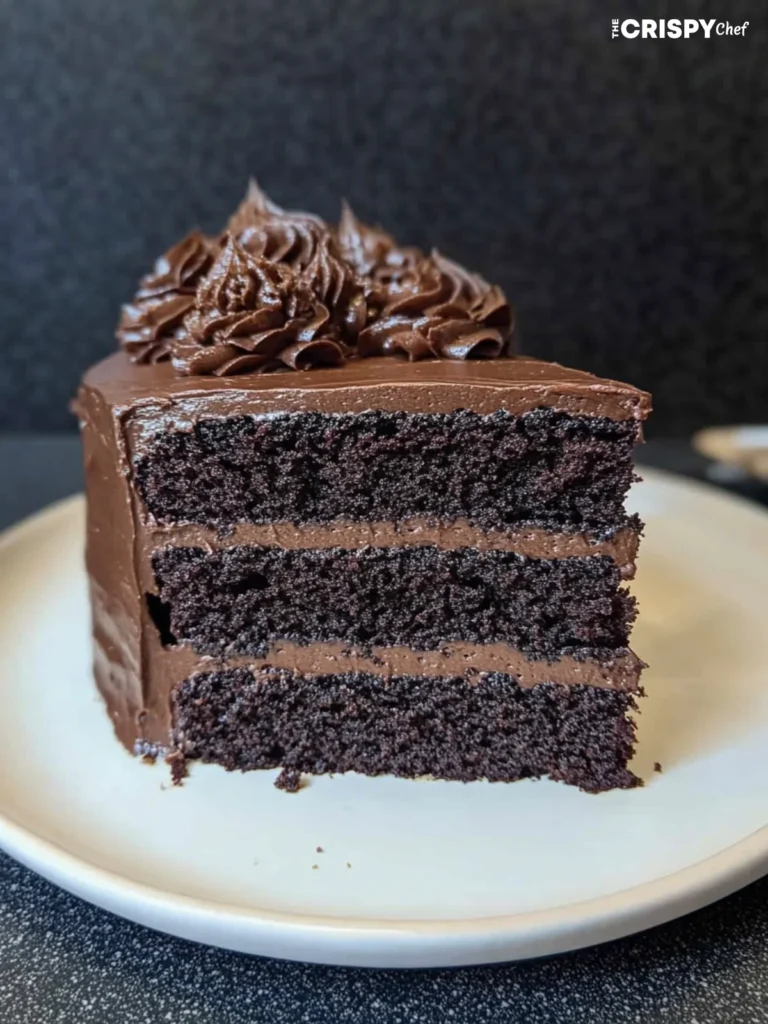
Devil’s Food Cake Layers
The base of your Brooklyn chocolate cake is moist devil’s food cake layers. These layers need special ingredients to be as soft as they should be:
- Dutch-process cocoa powder (sifted to prevent lumps)
- Sour cream for enhanced richness
- Instant coffee granules to intensify chocolate flavor
Chocolate Pudding Filling
The pudding filling makes this cake stand out from other chocolate treats. It’s rich and full of chocolate, giving a luxurious taste.
| Ingredient | Quantity |
|---|---|
| Whole Milk | 1 ½ cups |
| Bittersweet Chocolate | 100 grams |
| Vanilla Extract | 1 teaspoon |
Dark Chocolate Frosting
The frosting adds the final touch of luxury. It’s a dark chocolate ganache that needs careful making for the right shine and feel.
“The frosting is what transforms a good cake into an unforgettable Brooklyn chocolate cake experience.”
Learning to make these three parts right will help you create a true Brooklyn chocolate cake. It honors the cake’s rich history.
Preparing the Perfect Chocolate Cake Base
Starting a Brooklyn blackout cake recipe means picking the right ingredients and mixing method. Your chocolate cake base is key, needing precision and care.
To make a great chocolate cake base, you need the right ingredients. Dutch-process cocoa powder is essential for that deep, rich chocolate taste.
Key Ingredients for the Chocolate Cake Base
- 3.5 cups all-purpose flour
- 1.5 cups dark cocoa powder
- 2 cups granulated sugar
- 1 cup dark brown sugar
- 1 tablespoon baking soda
- 1 teaspoon kosher salt
The secret to a perfect Brooklyn blackout cake recipe is in the mixing. Use just one bowl to mix your dry ingredients. This makes sure the cocoa and leavening agents are evenly spread.
“A great cake begins with great ingredients and careful preparation.” – Baking Enthusiast
Now, mix in your wet ingredients to make a rich batter. Add 5 large eggs, 2 cups milk, 1 cup Greek yogurt, and 1 tablespoon vanilla extract. Sour cream adds a tangy richness that boosts the chocolate flavor.
Baking Details
| Baking Temperature | Baking Time | Cooling Time |
|---|---|---|
| 325°F | 40-45 minutes | Minimum 10 minutes |
Pro tip for your Brooklyn blackout cake recipe: don’t overmix the batter. Fold ingredients gently until just combined. This keeps the cake tender and moist. Your patience will pay off with a rich chocolate cake base.
Making the Rich Chocolate Pudding Filling
The chocolate pudding filling is the heart of any authentic Brooklyn blackout cake. It turns an ordinary chocolate cake into a decadent treat. This dessert will take you back to the classic Brooklyn bakeries of the mid-20th century.
Traditional Pudding Preparation Technique
Making the perfect blackout cake pudding needs precision and patience. Success depends on several key steps:
- Use high-quality Dutch-process cocoa powder
- Sift dry ingredients to prevent lumps
- Maintain constant stirring during cooking
- Control cooking temperature carefully
Pudding Ingredient Breakdown
| Ingredient | Purpose | Quantity |
|---|---|---|
| Dutch-process cocoa | Rich chocolate flavor | 1/4 cup |
| Sugar | Sweetness | 1/2 cup |
| Cornstarch | Thickening agent | 3 tablespoons |
| Whole milk | Creamy base | 2 cups |
Storage and Setting Tips
For the ultimate blackout cake experience, follow these crucial pudding setting guidelines:
- Chill pudding completely before filling cake layers
- Use plastic wrap directly on pudding surface to prevent skin formation
- Refrigerate for at least 2-3 hours
- Test consistency before assembling cake
“The secret to a perfect blackout cake lies in its rich, smooth chocolate pudding filling” – Brooklyn Baking Tradition
Pro tip: Your pudding should be thick enough to hold its shape but spreadable enough to create smooth cake layers. The right consistency ensures your blackout cake looks as amazing as it tastes.
Crafting the Dark Chocolate Frosting
Making the perfect dark chocolate frosting is key to a great Brooklyn Blackout Cake. It’s the icing on the cake that makes it special.
To make this rich frosting, you’ll need a few ingredients:
- 12 oz semisweet chocolate
- 3/4 cup unsalted butter (1 1/2 sticks)
- 3/4 cup powdered sugar
- 2 tablespoons Dutch cocoa powder
- 1 tablespoon vanilla extract
- 1/4 cup hot water
The secret to a glossy frosting is in the technique. Start by melting the chocolate carefully, making sure it doesn’t burn. Slowly add the butter to make a smooth, velvety base.
“A perfect frosting is the crown jewel of any great cake.” – Brooklyn Baking Tradition
Your chocolate mix should be silky and rich. It should be sweet but not too much. Dutch cocoa powder makes the chocolate flavor deeper, and vanilla adds a hint of complexity.
| Ingredient | Quantity | Purpose |
|---|---|---|
| Semisweet Chocolate | 12 oz | Primary flavor base |
| Unsalted Butter | 3/4 cup | Provides creamy texture |
| Powdered Sugar | 3/4 cup | Adds sweetness |
The last step is whipping the frosting to the right consistency. Let it cool a bit, then spread it over your cake layers. It will give your cake a decadent finish that will wow anyone.
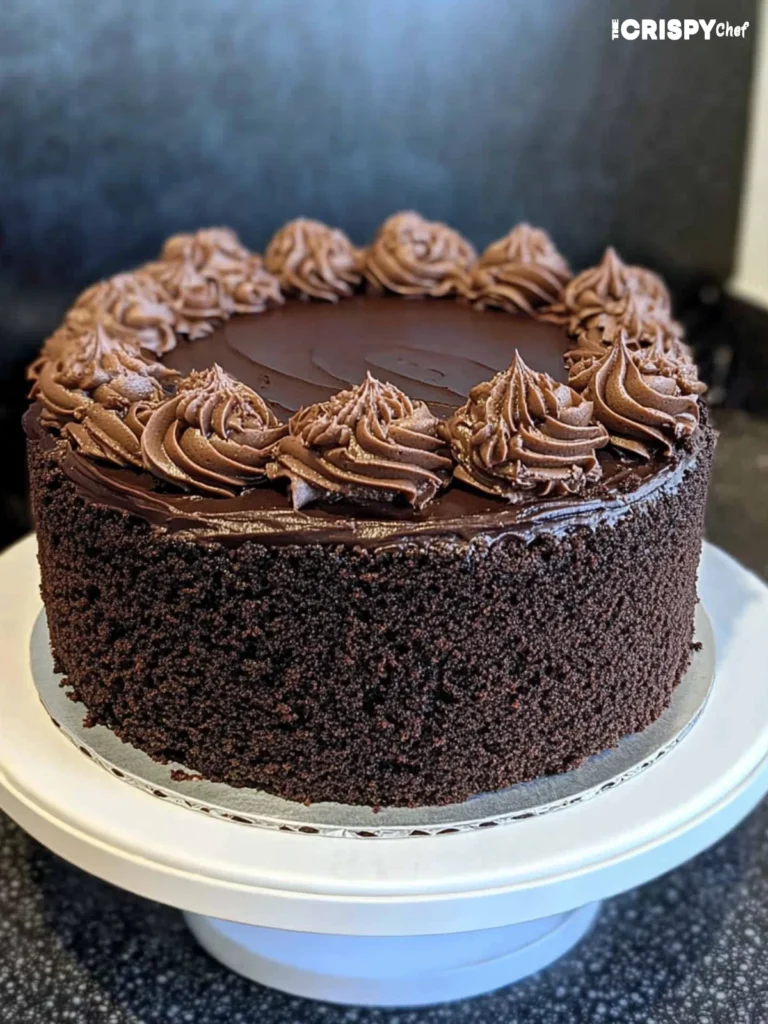
The Art of Cake Assembly
Making a stunning Brooklyn chocolate cake needs precision and skill. The assembly turns separate parts into a work of art. This dessert is a classic.
Your Brooklyn blackout cake will come together through a carefully orchestrated layering process. This involves strategic placement and unique textures.
Strategic Layer Stacking
When assembling your Brooklyn chocolate cake, follow these key steps:
- Bake two cake layers and carefully slice each horizontally
- Create four total layers for maximum flavor complexity
- Use chocolate pudding between each cake layer
- Spread pudding evenly to ensure consistent taste
Signature Crumb Coating Technique
The hallmark of an authentic Brooklyn blackout cake is its distinctive exterior. Here’s how to achieve the classic look:
- Reserve one cake layer for crumbling
- Crumble the reserved layer into fine, even pieces
- Apply a thin layer of chocolate frosting as a base
- Carefully press crumbs onto the frosted cake sides
“A true Brooklyn blackout cake is as much about presentation as it is about taste.” – Brooklyn Baking Tradition
Pro tip: Chill your cake between layering stages to help set the pudding. This ensures your Brooklyn chocolate cake looks as spectacular as it tastes.
Tips for Achieving the Classic Brooklyn Blackout Look
To make a perfect Brooklyn blackout cake, you need some special tips. These will turn your dessert from messy to magnificent. You can be inspired by Entenmann’s or try to make the original Ebinger’s Bakery cake. These tips will help you get the iconic look right.
Getting the blackout cake to look right involves a few key steps:
- Chill your chocolate pudding filling completely before assembly
- Use a gentle touch when layering to prevent filling from oozing
- Apply a thin crumb coat to seal in any imperfections
- Create a smooth, even chocolate frosting layer
The secret to a pro-looking blackout cake is in the temperature and technique. Make sure your pudding filling is thoroughly chilled. About 3 hours in the fridge is perfect. This stops the layers from getting messy and keeps your cake in shape.
“The genius of the crumb coating is that it hides all sins, transforming a potentially messy cake into a stunning dessert.” – Baking Professionals
For those who love blackout cakes, here’s a pro tip: Use a rotating cake stand and an offset spatula for the smoothest frosting. You want your cake to look as good as Entenmann’s but with a homemade touch that makes it extra special.
| Technique | Key Tip | Expected Result |
|---|---|---|
| Pudding Filling | Chill for 3 hours | Stable, clean layers |
| Crumb Coating | Thin, even layer | Smooth final appearance |
| Frosting | Use offset spatula | Professional finish |
Remember, the more you practice, the better you’ll get. Every blackout cake you make will improve your skills. You’ll get closer to the legendary Brooklyn bakery standard.
Storage and Serving Recommendations
Keeping your Brooklyn Blackout Cake fresh is key. It needs the right storage and serving tips. This way, it stays moist and full of chocolate flavor.
Keeping Your Cake Fresh
Storing your cake right is important. Here’s how to keep it fresh:
- Refrigerate in an airtight container for up to 4 days
- Use a cake carrier with a tight-sealing lid
- Wrap individual slices in plastic wrap for easy preservation
Freezing Your Brooklyn Blackout Cake
Freezing is great for keeping your cake for longer. Here’s how to do it:
| Storage Method | Duration | Recommended Technique |
|---|---|---|
| Freezer Storage | Up to 1 month | Wrap tightly in plastic wrap and aluminum foil |
| Thawing Process | 4-6 hours | Refrigerate before bringing to room temperature |
Serving Temperature Recommendations
The right serving temperature makes a big difference. Let the cake sit at room temperature for 15-20 minutes before serving. This brings out its best flavors.
“A perfectly served Brooklyn Blackout Cake is a chocolate lover’s dream!” – Pastry Chef
Pro tip: Always use a sharp, clean knife when cutting. Wipe the blade between cuts. This keeps your cake looking great and shows off its layers.
Common Mistakes to Avoid
Getting your brooklyn blackout cake recipe right takes focus and avoiding common mistakes. Even skilled bakers can slip up, affecting the cake’s chocolate taste and softness.
Here are the most critical errors to watch out for when creating this classic dessert:
- Overmixing the Cake Batter: Stir just until ingredients are combined. Overworking the batter leads to tough, dry cake layers that lack the signature tender crumb.
- Skipping the Ingredient Sifting Step: Always sift cocoa powder and powdered sugar to remove lumps. This ensures a smooth, silky frosting and even cake texture.
- Incorrect Ingredient Measurements: Use precise measuring tools. Baking is a science that requires exact proportions for the perfect brooklyn blackout cake recipe.
“Baking is about precision – every gram and every minute counts!” – Professional Pastry Chef
Temperature and timing are crucial in your brooklyn blackout cake recipe. Some additional critical mistakes include:
- Assembling the cake before layers are completely cooled
- Using room temperature ingredients that aren’t properly mixed
- Opening the oven door too frequently during baking
By avoiding these common errors, you’ll create a decadent brooklyn blackout cake that rivals the legendary Ebinger’s Bakery original. Practice makes perfect!
Variations and Modern Adaptations
Your classic blackout cake can become something new and exciting. Bakers have found ways to keep its rich chocolate taste while adding their own twist. This keeps the dessert’s heritage alive.
- Mocha Espresso Blackout Cake: Infuse layers with strong espresso for a sophisticated twist
- Gluten-Free Chocolate Version: Use alternative flour blends for dietary restrictions
- Mini Blackout Cupcakes: Perfect for portion-controlled indulgence
- Salted Caramel Blackout Cake: Add a layer of salted caramel between chocolate layers
Modern bakers also play with how they present the cake:
- Blackout Cake Pops: Bite-sized chocolate spheres
- Deconstructed Blackout Dessert: Architectural chocolate elements
- No-Bake Blackout Cheesecake: Combining classic techniques
“Innovation respects tradition while creating something beautifully new” – Unknown Pastry Chef
Experts say to use top-notch chocolate and try new flavors. Your blackout cake can show off your creativity while staying true to its Brooklyn roots.
Conclusion
Your journey into Brooklyn Blackout Cake has been a tasty trip through history and chocolate art. This dessert is more than a sweet treat. It’s a piece of New York’s baking history, loved by many for its deep chocolate taste and unique texture.
Making a Brooklyn Blackout Cake takes patience, care, and a love for baking. It’s a recipe that rewards both seasoned bakers and curious cooks. The mix of devil’s food cake, chocolate pudding, and dark chocolate frosting is a flavor mix that will wow everyone.
As you start making your Brooklyn Blackout Cake, think about the story it tells. It began during World War II and has stayed popular in New York. Your cake is more than just a dessert; it’s a link to a cherished tradition.
So, get your oven ready, collect your ingredients, and make a Brooklyn Blackout Cake that will be a favorite. Baking is about passion, precision, and the joy of making something amazing from simple things.
FAQ
What is a Brooklyn Blackout Cake?
A Brooklyn Blackout Cake is a decadent chocolate cake. It comes from Ebinger’s Bakery. It has layers of devil’s food cake, filled with chocolate pudding. The whole thing is covered in dark chocolate frosting and chocolate cake crumbs.
It’s named after Brooklyn’s World War II blackout drills. These drills were when Brooklyn would turn off its lights to avoid guiding enemy ships.
Why is it called a Blackout Cake?
The cake is named after the blackout drills of World War II. Brooklyn would darken its lights to avoid guiding enemy ships. The cake’s dark chocolate color symbolizes this “blacked out” look.
What makes the Brooklyn Blackout Cake unique?
Its layers of moist chocolate cake and rich chocolate pudding make it special. The dark chocolate frosting and crumbled chocolate cake on top add to its uniqueness. It’s a chocolate-encased dessert.
Can I make a Brooklyn Blackout Cake at home?
Yes, you can! Making it at home requires patience and quality ingredients. You’ll need to make cake layers, chocolate pudding, and dark chocolate frosting.
How long does a Brooklyn Blackout Cake stay fresh?
Stored in an airtight container, it stays fresh for 3-4 days at room temperature. It can last up to a week in the fridge. You can also freeze it for up to a month.
What type of cocoa powder works best for this cake?
Dutch-process cocoa powder is best for its rich chocolate flavor. It gives a deeper color and smoother taste than natural cocoa powder. This is key for the classic Brooklyn Blackout Cake taste.
Is the Brooklyn Blackout Cake similar to other chocolate cakes?
While it’s similar to other chocolate cakes, it stands out. Its layering, pudding filling, and crumb coating make it unique. These features completely cover the cake’s exterior.
Can I make a gluten-free version of this cake?
Yes, you can make a gluten-free version. Use gluten-free flour blends and ensure all ingredients are gluten-free. The goal is to keep the rich chocolate flavor and moist texture.
What’s the origin of this cake?
The Brooklyn Blackout Cake came from Ebinger’s Bakery in Brooklyn in the 1940s. It was made during World War II. The bakery closed in 1972, but the cake’s legacy lives on.
How difficult is it to make a Brooklyn Blackout Cake?
Making the cake is moderately challenging. It requires steps like making cake layers, pudding, and frosting. It’s best for bakers with some experience who enjoy complex recipes.

Brooklyn Blackout Cake
Equipment
- Cake pans
- Mixing bowls
- Whisk
- Spatula
- cake stand
Ingredients
Dry Ingredients:
- 1¾ cups all-purpose flour
- 2 cups white sugar
- ¾ cup Dutch-process cocoa powder
- 2 teaspoons baking soda
- 1 teaspoon baking powder
- 1 teaspoon salt
Wet Ingredients:
- 1 cup buttermilk
- ½ cup vegetable oil
- 2 large eggs
- 1 teaspoon vanilla extract
- 1 cup hot brewed coffee
- Chocolate Pudding Filling:
- 1½ cups whole milk
- 100 grams bittersweet chocolate
- 1 teaspoon vanilla extract
Dark Chocolate Frosting:
- 12 oz semisweet chocolate
- ¾ cup unsalted butter
- ¾ cup powdered sugar
- 2 tablespoons Dutch cocoa powder
- 1 tablespoon vanilla extract
- ¼ cup hot water
Instructions
- Preheat oven to 325°F (163°C).
- Mix dry ingredients in a large bowl.
- Add wet ingredients and mix until combined. Then, stir in the hot coffee.
- Pour batter into greased cake pans and bake for 40-45 minutes. Cool for 10 minutes.
- For the pudding, combine milk, chocolate, and vanilla. Cook over medium heat, stirring until thickened. Chill for 2-3 hours.
- Prepare the frosting by melting chocolate and combining with butter, powdered sugar, cocoa, and vanilla. Stir in hot water and mix until smooth.
- Slice the cake layers in half, layer with pudding, and frost with chocolate ganache. Press crumbled cake crumbs onto the frosting for the signature blackout appearance.
Notes
Chill the cake between layering stages to prevent the pudding from spilling.
For a pro-like finish, use a rotating cake stand and offset spatula.


5 Comments