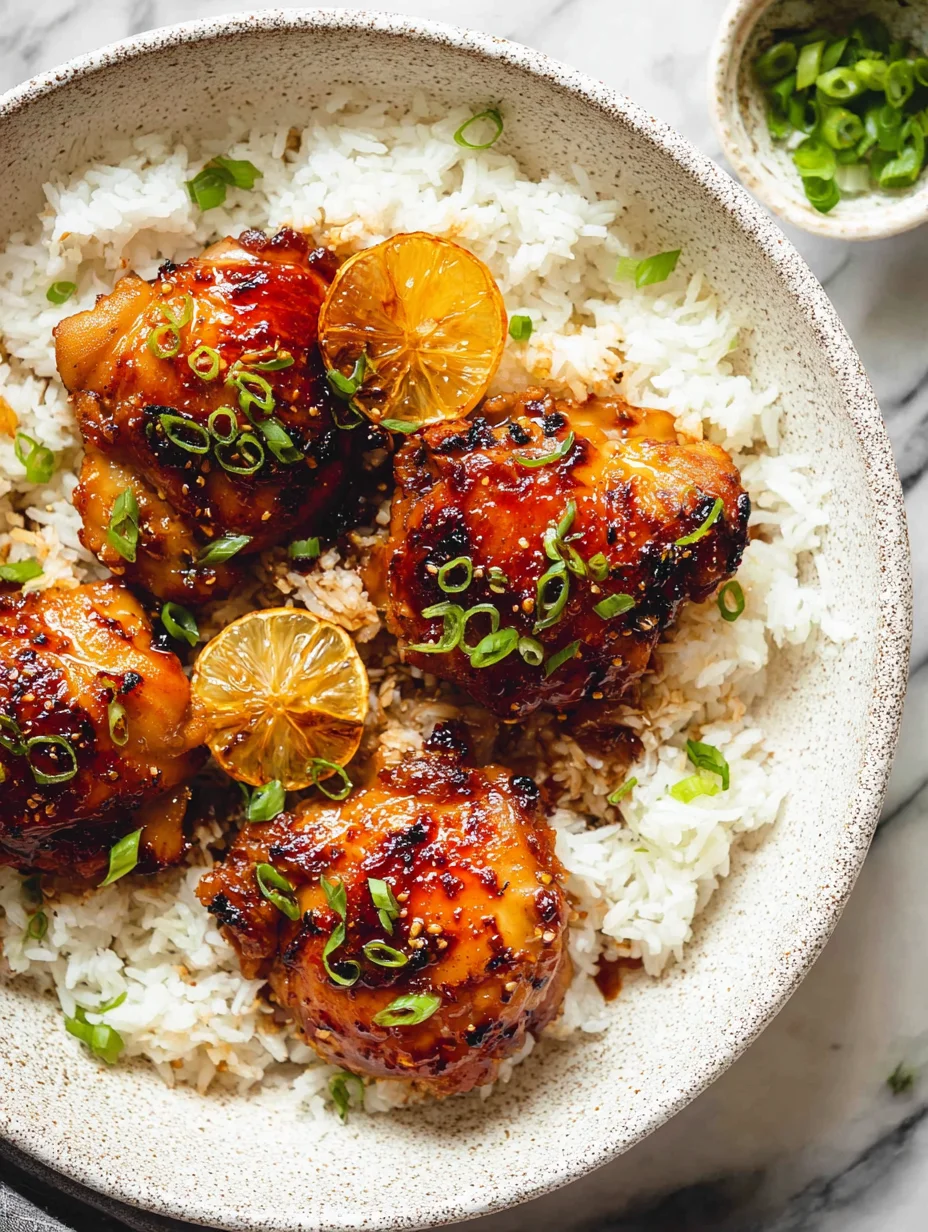
You know that moment when you walk into someone’s kitchen and immediately think “whatever they’re cooking, I need the recipe”? That’s exactly what happened to me the first time I smelled honey garlic chicken thighs sizzling away in a cast iron skillet. The sweet, savory aroma practically grabbed me by the collar and refused to let go.
Here’s the thing about chicken thighs – they’re the MVP of the poultry world, yet somehow they still don’t get the respect they deserve. While everyone’s obsessing over bland chicken breasts (sorry, not sorry), thighs are over here being juicy, flavorful, and virtually impossible to overcook. Add a sticky honey garlic glaze to the mix? Game over.

Why Chicken Thighs Beat Breasts Every Single Time
Let’s settle this debate once and for all. Chicken thighs are superior, and I’ll die on this hill. Here’s why:
Dark meat contains more fat than white meat, which translates to maximum flavor and juiciness. You can cook these bad boys a little longer without turning them into rubber – unlike their prissy breast counterparts that turn into shoe leather if you so much as look at them wrong.
The higher fat content also means thighs absorb marinades and glazes like nobody’s business. That honey garlic sauce? It doesn’t just sit on top looking pretty – it penetrates deep into the meat, creating layers of flavor that’ll make you question every chicken breast you’ve ever eaten.
Plus, let’s talk budget. Thighs cost significantly less than breasts, which means you can feed your family (or meal prep for the week) without breaking the bank. Ever wondered why restaurants love using thighs? It’s not just about flavor – it’s about smart economics too.
The Science Behind the Perfect Honey Garlic Glaze
Creating that perfect sticky glaze isn’t just about dumping honey and garlic into a pan and hoping for the best. There’s actually some kitchen chemistry at play here.
Honey caramelizes at around 300°F, creating those gorgeous golden-brown notes that make your mouth water. But here’s the tricky part – burn it, and you’ll end up with bitter, acrid flavors that’ll ruin the whole dish. The sweet spot (pun intended) is getting that gentle caramelization while keeping the garlic from turning bitter.
I learned this the hard way during my early cooking days. Nothing quite prepares you for the disappointment of burned garlic :/ The key is timing and temperature control. Add the garlic after the initial sear, let it bloom in the fat for maybe 30 seconds, then hit it with the honey mixture.
Building Layers of Flavor
The best honey garlic chicken thighs don’t just taste like honey and garlic – they’re a symphony of complementary flavors:
- Soy sauce adds umami depth and helps with browning
- Rice vinegar cuts through the sweetness and adds brightness
- Fresh ginger provides warmth and complexity
- Red pepper flakes bring just enough heat to keep things interesting
- Sesame oil (just a drizzle) adds nutty richness
IMO, the magic happens when these flavors meld together during the cooking process. The chicken renders its fat, which mixes with the glaze, creating this glossy, finger-licking coating that clings to every surface.

The Foolproof Cooking Method
Here’s where most people mess up honey garlic chicken thighs – they try to rush the process. Good things take time, and that includes properly rendered chicken skin.
Step 1: The Perfect Sear
Start with bone-in, skin-on thighs at room temperature. Cold chicken hits a hot pan = uneven cooking and sad, flabby skin. Season generously with salt and pepper, then place them skin-side down in a hot skillet.
Now comes the hardest part – don’t touch them. Seriously. I know it’s tempting to peek and poke, but resist the urge. Let that skin render and crisp for about 6-8 minutes. You’ll hear the sizzling slow down when they’re ready to flip.
Step 2: The Flip and Glaze
Flip those beauties and immediately reduce the heat to medium. This is when you add your minced garlic (about 4-5 cloves for 6 thighs) and let it bloom for 30 seconds. Then pour in your honey garlic mixture.
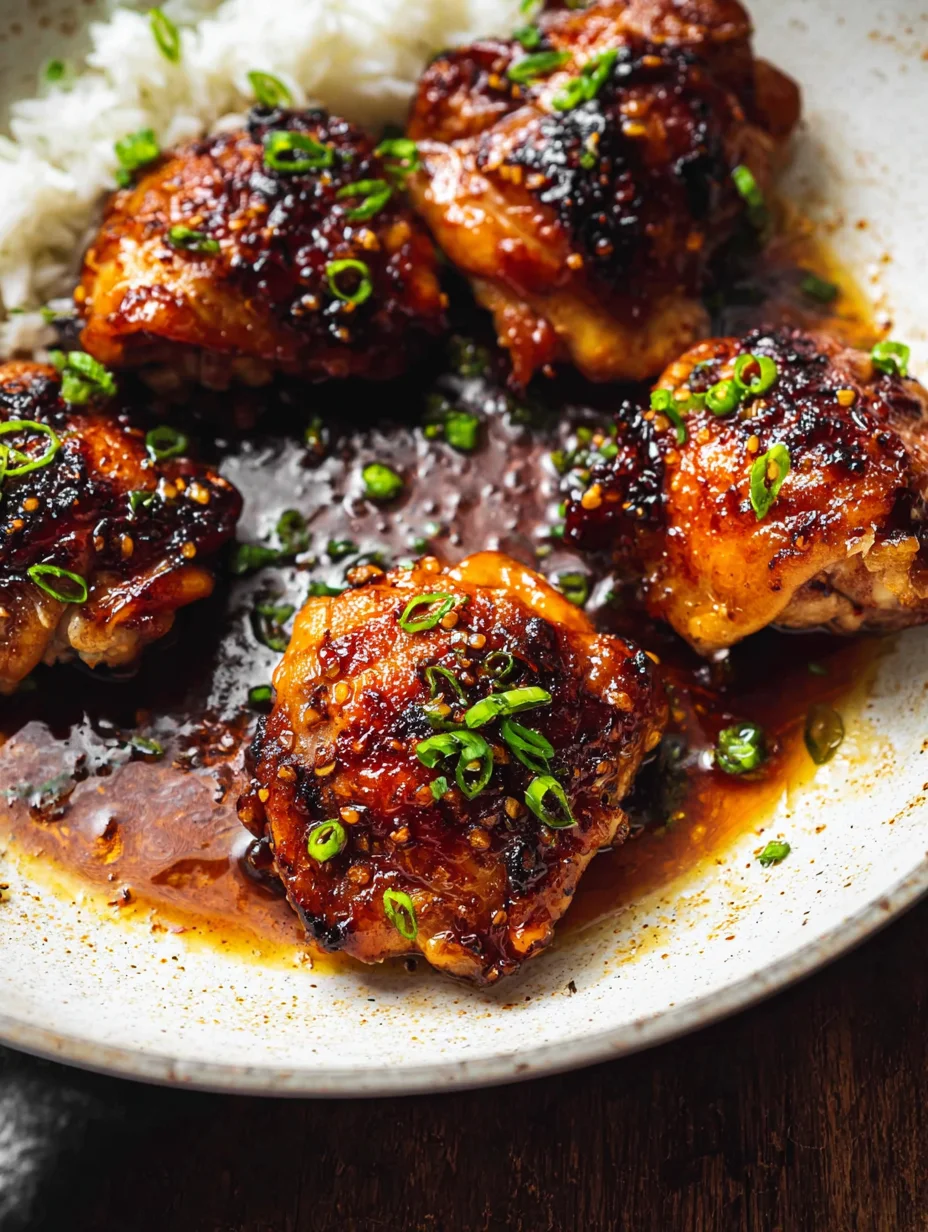
The sauce will bubble and foam initially – that’s normal. As it cooks, it’ll thicken and turn glossy. Baste those thighs with the sauce every few minutes. This is crucial for building up that sticky coating we’re after.
Step 3: The Oven Finish
Once the sauce has thickened nicely (about 5-6 minutes), transfer the whole skillet to a 400°F oven. This ensures the chicken cooks through evenly while the glaze continues to caramelize.
FYI, bone-in thighs need about 20-25 minutes in the oven to reach that safe internal temperature of 165°F. But here’s a pro tip – dark meat actually tastes better at 175°F, so don’t panic if you go a little over.
Common Mistakes That Ruin Everything
I’ve made every possible mistake with honey garlic chicken thighs, so you don’t have to. Learn from my kitchen disasters:
Mistake #1: Using boneless, skinless thighs Look, I get it – they seem convenient. But you’re missing out on all the flavor that bones and skin provide. The bones keep the meat moist during cooking, while the skin renders fat that adds richness to the glaze.
Mistake #2: Adding honey too early Honey burns faster than you think. Add it too early in the cooking process, and you’ll end up with a bitter, burned mess instead of a glossy glaze.
Mistake #3: Overcrowding the pan Cramming too many thighs into one pan creates steam instead of that beautiful sear we’re after. Work in batches if necessary – your patience will be rewarded.
Mistake #4: Not letting the sauce reduce properly A thin, watery glaze is nobody’s friend. Let that sauce bubble and reduce until it coats the back of a spoon. That’s when you know it’ll cling to the chicken properly.
Serving Suggestions That Actually Work
Honey garlic chicken thighs are incredibly versatile, but some pairings just work better than others. Here are my go-to combinations:
Rice and Grains
Steamed jasmine rice is the classic choice – it soaks up that extra glaze like a champ. But don’t sleep on coconut rice or quinoa pilaf. The nutty flavors complement the sweet-savory glaze beautifully.
Vegetables That Make Sense
Skip the boring steamed broccoli (unless that’s your thing – no judgment). Instead, try:
- Roasted Brussels sprouts with a touch of balsamic
- Stir-fried baby bok choy with garlic
- Honey-roasted carrots that echo the glaze flavors
The Asian Fusion Route
This is where honey garlic chicken thighs really shine. Serve over coconut rice with pickled cucumbers and a side of kimchi. The contrast between sweet, sour, and spicy creates this amazing flavor profile that’ll have you questioning why you ever ordered takeout.
Storage and Meal Prep Magic
Here’s something most people don’t realize – honey garlic chicken thighs actually taste better the next day. The flavors have time to meld and intensify, creating an even more delicious meal.
Store leftovers in the refrigerator for up to 4 days, or freeze for up to 3 months. When reheating, add a splash of water or chicken broth to the pan to help loosen the glaze. A quick stint under the broiler will restore that glossy finish.
For meal prep enthusiasts, these thighs are pure gold. Cook a big batch on Sunday, portion them out with rice and vegetables, and you’ve got lunches sorted for the week. Just remember to pack the sauce separately if you’re worried about soggy rice.
Taking It to the Next Level
Once you’ve mastered the basic honey garlic chicken thighs, it’s time to experiment. Here are some variations that’ll keep your taste buds guessing:
Korean-Inspired: Add gochujang to the glaze for heat and umami depth. Garnish with sesame seeds and sliced scallions.
Thai-Style: Substitute fish sauce for soy sauce and add lime juice and fresh chilies. Serve with jasmine rice and cucumber salad.
Mediterranean Twist: Use balsamic vinegar instead of rice vinegar, add fresh thyme, and serve with orzo and roasted vegetables.
The beauty of this dish lies in its adaptability. Once you understand the basic technique, you can riff on it endlessly.
The Bottom Line
Honey garlic chicken thighs aren’t just another weeknight dinner – they’re proof that simple ingredients, when treated with respect, can create something truly spectacular. The combination of crispy skin, juicy meat, and that glossy, finger-licking glaze hits every single flavor note you could want.
Sure, it takes a little patience to get the technique right, but isn’t that true of all the best things in life? Master this recipe, and you’ll have a go-to dish that impresses dinner guests and satisfies weeknight cravings with equal enthusiasm.
Next time you’re standing in the grocery store debating between breasts and thighs, do yourself a favor – grab the thighs, pick up some honey and garlic, and prepare to fall in love with what might just become your new signature dish. Your taste buds will thank you, and your wallet will too
Honey Garlic Chicken Thighs
Equipment
- cast iron skillet (oven-safe)
- Mixing bowl
- Tongs
- Meat thermometer
Ingredients
- 6 bone-in, skin-on chicken thighs
- 4-5 cloves garlic, minced
- 1/3 cup honey
- 1/4 cup soy sauce
- 2 tbsp rice vinegar
- 1 tbsp fresh ginger, grated
- 1/2 tsp red pepper flakes
- 1 tsp sesame oil
- to taste salt and black pepper
Instructions
- Preheat oven to 400°F (200°C). Pat chicken dry, season generously with salt and pepper, and let come to room temperature.
- Heat a cast-iron skillet over medium-high. Place thighs skin-side down and sear undisturbed for 6–8 minutes until skin is golden and fat is rendered.
- Flip chicken, reduce heat to medium. Add minced garlic and sauté 30 seconds until fragrant. Pour in honey, soy sauce, rice vinegar, ginger, red pepper flakes, and sesame oil.
- Let sauce bubble and reduce 5–6 minutes, basting chicken with glaze until glossy and thickened.
- Transfer skillet to oven and bake 20–25 minutes, until internal temp reaches 165°F (74°C). Dark meat is best at ~175°F.
- Let rest 5 minutes before serving. Spoon extra glaze over top and serve with rice, roasted vegetables, or Asian-inspired sides.


One Comment