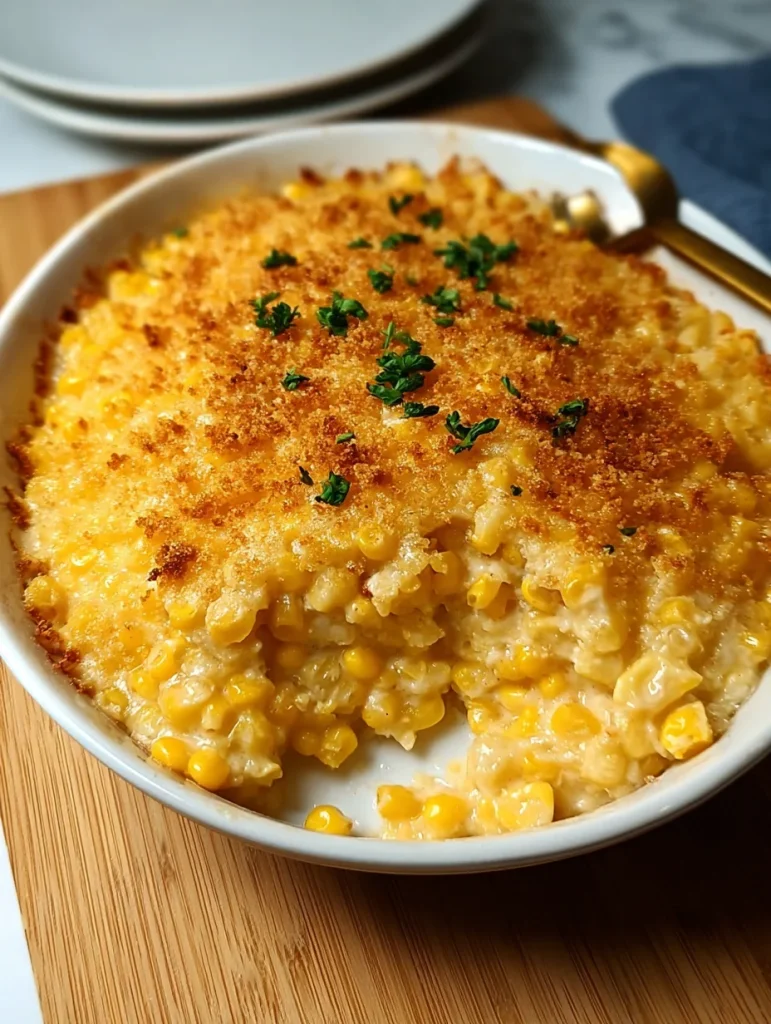
Let me tell you about the dish that saved my Thanksgiving reputation and turned me into the person everyone actually wants at their dinner table. Scalloped corn might sound like something your great-aunt made in 1987, but this creamy, golden masterpiece deserves a serious comeback.
I discovered this recipe during a particularly stressful holiday season when I needed a side dish that wouldn’t compete for oven space with the turkey but would still make people forget about the slightly dry stuffing. Turns out, scalloped corn checks every box: it’s make-ahead friendly, feeds a crowd, tastes like comfort food heaven, and somehow makes even corn-haters ask for seconds.

What Makes Scalloped Corn Different from Regular Corn
Scalloped corn isn’t just corn with some cream dumped on it (though honestly, that would probably taste decent too). It’s a carefully balanced casserole that transforms humble corn kernels into something that belongs on a fancy restaurant menu.
The magic happens when you combine corn with a rich, custard-like base made from eggs, cream, and butter, then bake it until the top turns golden and slightly crispy while the inside stays creamy and luxurious. Think of it as corn’s sophisticated older sibling who went to culinary school.
The Texture Game-Changer
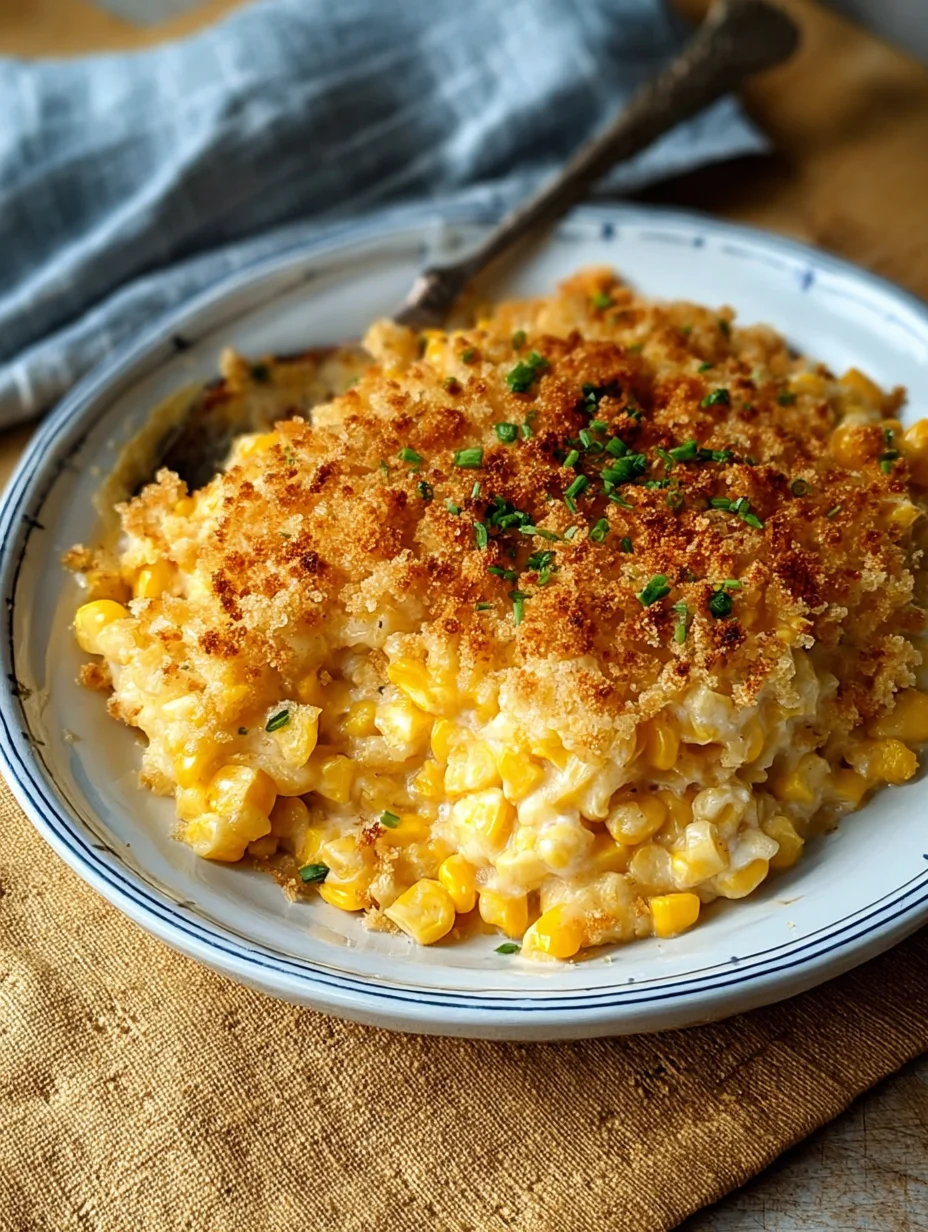
What sets scalloped corn apart from other corn dishes is that incredible contrast between the crispy top and the creamy interior. When you nail this dish, every spoonful gives you that satisfying crunch followed by smooth, almost pudding-like corn goodness.
The key lies in the custard base that holds everything together without making it soupy or dry. This isn’t corn swimming in liquid—it’s corn suspended in a perfectly set, savory custard that amplifies the natural sweetness of the corn.
Essential Ingredients for Success
Fresh corn makes the biggest difference, but let’s be realistic—sometimes frozen corn is what you’ve got, and that works perfectly fine. If you’re using fresh, cut it off the cob and scrape the cob with the back of your knife to get all that sweet corn milk. That’s liquid gold right there.
Eggs create the custard structure that holds everything together. I use whole eggs because the fat content matters for achieving that perfect creamy texture. Don’t even think about egg substitutes here—this is comfort food territory.
The Dairy Foundation
Heavy cream provides richness, but you can substitute half-and-half if you want to dial back the indulgence slightly. Milk works too, though you’ll lose some of that luxurious mouthfeel that makes people think you’re a better cook than you actually are.
Butter adds flavor and helps create that golden top. I use real butter because margarine tastes like disappointment mixed with chemicals, and life’s too short for fake butter in your scalloped corn.
Sharp cheddar cheese appears in some variations and adds a tangy depth that complements the sweet corn beautifully. Not every recipe includes cheese, but IMO it takes the dish from good to unforgettable.
Supporting Players That Matter
Sugar might seem weird in a savory dish, but a small amount enhances the corn’s natural sweetness without making it taste like dessert. Trust the process on this one.
Salt and pepper are obvious, but nutmeg is the secret weapon that most people skip. A tiny pinch adds warmth and complexity that makes people wonder what your secret ingredient is.
Flour or cornstarch helps thicken the custard base and prevents it from being too loose. Just a tablespoon or two makes all the difference between creamy success and soupy disaster.
My Proven Method for Perfect Scalloped Corn
Ready to become the scalloped corn champion of your social circle? Here’s the method I’ve refined through years of trial and error (mostly error, if we’re being honest).
Preparation Steps That Matter
Preheat your oven to 350°F and butter a 2-quart baking dish generously. Don’t skip the buttering step unless you enjoy scraping stuck corn off the bottom of your dish with a chisel.
If you’re using fresh corn, cut the kernels off the cob and scrape the cobs to extract the corn milk. This step adds natural thickening and intensifies the corn flavor significantly.
Creating the Custard Base
Beat your eggs in a large bowl until they’re well combined but not frothy. Gradually whisk in the cream, melted butter, and seasonings. This gradual process prevents the eggs from scrambling when they hit the warm butter.
Add your flour or cornstarch to the egg mixture and whisk until completely smooth. Any lumps here will show up as weird globs in your finished dish, so take your time with this step.
Assembly and Baking Strategy
Fold the corn kernels into the custard mixture gently but thoroughly. You want every kernel coated with the creamy base for even cooking and maximum flavor distribution.
Pour everything into your prepared baking dish and smooth the top with a spatula. Some recipes call for dots of additional butter on top, which creates those beautiful golden patches that make people think you’re a culinary genius.
Ever wonder why some scalloped corn turns out watery while others achieve that perfect custard consistency? It’s all about the egg-to-liquid ratio and proper baking temperature.
Timing and Temperature Secrets
Scalloped corn bakes for about 45-60 minutes, but the real indicator isn’t time—it’s appearance and texture. You want the top golden brown and the center just barely set when you gently shake the dish.
Testing for Doneness
Insert a knife into the center of the casserole. It should come out mostly clean with just a few moist crumbs clinging to it. If it comes out wet or liquid runs into the hole, give it another 10-15 minutes.
The surface should be golden brown and slightly puffed. If it’s browning too quickly, tent it with foil and continue baking. If it’s not browning at all, bump the temperature up to 375°F for the last 10 minutes.
Make-Ahead Magic
This is where scalloped corn really shines for entertaining. You can assemble the entire dish the day before, cover it tightly, and refrigerate overnight. Just add an extra 15-20 minutes to the baking time since you’re starting from cold.
The flavors actually improve overnight as everything melds together, which means less stress on party day and better results overall. Win-win situation right there :/
Creative Variations That Actually Work
Scalloped corn serves as an excellent base for customization, and I’ve experimented with probably a dozen different variations over the years. Here are the ones that actually enhanced the original rather than ruining it:
Cheese-Lovers Version
Add sharp cheddar and a touch of Parmesan to the custard base. The cheddar provides tang while the Parmesan adds nuttiness and helps create a more golden top. Use about 1 cup total cheese for a standard recipe.
Bacon-Enhanced Option
Crispy bacon crumbles mixed into the corn before baking create smoky pockets of flavor throughout. Cook the bacon until crispy, crumble it, and fold it in during assembly. Save a few pieces to sprinkle on top for visual appeal.
Mexican-Inspired Twist
Add diced jalapeños, a touch of cumin, and swap some of the cheddar for pepper jack cheese. This creates a southwestern version that pairs beautifully with grilled meats and adds a gentle heat that doesn’t overpower the corn.
Holiday Herb Version
Fresh thyme, sage, or chives mixed into the custard base create a more sophisticated flavor profile perfect for special occasions. Use herbs sparingly—you want them to enhance, not dominate.
Troubleshooting Common Problems
I’ve seen people mess up scalloped corn in predictable ways, and most of these issues come down to technique rather than ingredients. Here’s how to avoid the most common disasters:
Preventing Watery Results
Excess moisture in frozen corn causes watery scalloped corn. Thaw frozen corn completely and drain it thoroughly before using. Fresh corn rarely causes this problem unless you’re heavy-handed with the liquid.
Underbaking leaves you with loose, custard-like texture instead of properly set results. Trust your visual cues more than the timer, and don’t be afraid to bake longer if needed.
Avoiding Curdled Texture
Temperature shock causes eggs to scramble and creates a grainy, curdled texture. Always temper your eggs by adding warm ingredients gradually while whisking constantly.
Overbaking at too high a temperature causes similar problems. Keep your oven at 350°F and resist the urge to crank it up for faster results.
Fixing Bland Results
Underseasoning creates boring scalloped corn that tastes like missed opportunities. Corn is naturally sweet, so it needs adequate salt to balance those flavors and make everything pop.
Don’t forget that pinch of nutmeg and consider adding a touch of sugar to enhance the natural corn sweetness.
Serving and Pairing Suggestions
Scalloped corn works beautifully as a side dish for almost any protein, but it particularly shines alongside roasted meats and grilled foods. The creamy richness balances smoky, savory flavors perfectly.
Holiday Menu Integration
This dish fits seamlessly into traditional holiday spreads. It complements turkey, ham, and prime rib without competing for attention. Plus, it can go in the oven while your main dish rests, making timing much easier.
For potluck situations, scalloped corn travels well and stays warm longer than most vegetable sides. It’s also vegetarian-friendly (assuming you skip the bacon variation), which makes it accessible to more guests.
Leftover Transformation
FYI, leftover scalloped corn reheats beautifully and actually makes an excellent breakfast side with eggs and bacon. The slightly firmer texture after refrigeration works perfectly for morning meals.
You can also use leftovers as a base for corn chowder by thinning it with broth and adding diced potatoes. Waste not, want not, right?
Storage and Make-Ahead Strategies
Scalloped corn keeps well in the refrigerator for up to four days and freezes reasonably well for up to three months. The texture changes slightly after freezing, but it’s still perfectly edible and tasty.
Reheating Best Practices
Oven reheating preserves the texture better than microwaving. Cover with foil and warm at 325°F until heated through, then uncover for the last few minutes to re-crisp the top.
Individual portions work well in the microwave, though you’ll lose some of the textural contrast between the crispy top and creamy interior.
Why Scalloped Corn Deserves More Recognition
Here’s the thing about scalloped corn—it’s one of those dishes that people forget exists until someone serves it, and then everyone remembers why they loved it. It’s like comfort food amnesia or something.
Unlike trendy side dishes that require seventeen exotic ingredients and three different cooking techniques, scalloped corn delivers maximum impact with minimal fuss. You can make it with pantry staples and frozen corn, yet it tastes like you spent hours crafting something special.
The best part? It makes corn exciting, which honestly feels like a minor miracle. We’re talking about taking one of the most basic vegetables and turning it into something people actually crave and request at future gatherings.
Whether you’re looking to upgrade your holiday menu or just want a side dish that makes weeknight dinners feel more special, scalloped corn delivers the goods without the drama. And in a world where good comfort food feels increasingly rare, that’s worth celebrating.
Scalloped Corn
Equipment
- 2-quart baking dish
- Large mixing bowl
- Whisk
- Spatula
- Oven
Ingredients
- 4 cups corn kernels (fresh or thawed frozen, drained well)
- 3 large eggs
- 1 cup heavy cream (or half-and-half)
- 0.25 cup unsalted butter, melted
- 2 tbsp all-purpose flour (or cornstarch)
- 1 tbsp sugar
- 1 tsp salt
- 0.5 tsp black pepper
- 0.25 tsp ground nutmeg (optional)
- 1 cup shredded sharp cheddar cheese (optional, for variation)
Instructions
- Preheat oven to 350°F (175°C). Grease a 2-quart baking dish generously with butter.
- In a large bowl, whisk eggs until smooth. Gradually whisk in cream, melted butter, sugar, salt, pepper, and nutmeg until fully combined.
- Whisk in flour until smooth and no lumps remain. This will help thicken the custard base.
- Fold in the corn kernels until evenly coated. If using cheese, fold it in at this stage as well.
- Pour mixture into prepared baking dish. Smooth the top with a spatula. Optionally dot with extra butter on top.
- Bake uncovered for 45–60 minutes until the top is golden and the center is just set. A knife inserted should come out mostly clean with a few moist crumbs.
- Let cool for 5–10 minutes before serving. Serve warm as a side dish.